Want to make an LED glow bright or dim just by turning a knob?
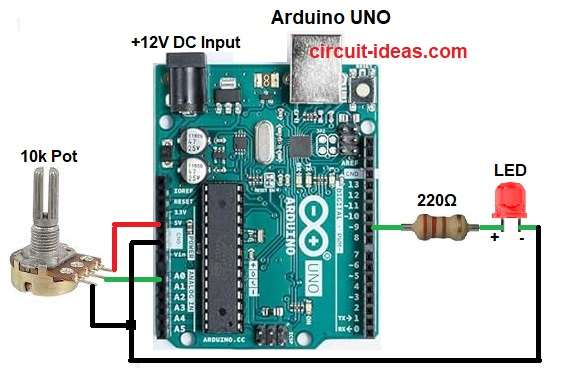
This simple Arduino Based Control LED Light Circuit with Potentiometer does that same thing.
Turn the knob to adjust the LED light from soft to full brightness.
It is a fun and easy way to learn how Arduino reads analog signals.
It also shows how PWM controls the LED light intensity.
Arduino Coding:
int potPin = A0;
int ledPin = 9;
int potValue = 0;
int ledValue = 0;

void setup() {
pinMode(ledPin, OUTPUT);
}

void loop() {
potValue = analogRead(potPin);
ledValue = map(potValue, 0, 1023, 0, 255);
analogWrite(ledPin, ledValue);
delay(10);
}
Coding Explanation:
- PotPin read analog value from potentiometer between 0 and 1023.
- Map function change this value to range 0 to 255.
- AnalogWrite send PWM signal to LED pin 9.
- When we turn potentiometer, voltage also change.
- This change make LED bright or dim.
Circuit Working:

Parts List:
| Component Name | Specification | Quantity |
|---|---|---|
| Resistors | 220Ω 1/4 watt | 1 |
| Potentiometer 10k | 1 | |
| Semiconductors | Arduino UNO Board | 1 |
| LED any color | 1 |
When the potentiometer is rotated, its resistance changes.
This changes the voltage on analog pin A0.
Arduino reads this voltage and creates a PWM output.
PWM controls the average current through the LED.
So the LED becomes dim or bright.
How to Build:
To build a Arduino Based Control LED Light Circuit with Potentiometer follow the below collection steps:
- Take all the parts as shown in circuit diagram above.
- Connect the potentiometer middle pin to analog pin A0 of Arduino.
- Connect the left pin of the potentiometer to 5V.
- Connect the right pin of the potentiometer to GND.
- Connect the LED positive leg (anode) to digital pin 9 through a 220 ohm resistor.
- Connect the LED negative leg (cathode) to GND of Arduino.
Conclusion:
This Arduino Based Control LED Light Circuit with Potentiometer is a simple way to control LED brightness.
It helps to learn about analog input and PWM output in Arduino.
We can use this in small light dimmer projects or sensor control projects.