
Want to control appliances by touch? then this circuit makes it possible, as this Arduino Touch Sensor Relay Circuit uses Arduino and touch sensor.
The Arduino reads the touch signal and uses the relay as a toggle switch.
When we touch the sensor once, the relay turns ON and when we touch the sensor again, the relay turns OFF; also each touch changes the relays state.
ON becomes OFF and OFF becomes ON.
Furthermore, this project is useful for home automation where we can control light, fan or other load devices.
Arduino Code:
int touchPin = 2;
int relayPin = 8;

int lastTouchState = LOW;
int relayState = LOW;

void setup()
{
pinMode(touchPin, INPUT);
pinMode(relayPin, OUTPUT);
digitalWrite(relayPin, relayState);
}

void loop()
{
int touchState = digitalRead(touchPin);

if (touchState == HIGH && lastTouchState == LOW)
{
relayState = !relayState;
digitalWrite(relayPin, relayState);
delay(300);
}

lastTouchState = touchState;
}
Circuit Working:
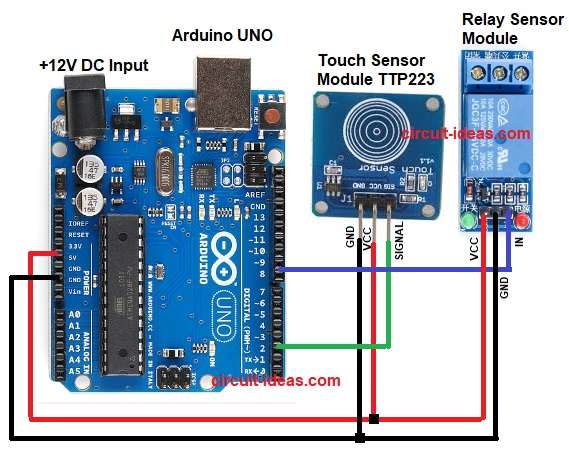
Parts List:
| Components | Quantity |
|---|---|
| Arduino UNO | 1 |
| Touch Sensor Module TTP223 | 1 |
| Relay Sensor Module | 1 |
The TTP223 touch sensor works like a switch, it detects finger touch and it gives digital output when output is HIGH or LOW.
Then Arduino reads this signal and it toggles the relay output and relay changes contact position and connected load turns ON or OFF; further, each touch changes the state.
How to Build:
To build a Arduino Touch Sensor Relay Circuit follow below steps for connections:
- First, take all the parts as shown in circuit diagram.
- Next, touch sensor VCC pin goes to Arduino 5V, touch sensor GND pin connects to Arduino GND and touch sensor SIGNAL pin goes to Arduino Digital Pin 2
- Then relay VCC pin connects to Arduino 5V, relay GND pin connects to Arduino GND and relay IN pin goes to Arduino Digital Pin 8
- After that, connect the relay COM and NO terminal pins to the required load and use the NC terminal if you need the load to remain normally ON.
Conclusion:
To conclude, this is a simple Arduino Touch Sensor Relay Circuit which uses few components, easily available in market.
Arduino coding is easy and relay works as toggle switch and also this project is good for beginners and it is useful in real life automation.