This Smart Table to Kitchen Order Circuit with Arduino brings smart techniques to restaurants.
It creates a wireless food order system using Arduino.
Just press a button and our order reaches the kitchen instantly.
No waiting, no confusion and just smart service.
Transmitter Arduino Coding:
Arduino Code (Transmitter)

#include <VirtualWire.h>

void setup() {
vw_set_tx_pin(13);
vw_setup(2000);
}

void loop() {
const char *msg = "ORDER1";
vw_send((uint8_t *)msg, strlen(msg));
vw_wait_tx();
delay(5000);
}
Receiver Arduino Coding:
#include <Wire.h>
#include <LiquidCrystal_I2C.h>
#include <VirtualWire.h>

LiquidCrystal_I2C lcd(0x27,16,2);

void setup() {
lcd.init();
lcd.backlight();
vw_set_rx_pin(11);
vw_setup(2000);
vw_rx_start();
pinMode(8, OUTPUT);
}

void loop() {
uint8_t buf[VW_MAX_MESSAGE_LEN];
uint8_t buflen = VW_MAX_MESSAGE_LEN;
if (vw_get_message(buf, &buflen)) {
digitalWrite(8, HIGH);
lcd.clear();
lcd.setCursor(0,0);
lcd.print("Order Received");
delay(3000);
digitalWrite(8, LOW);
}
}
Code Explanation:
- Transmitter sends message through RF module using VirtualWire library.
- It sends every 5 seconds.
- Receiver listens on RF pin.
- When message comes, buzzer rings and LCD shows “Order Received”.
- After few seconds buzzer turns OFF.
Circuit Working:
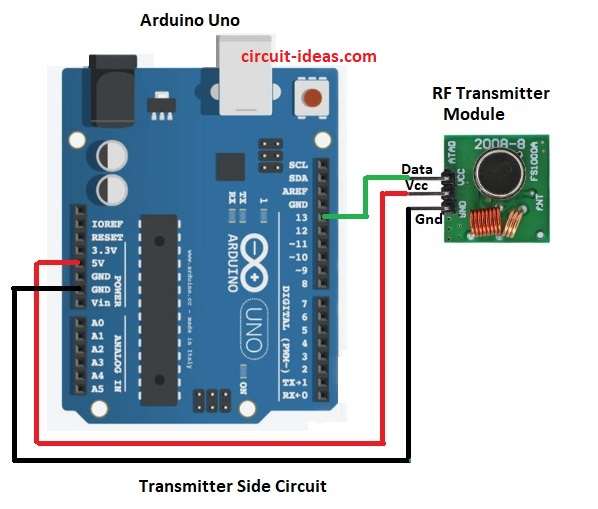
Transmitter Side Circuit:
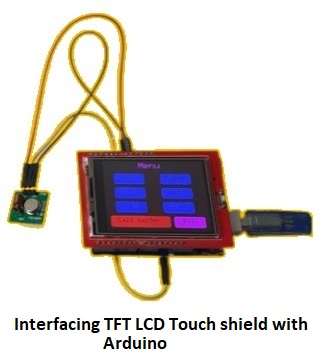
Interfacing TFT LCD with Arduino is easy.
Just fix TFT display on top of Arduino Uno board like shown in image below.
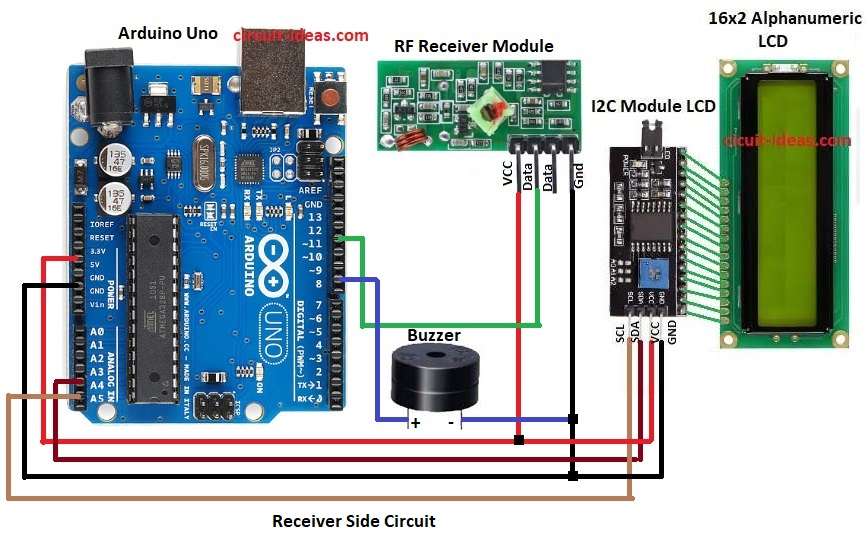
Receiver Side Circuit:
Parts List:
| Part Name | Quantity |
|---|---|
| Arduino Uno | 2 |
| 433MHz RF Transmitter Module | 1 |
| 433MHz RF Receiver Module | 1 |
| 2.4″ TFT LCD Touch Shield | 1 |
| 16×2 LCD Module | 1 |
| I2C Module for LCD | 1 |
| Buzzer | 1 |
There are two parts in the circuit transmitter side and receiver side.
When customer presses button, Arduino sends data wirelessly through RF transmitter.
RF receiver gets the data and Arduino at receiver side detects it.
It alerts kitchen using buzzer and shows message on LCD screen.
This makes ordering fast without waiter.
Formula with Calculations:
RF module works at 315/433 MHz frequency.
Data rate set in code is 2000 bps.
Range = (Transmitter Power × Antenna gain) / Path loss.
Typical range indoor = 10 to 20 meters.
Power used = 5V × 20mA = 0.1W approx for RF module.
How to Build:
To build a Smart Table to Kitchen Order Circuit with Arduino follow the below steps for connections:
- Collect all parts shown in circuit diagram
- Connect RF Transmitter VCC to Arduino 5V.
- Connect RF Transmitter GND to Arduino GND.
- Connect RF Transmitter DATA to Arduino pin 13.
- Connect RF Receiver DATA to Arduino pin 11.
- Connect RF Receiver VCC to 5V
- And GND pin to Arduino GND.
- Connect LCD SDA to A4.
- Connect LCD SCL to A5.
- Connect LCD VCC to 5V.
- Connect LCD GND to Arduino GND.
- Connect buzzer positive to Arduino pin 8.
- Connect buzzer negative to GND.
Leave a Reply