This simple circuit makes a normal buzzer produce a chirping or tweeting sound; it uses a 9 V battery, two push buttons, one capacitor, and a buzzer, also the circuit also does not need a microcontroller or IC.
Also, it works on charging and discharging of capacitor and this Chirping Sound Buzzer Circuit is good for beginners to learn.
Circuit Working:
Parts List:
| Components | Values | Quantity |
|---|---|---|
| Capacitor | Electrolytic 1000µF 25V | 1 |
| Semiconductors | Buzzer | 1 |
| Push Button Switch SPST | 2 | |
| Battery 9V DC | 1 |
When we press Push Button1, current go from 9V battery and charge the 1000µF capacitor, also capacitor keep some energy inside.
When we leave Button1 then capacitor still have charge and now when we press Push Button2, that stored energy go through buzzer.
Then buzzer make short sound when capacitor empties the charge and sound go slowly down like bird chirp; hence every time we press Button2 we will hear one chirp sound.
Formulas with Calculations:
Sound time depend on capacitor and buzzer resistance.
Formula: T = R × C
where,
- R is 100 ohm of buzzer
- C is 1000µF
T = 1000 × 10⁻⁶ F
T = 100 × 0.001 = 0.1 sec
So buzzer sound last about 0.1 second.
How to Build:
To build a Chirping Sound Buzzer Circuit follow the below steps for connection:
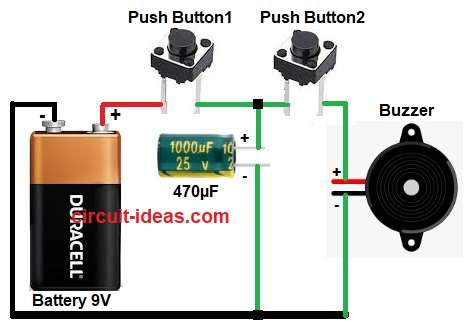
- First, take all the parts as shown in circuit diagram
- Next, connect 9V battery positive to Push Button1 and connect the other end of Button1 to positive lead of 1000µF capacitor.
- Then connect negative lead of capacitor to ground.
- After that, connect Push Button2 between capacitor positive and buzzer positive and then connect buzzer negative to ground.
- Finally, positive terminal of buzzer connect one end of Push Button2.
Conclusion:
To conclude, this small project for Chirping Sound Buzzer Circuit show how capacitor make buzzer sound like bird chirp; it is easy and fun for beginner people.
Also, we can use different capacitors to change the chirp time, and this circuit needs only simple parts and wire connections because it does not need any code.
Leave a Reply