This project shows how to Make Sound with Arduino using Buzzer Circuit; also buzzer makes sound when we send signal from Arduino pin.
Here, we can use it for alarms, alerts, or simple tones; moreover, we use two versions here: one with individual components and another with a buzzer module.
Arduino Code:
int buzzer = 8;
void setup() {
pinMode(buzzer, OUTPUT);
}
void loop() {
digitalWrite(buzzer, HIGH);
delay(1000);
digitalWrite(buzzer, LOW);
delay(1000);
}
Code Explanation:
- int buzzer 8 connect buzzer to pin 8.
- pinMode(buzzer, OUTPUT) make pin 8 output.
- digitalWrite(buzzer, HIGH) turn buzzer ON.
- delay(1000) wait for 1 second.
- digitalWrite(buzzer, LOW) turn buzzer OFF.
- delay(1000) wait for 1 second.
- Loop repeats to make buzzer beep continuously.
Parts List:
| Components | Quantity |
|---|---|
| Resistor 220Ω | 1 |
| Buzzer | 1 |
| Buzzer Module | 1 |
| Arduino UNO | 1 |
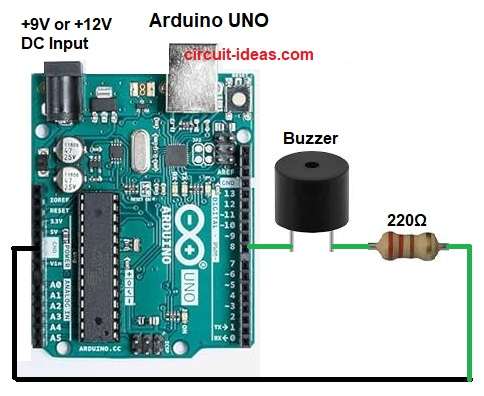
The above circuit diagram uses a normal buzzer with a 220 Ω resistor; the circuit connects the positive pin of the buzzer to Arduino pin 8 and connects the negative pin to GND through the 220Ω resistor.
Also, this resistor limits current to protect buzzer and Arduino pin.
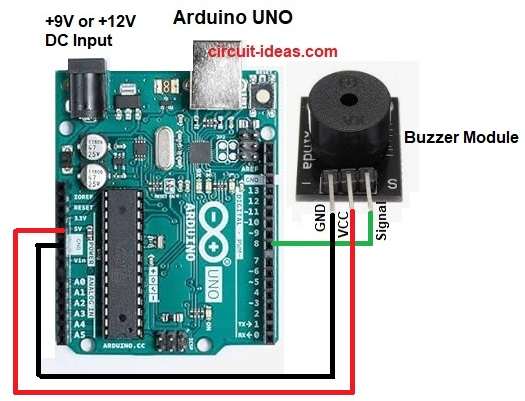
In the above circuit diagram, we use a ready-made buzzer module, the module also has three pins: Signal (S), VCC (+) and GND (−).
Signal pin connects to Arduino pin 8, VCC connects to 5V of Arduino and then GND connects to Arduino GND.
Circuit Working:
First, Arduino sends HIGH signal (5V) to buzzer pin; when signal is HIGH, buzzer turns ON and makes sound and when signal is LOW, buzzer turns OFF and becomes silent.
Therefore, this ON and OFF control and creates beep or tone sound.
Formulas:
Below is the formula for Sound with Arduino using Buzzer Circuit:
Ohm s Law: V = I × R
Arduino output voltage is 5V
If buzzer uses around 20mA current.
Then resistor = V / I = 5 / 0.02 = 250 ohm (approx)
So, we used 220 ohm resistor for extra protection and with slightly lower sound.
How to Build:
To Make Sound with Arduino using Buzzer Circuit follow the below steps for connection:
- First, assemble all the parts as shown in circuit diagram.
- Next, pin 8 connect to output signal to buzzer, GND pin connect to common ground and then 5V pin connect to power supply for buzzer module version
- Finally, resistor 220Ω connect between GND and buzzer in component version
Conclusion:
To include, this simple Make Sound with Arduino using Buzzer Circuit helps understand buzzer working with Arduino; also we can use it for alarms, countdowns or sound effects.
Additionally, it is one of the basic and fun Arduino beginner projects.

Leave a Reply