This project show how to Adjust LED Glow with Potentiometer Circuit, also we used diode, resistor, battery and potentiometer.
By turning potentiometer we can change voltage and LED brightness and its a very easy to make project and works with 9V battery.
Circuit Working:
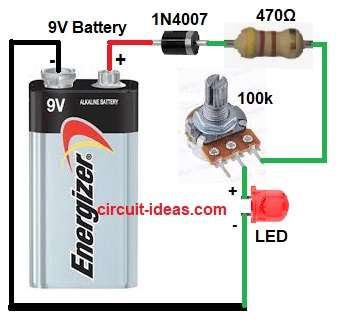
Parts List:
| Components | Values | Quantity |
|---|---|---|
| Resistors | 470Ω 1/4 watt | 1 |
| Potentiometer 100k | 1 | |
| Semiconductors | Diode 1N4007 | 1 |
| LED any color | 1 | |
| Battery 9V | 1 |
First, the diode let current flow in one direction only and it protect LED from reverse voltage and then 470 ohm resistor limit the current so LED does not burn.
After that, 100k potentiometer act like variable resistor and when we rotate potentiometer knob its resistance change; more resistance means less current and LED glow is dim and less resistance means more current and LED glow is bright.
Formula with Calculation:
Below is the Ohms law formula for Adjust LED Glow with Potentiometer Circuit:
Ohm law: V = I × R
LED forward voltage about 2V
Battery voltage = 9V
Voltage drop across resistor and potentiometer = 9 – 2 = 7V
If LED current = 10mA
Then total resistance needed = 7 / 0.01 = 700 ohm
So we have used 470 ohm fixed resistor and 100k potentiometer to adjust brightness smoothly.
How to Build:
To build a Adjust LED Glow with Potentiometer Circuit follow the below steps:
- First, gather all the components as per the circuit diagram.
- Next, connect diode anode to positive of 9V battery.
- After that, connect D1 diode cathode to one end of 470 ohm resistor and connect other end of resistor to one side of 100k potentiometer.
- Now connect potentiometer middle pin to positive pin of LED and connect LED negative pin to battery negative GND.
Conclusion:
To conclude, this simple Adjust LED Glow with Potentiometer Circuit help to change LED brightness; only few parts needed and is easy to build.
Also, its good for beginners for learning basic electronics and if required we can use any color LED and different resistor for testing.

Leave a Reply