Ultrasonic sensor use high sound wave to find distance, also it send sound and wait for echo to come back and then it measures time.
With Arduino help we can make system to know how far object is, as this project for Distance Measurement Circuit using Ultrasonic Sensor and Arduino shows basic of ultrasonic sensor, Arduino code and steps to make distance measuring system.
Arduino Code:
const int trigPin = 2;
const int echoPin = 3;

void setup() {
  pinMode(trigPin, OUTPUT);
  pinMode(echoPin, INPUT);
  Serial.begin(9600);
}

void loop() {
  // Trigger the sensor
  digitalWrite(trigPin, HIGH);
  delayMicroseconds(10);
  digitalWrite(trigPin, LOW);

  // Measure pulse duration
  long duration = pulseIn(echoPin, HIGH);

  // Calculate distance
  int distance = duration * 0.034 / 2;

  Serial.print("Distance: ");
  Serial.print(distance);
  Serial.println(" cm");
  delay(100);
}
Code explanation:
No need of extra libraries for this project.
Pick pins for sensor:
- Trigger pin goes to pin 9 and Echo pin goes to pin 10
Setup:
- Set trigger pin as output and set echo pin as input and then begin serial communication
Loop:
- Send short pulse from trigger pi and then measure how long echo pin stay high like pulse time
Use formula:
- distance = (duration * speed of sound) / 2
- Print distance on serial monitor
- Speed of sound is around 0.034 cm/microsecond.
Ultrasonic Sensor Circuit Working :
Parts List:
| Components | Quantity |
|---|---|
| Resistor | |
| Potentiometer 10k | 1 |
| Semiconductors | |
| Arduino UNO | 1 |
| LCD 16X2 Display | 1 |
| Ultrasonic Sensor Module | 1 |
| IC 7809 | 1 |
Ultrasonic sensor have two parts: transmitter and receiver.
Transmission: Transmitter send short burst of ultrasonic sound.
Wave travel: Sound wave move in air and hits the object.
Reflection: When wave hit object then it bounce back as echo.
Reception: Receiver catches the echo.
Distance calculation: Time between sends and receive tell how far the object is, more time means more distance.
How to Build:
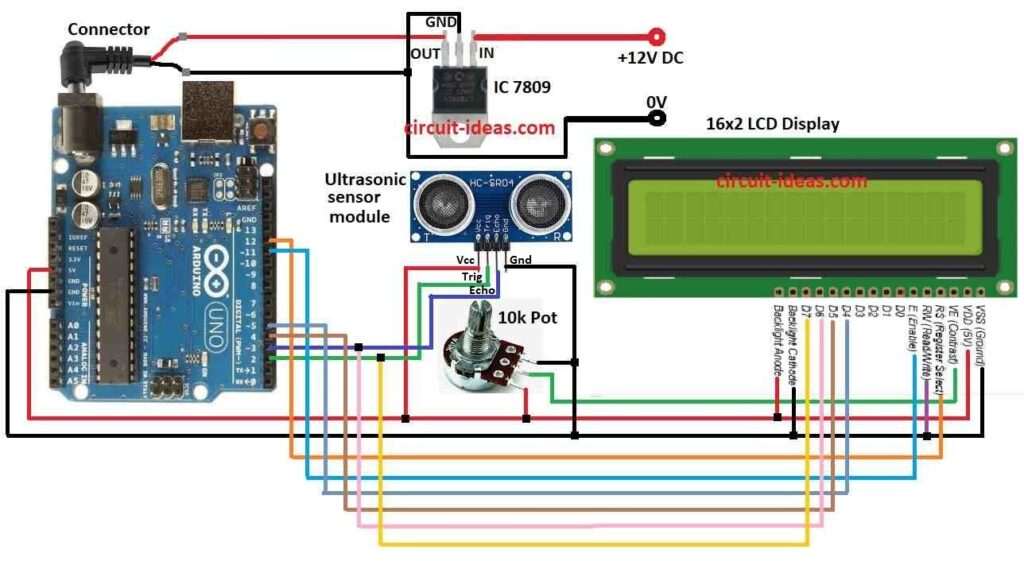
To build a Distance Measurement using Ultrasonic Sensor and Arduino follow the below mentioned steps for connections:
- First, collect all parts like in circuit diagram.
- Next, connect IC 7809 to give stable 9V DC power to Arduino.
- After that, connect 10k potentiometer to LCD 1st pin of pot goes to LCD VDD of 5V, 2nd pin of pot goes to LCD VE the contrast control and then 3rd pin of pot goes to LCD VSS the GND
Connections details of Arduino and LCD
LCD Connections:
- Now LCD VDD connects to Arduino 5V, LCD VSS (GND) connects to Arduino GND, LCD RS connects to Arduino pin 12, LCD E Enable pin connects to Arduino pin 11, LCD RW connects to Arduino GND, LCD D4 connects to Arduino pin 5, LCD D5 connects to Arduino pin 4, LCD D6 connects to Arduino pin 3, LCD D7 connects to Arduino pin 2, LCD backlight + (anode) connects to Arduino 5V, and then LCD backlight – (cathode) connects to Arduino GND
Ultrasonic Sensor Connections:
- Then trig pin goes Arduino pin 2 which is the output
- After that, the echo pin connects to Arduino pin 3, which acts as an input.
- Now Vcc connects to Arduino 5V
- Finally, GND to Arduino GND
Note:
Speed of sound is around 0.034 cm/µs but this can change with air temperature and humidity, hence, if we need more accurate result then we can adjust this value.
Conclusion:
To conclude, by using Arduino and ultrasonic sensor we can make system to measure distance.
Furthermore, this Distance Measurement Circuit using Ultrasonic Sensor and Arduino is useful for many things like object detection, obstacle avoid and proximity sense.
Finally, ew can make smarter system by adding more sensors, displays or other parts.
Leave a Reply