This project show How to Measure Humidity and Temperature using Arduino and DHT11
DHT11 give temperature in Celsius and humidity in percent.
Arduino read sensor and show on LCD.
This circuit is good for checking room, garden or weather.
It is also good for learning how sensor and Arduino work together.
Coding:
#include <DHT.h>
#include <LiquidCrystal.h>

// Define pins
#define DHTPIN 2 // Digital pin connected to the DHT sensor
#define DHTTYPE DHT11 // DHT 11

// Define LCD pins (adjust according to your connections)
LiquidCrystal lcd(12, 11, 5, 4, 3, 2);

// Create DHT instance
DHT dht(DHTPIN, DHTTYPE);

void setup() {
  // Initialize serial communication
  Serial.begin(9600);

  // Initialize LCD
  lcd.begin(16, 2); // Set number of columns and rows

  // Initialize DHT sensor
  dht.begin();
}

void loop() {
  // Read data from DHT sensor
  float h = dht.readHumidity();
  float t = dht.readTemperature();

  // Check if readings are valid
  if (isnan(h) || isnan(t)) {
    Serial.println("Failed to read from DHT sensor!");
    return;

  }

  // Display data on LCD
  lcd.setCursor(0, 0);
  lcd.print("Humidity: ");
  lcd.print(h);
  lcd.print("%");

  lcd.setCursor(0, 1);
  lcd.print("Temp: ");
  lcd.print(t);
  lcd.print("C");

  // Print data to serial monitor for debugging
  Serial.print("Humidity: ");
  Serial.print(h);
  Serial.print("%  ");
  Serial.print("Temperature: ");
  Serial.print(t);
  Serial.println("C ");

  delay(2000);
}
Code Explanation:
- Libraries for LCD and DHT added in code.
- Pins for DHT and LCD are set.
- In setup() DHT and LCD start working.
- In loop() Arduino read temperature and humidity from DHT.
- If reading is okay then it shows on serial monitor and LCD.
Circuit Working:
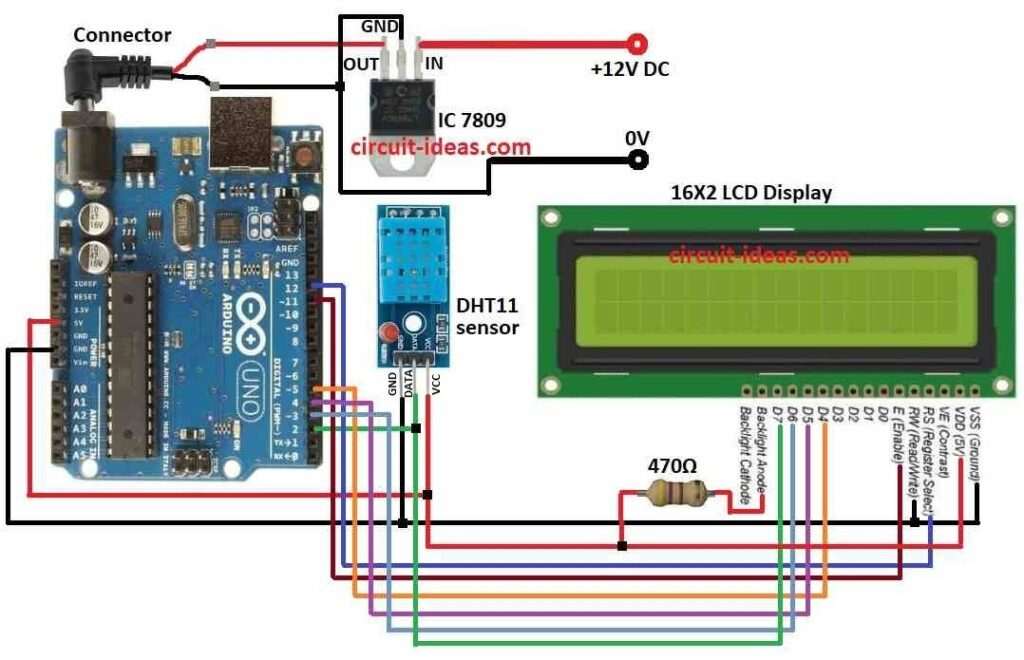
Parts List:
| Component | Quantity |
|---|---|
| Resistor | |
| 470Ω 1/4 watt | 1 |
| Semiconductors | |
| Arduino UNO | 1 |
| IC 7809 | 1 |
| DHT11 Sensor | 1 |
| LCD Display 16×2 | 1 |
We use DHT11 sensor as it give temperature and humidity.
It look like one sensor but does both the jobs.
Gives good data, work long time and is cheap and easy.
Inside it has small computer which uses special way to measure.
Send data to Arduino with small signal blinks.
Need command to start and take little time to finish.
Microcontroller read data and send to LCD.
LCD show temperature and humidity.
470Ω resistor control LCD backlight.
How to Build:
To Measure Humidity and Temperature using Arduino and DHT11 following are the steps to follow:
- First collect all parts in the circuit.
- Use IC 7809 to give stable 9V power to Arduino.
- Put 470Ω resistor from LCD backlight anode to Arduino 5V.
DHT11 sensor connection:
- Connect VCC to Arduino 5V
- Connect GND to Arduino GND
- Connect DATA to Arduino pin 2
LCD to Arduino connection:
- Connect VDD to Arduino 5V
- Connect VSS to Arduino GND
- Connect RS to Arduino pin 12
- Connect R/W to Arduino GND
- Connect E to Arduino pin 11
- Connect D4 to Arduino pin 5
- Connect D5 to Arduino pin 4
- Connect D6 to Arduino pin 3
- Connect D7 to Arduino pin 2
Conclusion:
This tutorial for How to Measure Humidity and Temperature show how to use Arduino, DHT11 and LCD to measure temperature and humidity.
Code is simple and good for starting.
We can add more things later if required.