
Simple Mains Powered LED Light Circuit runs on 230V AC mains; also it uses capacitor dropper to limit the current.
Moreover, LEDs in series-parallel are cheap and easy for mains lighting and they are with bright white light and no big transformer; furthermore, it is good for low power light needs.
Circuit Working:
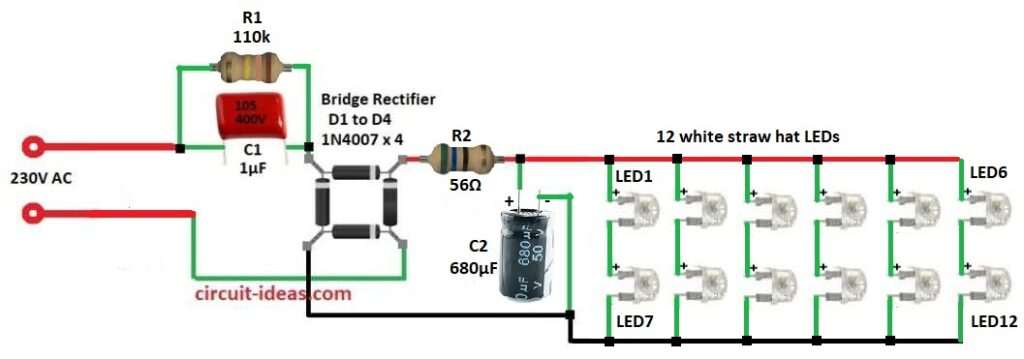
Parts List:
| Components | Values | Quantity |
|---|---|---|
| Resistors | 110k 1/4 watt | 1 |
| 56Ω 2W | 1 | |
| Capacitors | PPC 1µF 400V | 1 |
| Electrolytic 680µF 50V | 1 | |
| Semiconductors | Bridge Rectifier 1N4007 | 4 |
| LEDs white Straw Hat | 12 |
To begin with, circuit changes high AC to safe DC for LEDs and below are the circuit working for each circuit parts:
C1 Capacitor dropper: Limits current safely using reactance and not resistors and it stops overheating.
Resistor R1: Discharges C1 after unplugging and prevents shock.
D1 to D4 (Bridge rectifier): Turns AC into pulsating DC by using both halves of AC wave.
C2 (Smoothing capacitor): Smooths DC, reduces LED flicker and improves life.
Resistor R2: Limits surge current to LEDs and stops damage.
LED1 to LED12: Parallel groups share voltage and current evenly for bright light.
Formulas with Calculations:
Formulas and calcultions for mains LED light:
Capacitor Reactance C1:
Xc = 1 / (2πfC)
where,
- C = 1µF and f = 50Hz
Xc = 3185Ω
Circuit Current:
I = V / Xc
230V / 3185Ω = 0.0723A (72mA) which is enough for LEDs
Power in R2:
P = I² × R
(0.0723)² × 56Ω = 0.29W this is higher than 0.25W limit, so use 2W resistor
How to Build:
To build a Simple Mains Powered LED Light Circuit follow below steps for connection:
- First, gather all parts as per circuit diagram
- Next, connect AC input to 230V mains and then put C1 in series with live wire to drops voltage.
- Then put R1 parallel to C1 to discharge safety.
- After that, add D1 to D4 bridge rectifier from AC to DC.
- Further, put C2 across rectifier output which is the smooth voltage.
- Now add R2 in series with limit LED current and then finally, connect LED1 to LED12 in parallel groups.
Conclusion:
Overall, Simple Mains Powered LED Light Circuit is and easy to make project, as it is cheap, transformer free LED light using capacitor dropper.
Also, it is good for night lamps, emergency lights and indicators.