Accurate data logging is very important in electronics and data work.
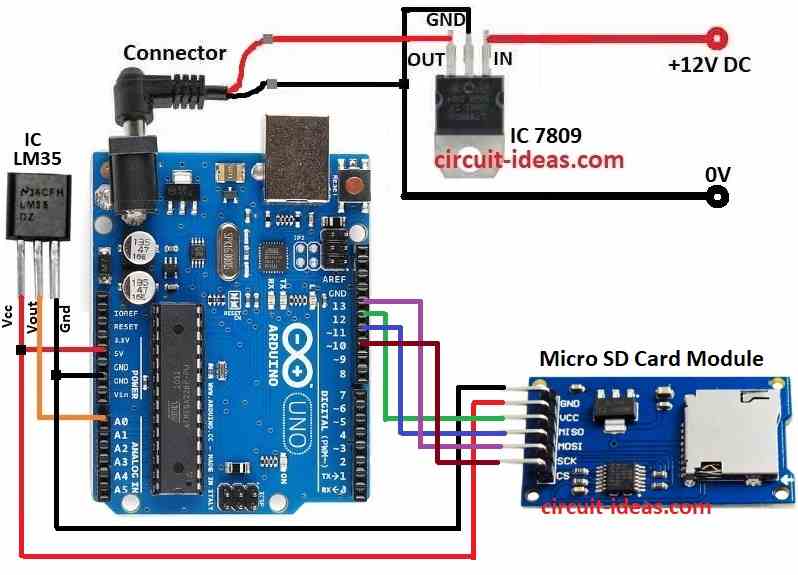
This project for Simple Micro SD Card Data Logging Circuit with Arduino UNO show how to use micro SD card, IC 7809 and LM35 sensor to make simple data logger.
It saves temperature data to SD card and later we can check data for things like environment check, experiments or for teaching.
Code:
#include <SPI.h>
#include <SD.h>

const int chipSelect = 10; // SD card select pin
const int tempPin = A0;

void setup() {
  Serial.begin(9600);
  Serial.println("Initializing SD card...");

  if (!SD.begin(chipSelect)) {
    Serial.println("Card failed, or not present");
    return;

  }
  Serial.println("Card initialized.");


  // Create a file on the SD card
  File dataFile;
  dataFile = SD.open("temperature.txt", FILE_WRITE);

  // Write a header to the file
  dataFile.println("Time, Temperature (Celsius)");
  dataFile.close();
}

void loop() {
  // Read the temperature from the LM35
  int sensorValue = analogRead(tempPin);
  float temperature = (sensorValue * 5.0) / 1023.0 * 100.0; // Adjust formula as needed

  // Get the current time
  DateTime now = DateTime.now();

  // Write the data to the file
  File dataFile;
  dataFile = SD.open("temperature.txt", FILE_WRITE);
  dataFile.print(now.hour());
  dataFile.print(":");
  dataFile.print(now.minute());
  dataFile.print(":");
  dataFile.print(now.second());
  dataFile.print(",");
  dataFile.println(temperature);

  dataFile.close();

  // Print the data to the serial monitor
  Serial.print("Temperature: ");
  Serial.print(temperature);
  Serial.println(" degrees Celsius");

  delay(1000); // Delay for 1 second
}
Code Explanation:
- Use SPI library to talk with SD card: #include .
- Use SD library for SD card work: #include .
- Set pin 10 for SD card chip select: const int chipSelect = 10;
- Set pin A0 for LM35 sensor: const int tempPin = A0;
- Start serial at 9600 for debug: Serial.begin(9600);
- Try start SD card: if (!SD.begin(chipSelect))
- If does not work then it will show error and If it works then will go on.
- Open file to write: dataFile = SD.open(“temperature.txt”, FILE_WRITE);
- Write header line: dataFile.println(“Time, Temperature (Celsius)”);
- Close file: dataFile.close();
- Read LM35 analog: int sensorValue = analogRead(tempPin);
- Convert to Celsius: float temperature = (sensorValue * 5.0) / 1023.0 * 100.0;
- If required change formula if sensor is different
- Get time: DateTime now = DateTime.now();
- Open file again: dataFile = SD.open(“temperature.txt”, FILE_WRITE);
- Write time:
- dataFile.print(now.hour());
- dataFile.print(“:”);
- dataFile.print(now.minute());
- dataFile.print(“:”);
- dataFile.print(now.second());
- Write comma: dataFile.print(“,”);
- Write temperature: dataFile.println(temperature);
- Close file: dataFile.close();
- Print temperature to serial:
- Serial.print(“Temperature: “);
- Serial.print(temperature);
- Serial.println(“degrees Celsius”);
- Wait 1 second: delay(1000);
Circuit Working:

Parts List:
| Component | Quantity |
|---|---|
| Arduino UNO | 1 |
| Micro SD Card Module | 1 |
| IC 7809 Voltage Regulator | 1 |
| IC LM35 Temperature Sensor | 1 |
Arduino UNO is popular and flexible board for many electronics projects.
It works like main brain which connects with other parts and collect and control data.
Micro SD card is used for saving data which is easy to use and can store more.
LM35 sensor gives temperature.
In this project it saves temperature to SD card.
Voltage regulator gives steady 9V power.
It is important to give right power to parts for good work.
LM35 is accurate sensor and gives analog output as temperature.
It reads outside temperature and send to Arduino.
How to Build:
To build a Simple Micro SD Card Data Logging Circuit with Arduino UNO following are the steps for connections:
- Collect all parts shown in circuit diagram.
- Use IC 7809 to give 9V steady power to Arduino.
- Connect LM35 with Vcc to Arduino 5V, GND to Arduino GND and Vout to A0 on Arduino
- Connect SD Card Module with GND to Arduino GND, Vcc to Arduino 5V, MISO to pin 12, MOSI to pin 11, SCK to pin 13 and CS to pin 10
Conclusion:
This Simple Micro SD Card Data Logging Circuit with Arduino UNO is basic design.
We can make it better by storing data for long time, adding more sensors and by connecting with other systems for display or analysis
If we understand this project we can build custom data loggers for many uses.
Leave a Reply