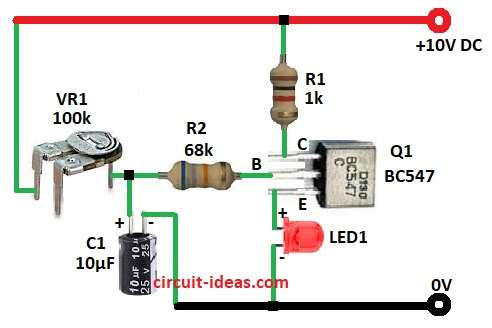
This article is about Simple Time Delay LED Circuit using Transistor where the LED lit after a short wait.
The circuit needs transistor, capacitor and few resistors for delay.
It is good for power light, warning light and timing project.
It work with 10V DC and fits many electronics.
Circuit Working:

Parts List:
| Component | Specification | Quantity |
|---|---|---|
| Resistors | 1k, 68k 1/4 watts | 1 each |
| Preset 100k | 1 | |
| Capacitor | Electrolytic 10µF 25V | 1 |
| Semiconductors | Transistor BC547 | 1 |
| LED 5mm 20mA | 1 |
Circuit is made up of parts like transistor Q1, capacitor C1, resistors R1, R2, and VR1 preset.
First the capacitor charge through VR1.
When charge is high enough then transistor Q1 is ON and LED1 lights.
Delay time = VR1 resistance × C1 capacitance (RC constant).
Formulas with Calculations:
Below are the formulas with calculations for Simple Time Delay LED Circuit using Transistor:
Delay time T = 0.693 × VR1 × C1
Example: 0.693 × 100kΩ × 10µF = 0.693 sec (693ms).
For more delay then use bigger preset VR1 or bigger C1 capacitor.
How to Build:
To build a Simple Time Delay LED Circuit using Transistor following steps are required for connections:
- Take all parts from circuit diagram.
- Connect base of Q1 to one end of R2 and other end of R2 goes to one end of VR1 and other end of VR1 go to +10V.
- Connect collector of Q1 to one end of R1 and other end of R1 go to +10V.
- Connect emitter of Q1 to anode of LED1 and cathode of LED1 go to GND.
- Connect positive of C1 to point between R2 and VR1.
Conclusion:
This circuit is Simple Time Delay LED Circuit using Transistor which is useful project.
Delay is changed by VR1 or C1.
It is easy to build and need only few parts and is good for fun and learning.