Sound Pressure Level Meter Circuit using IC CA3140 is device to check how loud sound is in one place, also it shows sound level with visuals.
Furthermore, the circuit is useful for audio testing, noise check and sound work and it shows simple way to make it using condenser mic, op-amp and FSD meter for correct sound measure.
Circuit Working:
Parts List:
| Components | Values | Quantity |
|---|---|---|
| Resistors | 10k, 100k, 100Ω 1/4 watts | 1 each |
| 22k 1/4 watt | 2 | |
| Capacitors | Electrolytic 1µF, 100µF, 220µF | 1 each |
| Semiconductors | IC CA3140 | 1 |
| Electret Mic | 1 | |
| ON/OFF Switch | 1 | |
| Bridge Rectifier 1N4007 Diodes | 4 | |
| Full Scale Deflection FSD Meter 100µA | 1 | |
| Battery 9V | 1 |
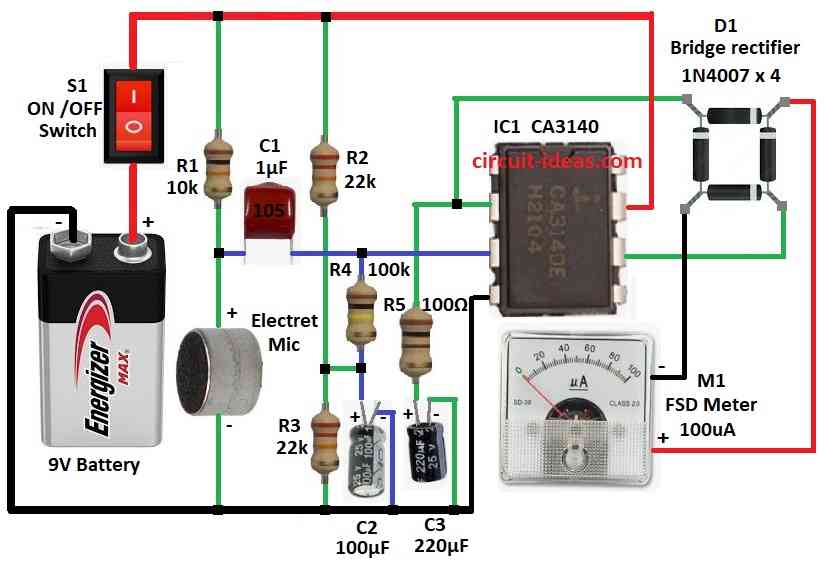
To begin with, the circuit operates on a 9V battery and an ON/OFF switch starts or stops it.
and capacitor C2 100µF control the amount of signal amplification.
Then electret mic hears sound and changes it to electric signal and then signal goes through capacitor C1 1µF to amplifier.
After that, IC1 CA3140 op-amp strengthens the weak signal, and resistors R1 10k, R2 22k and capacitor C2 100µF control the amount of signal amplification.
R4 100k keeps amplifier stable and balances input and output.
Now IC1 output goes to diode bridge D1 and changes AC to DC based on sound level and capacitor C3 220µF smooths DC signal.
Final DC goes to FSD meter M1 which shows sound pressure in microamperes (µA).
Formulas:
Amplifier Gain Formula:
Gain = R4 / (R2 + R3)
where,
- R4 is the feedback resistor
- R2 and R3 is the input resistors
This tells how much op-amp boosts signal.
Example:
R4 = 100k, R2 + R3 = 22k + 22k = 44k
Gain = 100k / 44k = 2.27
Signal from mic gets 2.27 times stronger.
τ = R × C
where,
- R is the resistance
- C is the capacitance
This tells how fast capacitor charges/discharges.
Example:
C3 = 220µF, R5 = 100Ω
τ = 100 × 220 × 10⁻⁶ = 0.022 sec
This helps smooth out the signal.
How to Build:
To build a Sound Pressure Level Meter Circuit using IC CA3140 following are the steps to follow for assembling.
- First, gather all parts shown in the circuit diagram.
- Next, connect pin 2 of IC1 CA3140 to one side of R5 and other side of R5 goes to positive of C3 and also negative of C3 goes to GND.
- Then connect pin 3 of IC1 to the joining point of C1 and R4 and other end of R4 goes to positive of C2 and also negative of C2 goes to GND.
- Join the middle point of R4 and C2 to the point between R2 and R3 and then top of R2 goes to positive supply and bottom of R3 goes to GND.
- Also, top of R1 goes to positive supply and bottom of R1 connects to C1 and positive of mic and negative of mic goes to GND.
- Then pin 6 of IC1 goes to one AC input of D1 bridge and other AC input of D1 goes to pin 2 of IC1.
- After that, positive output of D1 goes to positive of M1 meter and negative of D1 goes to negative of M1 meter.
- Now connect positive of 9V battery to positive supply rail using S1 switch and negative of battery goes to GND.
Conclusion:
Overall, this Sound Pressure Level Meter Circuit using IC CA3140 is easy and cheap and it uses mic and op-amp to measure the sound.
Also, the analog meter clearly shows the sound level, and this circuit works well for both school projects and real-life use because it uses common components.
Leave a Reply