
Traffic light is one of the best beginner Arduino projects, which shows how to control LEDs using Arduino; also this project works like a real traffic signal like red for stop, yellow for wait and green for go.
In addition, Arduino Based Smart Traffic Light Circuit for Beginners is easy to build and fun to learn.
Arduino Code:
int red = 8;
int yellow = 9;
int green = 10;

void setup() {
pinMode(red, OUTPUT);
pinMode(yellow, OUTPUT);
pinMode(green, OUTPUT);
}

void loop() {
digitalWrite(green, HIGH);
delay(5000);
digitalWrite(green, LOW);

digitalWrite(yellow, HIGH);
delay(2000);
digitalWrite(yellow, LOW);

digitalWrite(red, HIGH);
delay(5000);
digitalWrite(red, LOW);
}
Coding Explanation:
- Three LEDs connect to pins 8, 9 and 10.
- In setup part we set them as output.
- In loop part green LED is on for 5 seconds and then goes OFF.
- Yellow LED is ON for 2 seconds and then goes OFF.
- Red LED is ON for 5 seconds and then is OFF.
- The loop repeats again by making a traffic light sequence.
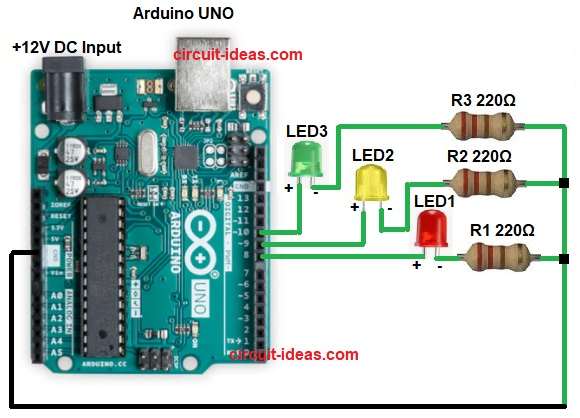
Circuit Working:
Parts List:
| Components | Quantity |
|---|---|
| Resistors | |
| 220Ω 1/4 watt | 3 |
| Semiconductors | |
| Arduino UNO | 1 |
| LEDs Red, Yellow and Green | 1 each |
When Arduino starts, green LED turns ON for few seconds, which means vehicles can go; after that yellow LED turns ON to show warning or wait and then red LED turns ON to stop vehicles.
Hence, the cycle repeats again and again and finally, the circuit uses 220 Ω resistors to protect the LEDs.
Formula with Calculations:
Below is the formula for Smart Traffic Light Circuit and to limit current for LEDs we have used resistor.
Formula: R = (Vsource – Vled) / Iled
Example: R = (5V – 2V) / 0.015A = 200 ohms (approx)
So we have used 220Ω resistor for safety.
How to Build:
To build a Arduino Based Smart Traffic Light Circuit for Beginners below is the connection steps for connection.
- First, collect all parts same as circuit diagram.
- Next, join red LED long leg to pin 8 of Arduino, join yellow LED long leg to pin 9 and then join green LED long leg to pin 10.
- Lastly, short leg of all LEDs go to GND of Arduino with 220Ω resistors.
Conclusion:
To conclude, this simple Arduino Based Smart Traffic Light Circuit for Beginners helps understand basic LED control and we can learn how to use digital pins, timing and loops.
Moreover, this project suits beginners and allows them to add sensors later for smart traffic systems.