This project is for Arduino Piano Music Keyboard with Memory Circuit.
Main parts are Arduino Uno, push buttons, buzzer, LCD and resistors.
When button is press then buzzer make piano sound.
LCD show note name on screen.
We can record notes and play again later.
It is small and fun project.
Good for learning Arduino, electronics and music.
Circuit Coding:
#include <LiquidCrystal.h>
#include <Tone.h>

LiquidCrystal lcd(12, 11, 5, 4, 3, 2);
int buzzer = 10;
int keys[8] = {A0, A1, A2, A3, A4, A5, 6, 7};
int notes[8] = {262, 294, 330, 349, 392, 440, 494, 523};
int recordData[100];
int recordTime[100];
int index = 0;
bool recording = false;
unsigned long lastTime;

void setup() {
lcd.begin(16,2);
lcd.print("Arduino Piano");
for(int i=0;i<8;i++){
pinMode(keys[i],INPUT);
}
pinMode(buzzer,OUTPUT);
delay(1000);
lcd.clear();
}

void loop() {
for(int i=0;i<8;i++){
if(digitalRead(keys[i])==HIGH){
tone(buzzer,notes[i],300);
lcd.setCursor(0,0);
lcd.print("Note: ");
lcd.print(notes[i]);
if(recording){
recordData[index] = notes[i];
recordTime[index] = millis()-lastTime;
lastTime = millis();
index++;
}
delay(300);
}
}
if(digitalRead(8)==HIGH){
recording = true;
index = 0;
lastTime = millis();
lcd.clear();
lcd.print("Recording...");
delay(500);
}
if(digitalRead(9)==HIGH){
lcd.clear();
lcd.print("Playing...");
for(int j=0;j<index;j++){
delay(recordTime[j]);
tone(buzzer,recordData[j],300);
}
recording = false;
delay(500);
}
}
Code Explanation:
- First LCD library is used for display.
- Buzzer pin is defined.
- Notes frequency array are used for 8 notes.
- Push buttons connected to analog and digital pins.
- In loop Arduino check button press.
- If pressed then it plays tone and display frequency on LCD.
- If recording true the note and time difference are saved in array.
- One button start recording and another button start replay.
- During replay, Arduino read notes and play them back with same delay.
Circuit Working:
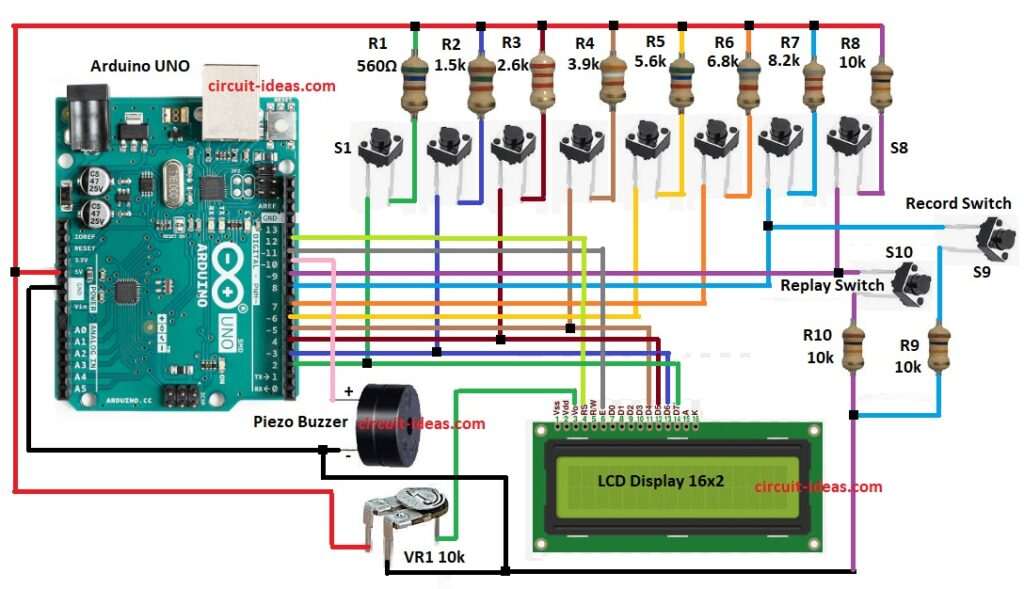
Parts List:
| Component | Value | Quantity |
|---|---|---|
| Resistors (All resistors are 1/4 watt unless specified) | 10k | 3 |
| 560Ω | 1 | |
| 1.5k | 1 | |
| 2.6k | 1 | |
| 3.9k | 1 | |
| 5.6k | 1 | |
| 6.8k | 1 | |
| 8.2k | 1 | |
| Preset 10k | 1 | |
| Semiconductors | Arduino UNO Board | 1 |
| LCD Display 16×2 | 1 | |
| Piezo Buzzer | 1 | |
| Tactile Switches S1 to S8 piano keys | 8 | |
| Record Tactile Switch | 1 | |
| Replay Tactile Switch | 1 |
Arduino Uno is brain of project.
Total 10 tactile switches are used.
8 buttons work as piano keys.
2 extra buttons are near buzzer and LCD.
One for Record and one for Replay.
When button is press then Arduino check which one.
Each button send signal to Arduino.
Arduino play tone on buzzer for that button.
LCD also show note name.
VR1 preset use for LCD contrast adjust.
Power come from Arduino 5V and GND to breadboard rails.
Resistors used as pull down for buttons.
If record mode is ON then Arduino save notes with time gap.
If replay button is pressed then Arduino read saved notes and play again with same timing.
Formulas:
Frequency of tone is given by formula:
f = 1/T
where,
- f is the frequency
- T is time period for (1/f)
Arduino tone function use square wave.
How to Build:
To build a Arduino Piano Music Keyboard with Memory Circuit follow the below steps for connections:
First collect all parts same like circuit diagram.
Push button connections:
- 8 tactile switches go to Arduino digital pins 2,3,4,5,6,7,8,9 through resistors.
- Record switch one side go to Arduino pin 8.
- Other side go to GND.
- Put 10k resistor pull-down between pin 8 and GND.
- Replay switch one side go to Arduino pin 9.
- Other side go to GND.
- Put 10k resistor pull-down between pin 9 and GND.
Buzzer connections:
- Buzzer positive leg (+) connect to Arduino pin 10.
- Buzzer negative leg (–) connect to GND.
LCD connections:
- 16×2 LCD connect in 4-bit mode: RS to pin 12, E to pin 11, D4 to pin 5, D5 to pin 4, D6 to pin 3, D7 to pin 2.
Preset connections:
- VR1 middle pin go to LCD pin V0 (pin 3).
- One side of VR1 go to +5V.
- Other side of VR1 go to GND.
Conclusion:
This Arduino Piano Music Keyboard with Memory Circuit is simple project.
It is small and fun to make.
Project show how to use buttons, buzzer, LCD and memory in Arduino.
We can add more notes in future.
We can use better buzzer or speaker.
Also can use SD card for saving songs.
It is a good project for learning embedded system.
This circuit is nice DIY music toy for beginners.
References:
Help Turn a toy Keyboard (piano) into a MIDI Device (Arduino uno)