This project uses electronic and integrated technology for energy saving, smart places and safety system.
Main idea is to sense human presence and movement.
We use mix of sensors and microcontroller to do this work.
In this tutorial for Human Presence and Motion Sensor Circuit using Arduino we have used STHS34PF80 sensor, IC 7809 and some other parts like resistors and capacitors to make simple working circuit.
Arduino work like brain of circuit and it read sensor data and give proper action.
STHS34PF80 is a capacitive proximity sensor.
It senses object or movement near by using change in capacitance.
This sensor is good for touchless sensing and it can feel human body and motion.
This circuit is very useful in many motion sensing jobs.
Code:
#include <Arduino.h>

const int sensorPin = A0;
const int threshold = 500; // Adjust threshold as needed

void setup() {
  Serial.begin(9600);
}

void loop() {
  int sensorValue = analogRead(sensorPin);

  if (sensorValue > threshold) {
    Serial.println("Human detected!");
  } else {
    Serial.println("No human detected");
  }

  delay(100); // Adjust delay as needed
}
Code Explanation:
- We used #include to add needed Arduino library and functions.
- Two constants: const int sensorPin = A0; sensor connect to analog pin A0 and const int threshold = 500; if value is more than 500 then human is there.
- Serial.begin(9600); start serial monitor for checking data.
- In loop: int sensorValue = analogRead(sensorPin); it read sensor data and if (sensorValue > threshold) it checks if value is more than threshold.
- If yes then print “Human detected!” on serial monitor.
- If no then print “No human detected”.
- delay(100); it waits for 100 milliseconds before next reading.
Circuit Working:
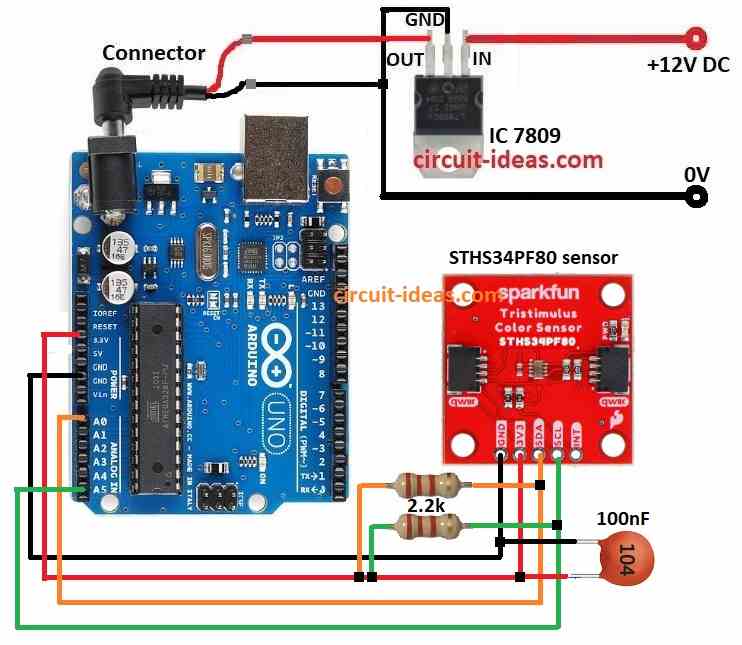
Parts List:
| Component | Quantity |
|---|---|
| Resistor | |
| 2.2k 1/4 watt | 2 |
| Capacitor | |
| Ceramic 100nF | 1 |
| Semiconductors | |
| Arduino Uno Board | 1 |
| IC 7809 | 1 |
| STHS34PF80 Human Sensor | 1 |
We have used IC 7809 to give steady 9V power to Arduino and STHS34PF80 sensor.
IC 7809 ensures power is stable so Arduino and sensor can work properly.
It also stop noise and voltage changes that can make sensor give wrong data.
IC 7809 protect circuit from too much voltage or current.
STHS34PF80 is a capacitive sensor.
It can measure temperature and humidity but here we used it to sense change in capacitance when human is near.
When human come close or move then capacitance around sensor changes.
Sensor gives raw analog signal.
Before Arduino reads it, signal need to adjust.
Resistors and capacitor in circuit make low-pass filter and this remove fast noise and clean the signal.
Arduino reads this filtered signal.
If signal is more than threshold and it means human is there or moving.
How to Build:
To build a Human Presence and Motion Sensor Circuit using Arduino follow the below mentioned steps for connections:
- Collect all parts as shown in circuit diagram.
- Use IC 7809 to give stable 9V DC to Arduino.
- Connect STHS34PF80 sensor GND to Arduino GND.
- Connect sensor 3.3V pin to Arduino 3.3V.
- Connect sensor SDA to Arduino A0.
- Connect sensor SCL to Arduino A5.
- Place 100nF capacitor between 3.3V and GND.
- Connect 2.2k resistor between SDA and 3.3V.
- Connect another 2.2k resistor between SCL and 3.3V.
Conclusion:
Arduino and STHS34PF80 sensor work together to detect human and motion.
We can change threshold and other settings for different uses.
This Human Presence and Motion Sensor Circuit using Arduino is useful for projects like smart home, safety system and interactive setup.
Leave a Reply