
This is a Simple 12V Battery Charger Circuit using TIP41 Transistor, as it uses one NPN power transistor TIP41 and one 13.8V Zener diode.
Furthermore, the circuit is cheap, easy and safe for charging 12V lead acid battery and works for small 7Ah to 20Ah batteries also, further, it is a good circuit for learning basic battery charging.
Circuit Working:
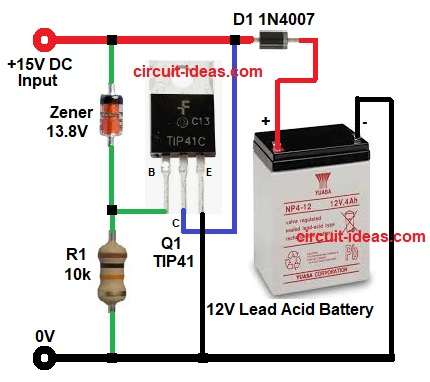
Parts List:
| Components | Values | Quantity |
|---|---|---|
| Resistor | 10k 1/4 watt | 1 |
| Semiconductors | Transistor TIP41 NPN | 1 |
| Zener Diode 13.8V | 1 | |
| Diode 1N4007 | 1 | |
| Battery 12V Lead Acid | 1 |
The input supply of this circuit is 15V DC and this voltage goes to the battery through D1 diode and Q1 TIP41 transistor; then the Zener diode keeps transistor base around 13.8V.
When battery voltage is low then the transistor gives more current and when battery voltage goes near 13.8V then the Zener stops base current.
Then transistor Q1 slowly reduces charging and so battery will not overcharge and finally, the 1N4007 diode stops battery from discharging back into the circuit.
How to Build:
To build a Simple 12V Battery Charger Circuit using TIP41 Transistor follow the below steps:
- First, collect all parts as shown in the circuit diagram above.
- Next, connect Q1 transistor collector pin to input positive line, connect emitter pin to battery positive line and then connect base pin through R110k resistor to ground.
- Also, connect Zener diode from base to input positive.
- Then connect D11N4007 diode between input positive and battery positive with right polarity and connect battery negative to circuit negative.
Conclusion:
Overall, this project is for Simple 12V Battery Charger Circuit using TIP41 Transistor, as it uses very few parts which are easily available in market.
Moreover, it protects battery from overcharging and is also good for beginners and small projects.