This project shows how to control LED with voice using Arduino.
We can use speech recognition module with Arduino Nano.
It takes voice command.
It turns LED ON or OFF based on command.
This Arduino with Speech Recognition Circuit is simple project for beginners.
Circuit Coding:
int led = D5;
char data;

void setup() {
  pinMode(led, OUTPUT);
  Serial.begin(9600);
}

void loop() {
  if (Serial.available()) {
    data = Serial.read();
    if (data == '1') {
      digitalWrite(led, HIGH);
    }
    if (data == '0') {
      digitalWrite(led, LOW);
    }
  }
}
Coding Explanation:
- We have set pin 5 as output.
- We have started serial at 9600 baud.
- We checked if data comes from speech module.
- If data is ‘1’ then LED turns ON.
- If data is ‘0’ then LED turns OFF.
Circuit Working:
Parts List:
| Component | Quantity |
|---|---|
| Resistor 220Ω 1/4 watt | 1 |
| Arduino Nano | 1 |
| Voice Recognition Module V3 | 1 |
| LED 5mm 20mA | 1 |
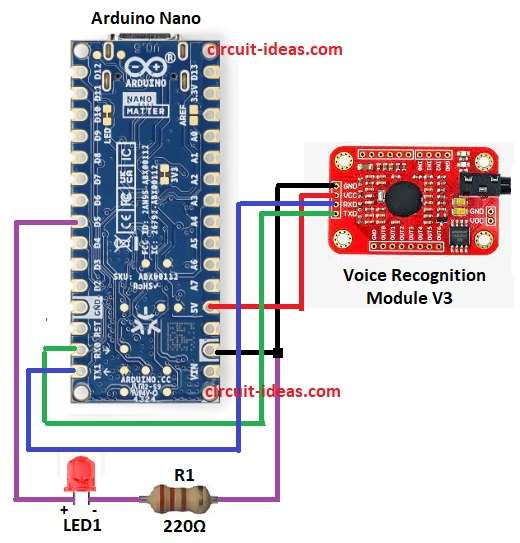
Power the circuit using Arduino Nano.
Connect LED long leg anode to Arduino D5.
Connect LED short leg to 220Ω resistor and other end of resistor to GND.
Speech module listens to voice.
It converts voice to digital data.
Arduino reads this data from RX pin.
Arduino compares data with saved command.
If command is “ON” then Arduino gives HIGH at D5.
And if command is “OFF” then Arduino gives LOW at D5.
This turns LED ON or OFF.
To stop, power OFF the circuit and first remove 5V then remove GND.
How to Build:
To build a Arduino with Speech Recognition Circuit follow the below mentioned steps:
- Collect all parts shown in circuit diagram.
- Connect LED long leg (anode) to Arduino D5 pin.
- Connect LED short leg (cathode) to one end of 220Ω resistor.
- Connect other end of 220Ω resistor to Arduino GND.
- Connect speech module VCC to Arduino 5V.
- Connect speech module GND to Arduino GND.
- Connect speech module TXD to Arduino RX.
- Connect speech module RXD to Arduino TX.
Conclusion:
This Arduino with Speech Recognition Circuit is easy for voice control system.
It shows how to use speech recognition with Arduino.
We can use this idea for many home automation projects.
Leave a Reply