
To begin with, this article is about Simple 3.6V High Power LED Torch Circuit, it uses a 3.6V battery and is easy to build and the circuit is very easy to understand.
The circuit uses only LEDs, one resistor, a switch and a battery; so beginners can also try this circuit and moreover, this circuit gives strong light, therefore, it is useful for emergency flashlight projects.
Circuit Working:
Parts List:
| Components | Values | Quantity |
|---|---|---|
| Resistor | 1Ω 1 watt | 1 |
| Semiconductors | White straw hat super bright LED 3.3V 20mA | 24 |
| ON OFF switch SPST toggle or slide switch | 1 | |
| 3.6V AA Ni-HM battery | 1 |
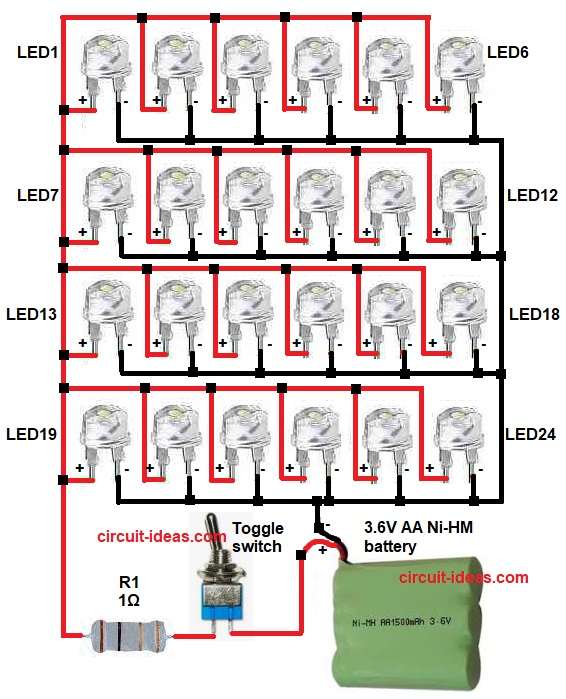
This circuit consists of multiple LEDs arranged and interconnected in a grid configuration.
They connected both in series and parallel, each LED needs about 3.3V and 20mA current, hence, this gives same and high brightness for all LEDs, but total current used is around 0.4A to 0.6A.
First, battery provides 3.6V DC voltage and then the current flows through the switch; after that the current passes through resistor R1 and the same resistor limits the current.
Next, current flows to LED network and all LEDs glow together and because of parallel paths the current divides equally and so brightness remains uniform.
Therefore, when switch turned OFF the circuit breaks and thus, the LEDs turn OFF immediately.
Formula with Calculation:
Battery voltage is 3.6V
Single LED forward voltage is 2.0V (approx)
LED current = 20mA (0.02A)
Lets say each LED string consumes 20mA.
If effective LED voltage drop is around 3.2V then remaining voltage across resistor is
3.6V – 3.2V = 0.4V
Resistor value = Voltage / Current
R = 0.4 / 0.4A (total current assumed)
R = 1 ohm
Power rating of resistor = I square x R
= 0.4 x 0.4 x 1
Power = 0.16 watt
So in this circuit 1 watt resistor, selected for safety.
How to Build:
To build a Simple 3.6V High Power LED Torch Circuit follow the below steps for connection:
- At first, start gathering all the circuit parts as shown in above diagram.
- Then battery positive pin connects to switch input and switch output connects to one end of resistor R1 and resistor other end connects to LED common line.
- After that, LED anodes connect as shown in rows and LED cathodes connect to ground line, also all LED grounds connect together.
- Now battery negative connects to LED ground and check polarity of every LED carefully, wrong polarity will stop glowing.
Conclusion:
To conclude, this Simple 3.6V High Power LED Torch Circuit is very useful project during emergency, as it works on only 3.6V battery and its design is easy and reliable.
Furthermore, even beginners can build it as it gives strong light output, so it is perfect for DIY flashlight projects and also, this circuit is efficient and practical.