Want to save energy bill?
Try this Simple PWM Solar Charge Controller Circuit and get power from sun.
It helps to charge battery from solar panel safely.
It also gives power to DC load like LED bulb or fan.
Just connect solar, battery and load and then controller will do all smart work.
This controller controls charging and stops overcharge.
Circuit Working:
Parts List:
| Component Name | Quantity |
|---|---|
| Solar Panel 18V 10 watt | 1 |
| Battery 12V | 1 |
| Solar PWM Charge Controller Module | 1 |
| DC Load 12V for LED Bulb or Fan | 1 |
Solar panel makes DC power when sunlight comes.
The power goes to charge controller.
Controller controls voltage and current before going to battery.
When battery is full the controller stops charging.
When sun is gone then battery gives power to DC load through same controller.
It keeps battery safe and last long life.
Formulas with Calculations:
Below is the formula for PWM Solar Charge Controller Circuit:
Power (P) = Voltage (V) × Current (I)
If solar panel is 18V 10W, then
Current = P/V = 10/18 = 0.55A
If battery is 12V then charge current = 0.55A
To fully charge 12V 2.5Ah battery:
Time = 2.5 / 0.55 = around 4.5 to 5 hours in full sun.
How to Build:
To build a Simple PWM Solar Charge Controller Circuit follow the below steps for connections:
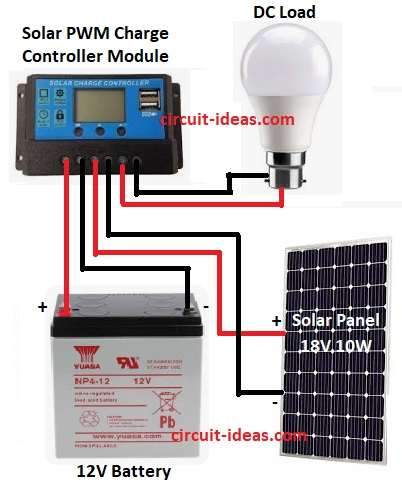
- Gather all the components as shown in circuit diagram.
- Battery Positive (+) connects to controller battery + terminal.
- Battery Negative (-) connects to controller battery – terminal.
- Solar Panel Positive (+) connects to controller solar + terminal.
- Solar Panel Negative (-) connects to controller solar – terminal.
- Load Positive (+) connects to controller load + terminal.
- Load Negative (-) connects to controller load – terminal.
Conclusion:
This Simple PWM Solar Charge Controller Circuit is safe for home solar setup.
It controls battery charge and power supply automatically.
Best for small solar light, fan or home DC system.
Leave a Reply