Hall sensor feel magnet near it and it make signal when magnet is close.
Signal can be digital or analog and here Arduino reads this signal.
We can see result on computer or LED.
It is use for motor, wheel speed or position check.
Circuit Coding:
int digitalPin = 2;
int analogPin = A0;
int digitalValue = 0;
int analogValue = 0;

void setup() {
  Serial.begin(9600);
  pinMode(digitalPin, INPUT);
}

void loop() {
  digitalValue = digitalRead(digitalPin);
  analogValue = analogRead(analogPin);

  Serial.print("Digital Value: ");
  Serial.println(digitalValue);

  Serial.print("Analog Value: ");
  Serial.println(analogValue);

  delay(500);
}
Coding Explanation:
- digitalPin is connected to DO of sensor.
- analogPin is connected to AO of sensor.
- In setup we start serial monitor and set in pin mode.
- In loop Arduino reads both the values.
- It prints digital and analog values.
- Delay is added for better reading.
Circuit Working:
Parts List:
| Component Name | Quantity |
|---|---|
| Arduino UNO | 1 |
| Hall Effect Sensor Module | 1 |
The Arduino code for the Hall sensor is simple and the circuit connections are easy.
The sensor detects a magnet nearby and its output changes when a magnetic field is present.
Digital output goes HIGH or LOW based on the magnets pole.
Analog output gives a voltage proportional to the magnetic field.
Arduino reads these values and displays the result.
Note: Go though the below link for Hall Effect Sensor Module Circuit:
Hall Effect Sensor Circuit with IC LM393
Formulas:
General formula for Hall Effect sensor is:
VH = (RH × I × B) / t
here,
- RH is the hall coefficient
- I is the current
- B is the magnetic field strength
- t is the sensor thickness
How to Build:
For Interfacing Hall Effect Magnetic Sensor Circuit with Arduino follow the below steps for connections:
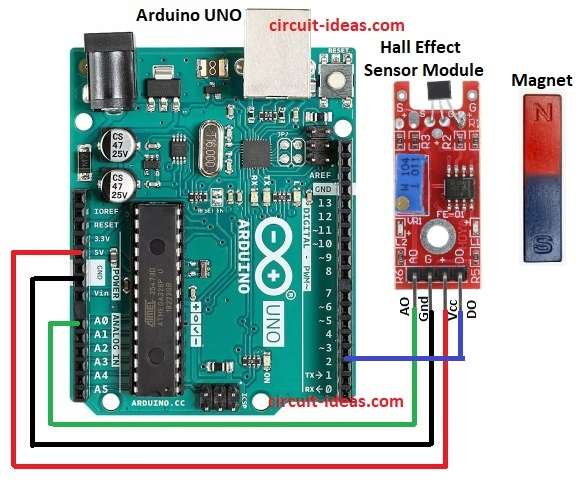
- Assemble parts as in circuit diagram.
- Connect Arduino 5V to sensor VCC.
- Connect Arduino GND to sensor GND.
- Connect Arduino A0 to sensor AO (analog out).
- Connect Arduino D2 to sensor DO (digital out).
Conclusion:
Interfacing Hall Effect Magnetic Sensor Circuit with Arduino is easy.
It can detect magnetic field quickly and sensor gives analog and digital output.
Project is useful in speed sensing and it is also used in position detection.
It works in security systems too.