
This 12V Mini Inverter Circuit using Transistor TIP41 is a simple micro inverter, which converts 12V DC battery power into AC power where the AC output is with low power.
Furthermore, it is useful for learning and for small experiments and it can light small AC load like night bulb; also this circuit uses two TIP41 transistors and it uses a center tap transformer.
Circuit Working:
Parts List:
| Components | Values | Quantity |
|---|---|---|
| Resistors | 1k 1/4 watt | 2 |
| 4.7k 1/4 watt | 1 | |
| Capacitor | Ceramic 0.01uF | 1 |
| Semiconductors | Transistor TIP41 | 2 |
| Battery 12V DC | 1 | |
| Transformer 12V-0V-12V Primary, 120V to 220V Secondary | 1 | |
| ON OFF Toggle Switch | 1 | |
| Fuse 0.5A to 1A | 1 | |
| Indicator LED any 5mm | 1 |
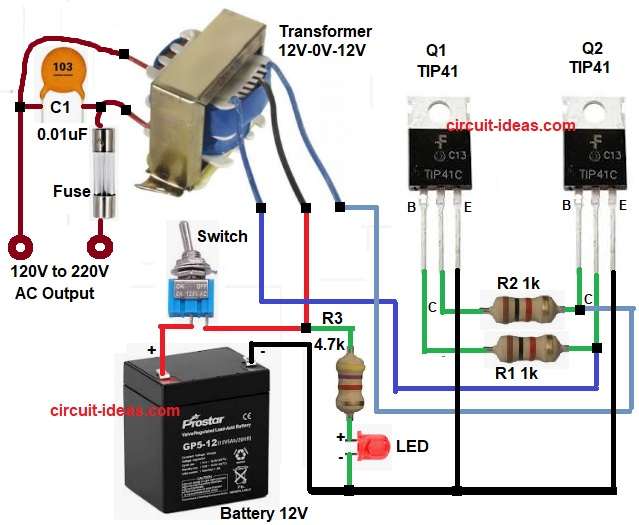
To begin with, the battery supplies 12V DC power, and switch S1 turns the circuit ON; furthermore, resistor R3 limits the current to the LED, and the LED indicates that the power is ON.
Then, connect the center tap of the transformer to the 12V supply.
After that, both TIP41 transistors work as switches and R1 and R2 resistors then control base current of transistors.
When transistor Q1 turns ON then current flows in one half of transformer and then Q1 turns OFF and Q2 turns ON.
Now current flows in other half of transformer and this ON and OFF action repeats fast and then transformer converts low voltage to high voltage.
Finally, the transformer secondary produces an AC voltage, and the circuit takes this AC output from the AC socket.
How to Build:
To build a 12V Mini Inverter Circuit using Transistor TIP41 follow the below connection steps:
- First, gather all the parts as shown in circuit diagram.
- Next, Q1 and Q2 transistors emitter pins connected to ground, collectors connected to transformer primary ends and base pins connected to R1 and R2 resistors.
- Then transformer center tap connected to 12V battery positive and transformer secondary connected to AC output socket.
- Also, LED anode connected to resistor R3 and LED cathode connected to ground.
- Now battery negative connected to common ground and then switch connected in series with battery positive.
Conclusion:
Overall, this 12V Mini Inverter Circuit using Transistor TIP41 is very simple and easy to make, as it is good for beginners and students.
Output power is low and its efficiency is also low as it is not suitable for heavy loads, so use heat sink on TIP41 transistors and always be careful with AC output voltage.