
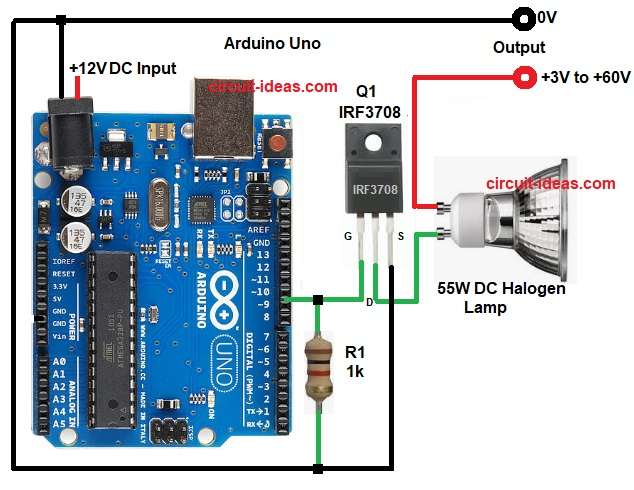
To begin with, this project controls a 55W halogen lamp using an Arduino, here, the Arduino provides a low-voltage signal, while the MOSFET handles the high voltage and high current.
Also, this circuit is useful for dimming, ON/OFF control and automation projects.
Arduino Code:
int lampPin = 9;

void setup() {
pinMode(lampPin, OUTPUT);
}

void loop() {
analogWrite(lampPin, 255); // lamp full ON
delay(2000);

analogWrite(lampPin, 120); // lamp dim
delay(2000);

analogWrite(lampPin, 0); // lamp OFF
delay(2000);
}
Circuit Working:
Parts List:
| Components | Values | Quantity |
|---|---|---|
| Resistor | 1k 1/4 watt | 1 |
| Arduino Board | Arduino Uno / Beetle | 1 |
| MOSFET | IRF3708 Logic Level / RFP30N06LE | 1 |
| Halogen Lamp | 55W DC Halogen | 1 |
| DC Power Supply | 12V for Arduino and +3V to +60V for Halogen lamp | 1 |
| Heat Sink | Suitable for MOSFET | 1 |
The above circuit can work with DC supply from about +3V to +60V; which is also a useful and easy to build project.
Then Arduino sends HIGH or PWM signal to MOSFET gate and when gate gets HIGH and MOSFET turns ON, current flows through lamp and lamp glows.
PWM controls the lamp brightness, and the MOSFET acts as an electronic switch, finally, the Arduino remains safe because it only drives the MOSFET gate.
Important Notes:
- Use heat sink on MOSFET and use logic level MOSFET only which supports 3V to 60V DC
- Do not power lamp from Arduino, use separate DC supply for lamp.
- Better value is 220 ohm to 1k resistor for stable PWM control
- Always connect common ground.
How to Build:
To build a Arduino Based 55W Halogen Light Controller Circuit follow the below steps for connection:
- First, take all the parts as shown in circuit diagram.
- Next, MOSFET gate pin connect to Arduino PWM pin 9 through 1k resistor and GND.
- Then MOSFET source pin connect to common GND.
- After that, MOSFET drain pin connect to one end of halogen lamp and lamp other end connect to output supply of +3V to +60V.
- Lastly, Arduino GND external supply GND must be common
Conclusion:
To conclude, Arduino Based 55W Halogen Light Controller Circuit is simple and reliable, as Arduino controls high power lamp safely.
In addition, MOSFET protects Arduino from high current and also this circuit is good for lighting control and automation projects.