This project make Arduino speak text.
It convert text into speech.
In this article we used Arduino UNO board, LM386 audio amplifier, speaker and some components.
Arduino send digital voice data and IC LM386 make sound loud.
Arduino Text to Speech Voice Generator Circuit is small and low cost project.
Circuit Coding:
#include <TTS.h>      // include Text To Speech library

TTS tts(3);            // create TTS object on digital pin 3

void setup() {
  tts.begin();         // start TTS engine
}

void loop() {
  tts.say("Alert! Alert! A big thunder storm is on the way.");
  delay(10000);         // wait 10 seconds before speaking again
}
Coding Explanation:
- The TTS library converts the text into a series of audio tones speech-like sound.
- tts(3) sets digital pin 3 as the output pin for the audio signal PWM.
- This pin is connected to our amplifier input LM386 through a capacitor and potentiometer.
- The LM386 amplifies the weak audio from Arduino and drives the speaker.
- The delay gives a pause so it will not keep repeating very fast.
Circuit Working:
Parts List:
| Part Name | Quantity |
|---|---|
| Resistors | |
| Resistor 10 ohms 1/4 watt | 1 |
| 10k Potentiometer | 1 |
| Capacitors | |
| Electrolytic 10uF | 3 |
| Electrolytic 1000uF | 1 |
| Ceramic 0.047uF | 1 |
| Semiconductors | |
| Arduino UNO Board | 1 |
| LM386 IC | 1 |
| Speaker 8 ohm | 1 |
| 12 Power supply | 1 |
Arduino digital pin 3 produce PWM audio signal when library speaks.
PWM signal go out from pin 3 to potentiometer input.
Potentiometer wiper send level-adjusted signal through a coupling capacitor 10uF to amplifier input.
Coupling capacitor block DC and pass only audio variations.
LM386 amplify the small audio signal.
Amplified output drive the 8 ohm speaker.
Arduino GND and LM386 GND must be common connected.
LM386 Vcc is from 12V battery or 12V power supply.
Arduino is powered by USB or 5V regulator.
Note: If require any help go through the same circuit for Simple LM386 Audio Amplifier Circuit
Formula with Calculations:
Gain of LM386 = 20 by default
If 10uF capacitor connect between pin1 and pin8 gain become 200
Power output P = V^2 / R
If LM386 give 1V RMS and speaker is 8 ohm
P = 1*1/8 = 0.125W
This is enough for small speaker.
How to Build:
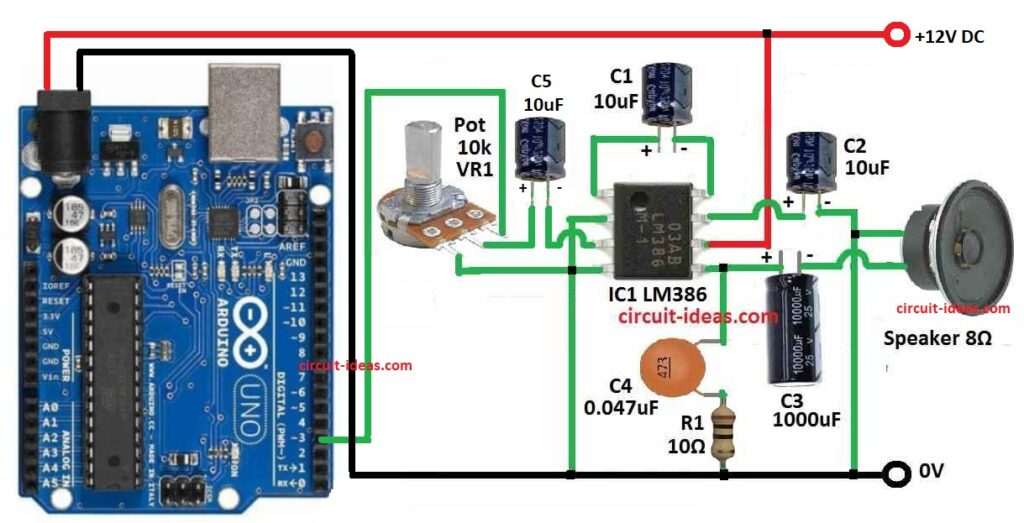
To build a Arduino Text to Speech Voice Generator Circuit follow the below steps for connections:
- Gather all the circuit parts as per the diagram above.
- Connect Arduino pin 3 to potentiometer input
- Potentiometer wiper to 10uF capacitor
- Capacitor C1 is between pin 1 and pin 8 of IC1
- Capacitor C5 negative connects from pin 3 and capacitor positive connects to middle pin of VR1 pot
- LM386 pin 2 to GND
- LM386 pin 4 to GND
- LM386 pin 6 to +12V
- LM386 pin 7 goes to one end of speaker through capacitor C2
- C3 1000uF capacitor between LM386 pin 5 and speaker negative
- Bypass capacitor C4 0.05uF and resistor R1 is between pin 5 and GND
How to Upload Code to Arduino:
- Open Arduino IDE
- Connect Arduino UNO using USB
- Select correct board and COM port
- Copy code in IDE
- Click verify and then upload
Conclusion:
This project for Arduino Text to Speech Voice Generator Circuit can speak words using Arduino.
It is simple and good for beginner.
We can change text in code to speak different words.
We can use for toys, talking notice board, voice alerts, etc.
Leave a Reply