12V Mini Emergency Light Circuit with LDR is simple project to make.
Light is ON automatically when dark.
It works with bright white LED and uses 12V battery.
Circuit is good for home, garage and emergency.
Circuit Working:
Parts List:
| Component Type | Value | Quantity |
|---|---|---|
| Resistors | 10k 1/4 watt | 1 |
| 2.2k 1/4 watt | 1 | |
| 33Ω 3 watt | 1 | |
| LDR Standard Light Dependent Resistor | 1 | |
| Preset 50k | 1 | |
| Semiconductors | Transistor BD140 PNP | 1 |
| Transistor BD139 NPN | 1 | |
| LED 1W High Bright Luxeon White LED | 1 | |
| Switch On/Off Switch | 1 | |
| Battery 12V Battery | 1 |
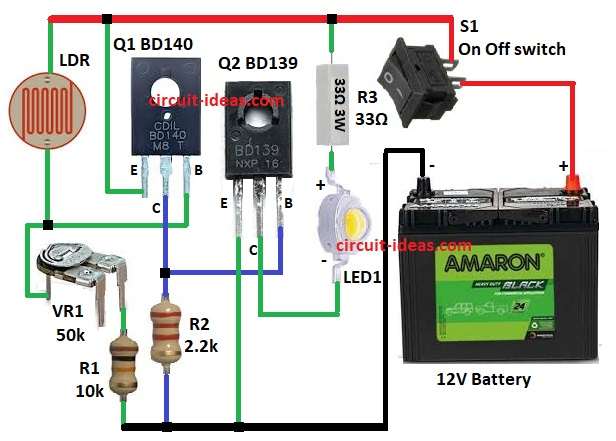
Light changes make circuit work.
LDR checks light level.
During dark time LDR resistance goes high and turns ON transistors and LED glow.
And during light time the LDR resistance goes low and LED is OFF.
VR1 50k set light sensitivity, Q1 BD140 act switch for Q2 and Q2 BD139 gives power to 1W LED.
R3 33Ω limit current and protect LED.
12V battery gives power and S1 switch allows us to ON/OFF manually.
Formulas with Calculations:
BD139 Q2 base current:
IB2 = IC2 / β
where,
- IC2 is 0.3A
- β is 50
- IB2 is 0.3 / 50 = 6mA.
LED current:
VR3 = 12V − 3.5V = 8.5V
ILED = 8.5 / 33Ω = 0.257A (257mA).
Power in R3:
P = I² × R = (0.257²) × 33 = 2.18W
So we used 3W resistor.
How to Build:
To build a 12V Mini Emergency Light Circuit with LDR follow the below mentioned steps for connection and assembling:
- Gather all the parts as per circuit diagram above
- Connect emitter of Q1 to positive supply.
- Connect base of Q1 between VR1 and LDR.
- Connect collector of Q1 to junction of R2 and base of Q2.
- Connect emitter of Q2 to GND.
- Connect collector of Q2 to LED1 cathode.
- Connect LED1 anode to one end of R3 and other end of R3 to positive supply.
- Connect LDR, VR1 and R1 in series from positive supply to GND.
- Connect S1 switch between +12V battery and positive supply of circuit and connect battery negative to GND.
Conclusion:
12V Mini Emergency Light Circuit with LDR gives bright light in blackout.
Preset VR1 adjusts sensitivity.
Transistors save power and run 1W LED.
Circuit is easy to build, good for home, office and garage.
Leave a Reply