Flame sensor is very important for many uses like industry machines, safety check and fire alarm.
In this post for Simple Flame Sensor Circuit using Arduino shows how to connect flame sensor to Arduino to find fire.
This project is cheap and works well for real-life fire detection.
Coding:
Code for Flame Sensor Digital (D0) Output:
// Pin Definitions
const int BUZZER_PIN = 13; // Pin connected to the buzzer
const int FLAME_SENSOR_PIN = 2; // Pin connected to the flame sensor

void setup() {
  // Set pin modes
  pinMode(BUZZER_PIN, OUTPUT);
  pinMode(FLAME_SENSOR_PIN, INPUT);

  // Initialize serial communication
  Serial.begin(9600);
}

void loop() {
  // Read the flame sensor value
  int flameDetected = digitalRead(FLAME_SENSOR_PIN);

  // Check if flame is detected
  if (flameDetected == HIGH) {
    Serial.println("Flame Detected!");
    digitalWrite(BUZZER_PIN, HIGH); // Turn on the buzzer
  } else {
    Serial.println("No Flame");
    digitalWrite(BUZZER_PIN, LOW); // Turn off the buzzer
  }

  // Add a small delay for stability
  delay(100);
}
Code for Flame Sensor Analog (A0) Output:
// Pin Definitions
const int ANALOG_PIN = A0;      // Flame sensor connected to analog input pin A0
const int BUZZER_PIN = 13;      // Buzzer connected to pin 13
const int THRESHOLD = 400;      // Flame detection threshold

void setup() {
  pinMode(BUZZER_PIN, OUTPUT);  // Set the buzzer pin as an output
  Serial.begin(9600);           // Initialize serial communication
}

void loop() {
  // Read the value from the flame sensor
  int analogValue = analogRead(ANALOG_PIN);
  Serial.print("Flame Sensor Value: ");
  Serial.println(analogValue); // Print the sensor value for debugging

  // Check flame levels
  if (analogValue > THRESHOLD) {
    digitalWrite(BUZZER_PIN, HIGH);  // Activate buzzer
    Serial.println("High Flame Detected!");
  }
  else if (analogValue == THRESHOLD) {
    digitalWrite(BUZZER_PIN, HIGH);  // Activate buzzer briefly
    Serial.println("Low Flame Detected!");
    delay(400);                      // Short delay to indicate low flame
    digitalWrite(BUZZER_PIN, LOW);   // Deactivate buzzer
  }
  else {
    digitalWrite(BUZZER_PIN, LOW);   // Deactivate buzzer
    Serial.println("No Flame Detected.");
  }

  // Small delay to stabilize sensor readings
  delay(100);
}
Circuit Working:
Parts List:
| Component | Quantity |
|---|---|
| IC 7809 | 1 |
| Arduino Uno | 1 |
| Flame Sensor Module 4 pin | 1 |
| Buzzer | 1 |
Circuit working is mentioned below:
This post shows how to use IC 7809 to keep voltage steady at 9V.
It is helpful when our power is more or not stable like 12V battery or unregulated power.
This gives safe voltage to Arduino and flame sensor using step down.
Flame sensor sees infrared light from fire and gives analog value which is more fire and higher value.
It also has digital pin with HIGH or LOW depending on fire level.
Arduino keeps checking the sensor.
If fire level is too high then buzzer turns ON to warn user.
Also shows fire level on Serial Monitor for checking or logging.
When flame is found then buzzer makes sound to alert.
Uses of Flame sensors:
Fire alarm are used in homes and offices
It watches for fire danger in labs and in kitchens
Keep fire based machines like furnace and kiln safe
Formula:
Analog-to-Digital Conversion (ADC):
Arduino uses built-in ADC to change analog signal from flame sensor to digital value.
Formula:
Vin = (ADC Value × Vref) / 1023
where:
- Vin is the voltage from sensor
- ADC Value is the output from analogRead() from 0 to 1023
- Vref is the reference voltage which is mostly 5V
This formula helps us convert sensor reading to real voltage.
How to Build:
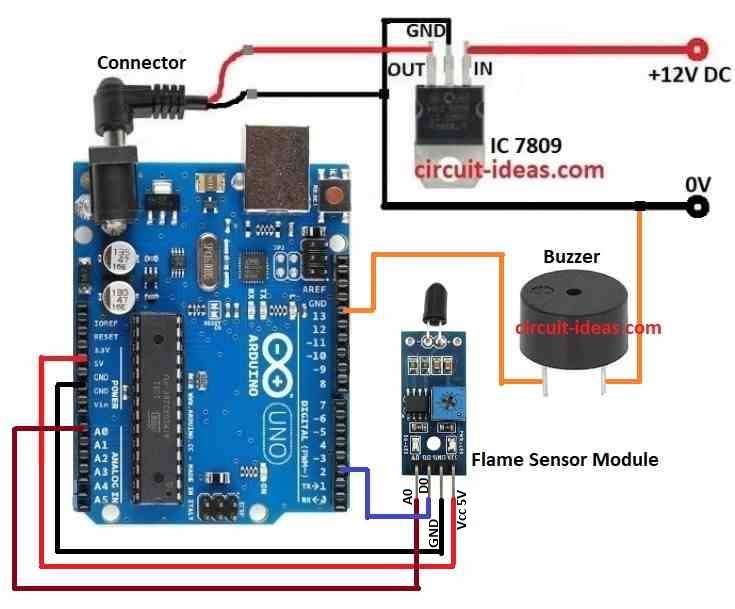
To build a Simple Flame Sensor Circuit using Arduino follow the below mentioned steps for connections:
- Get all parts shown in the circuit diagram.
- Use IC 7809 to give stable 9V to Arduino as shown in circuit diagram.
- Connect flame sensor A0 analog out pin to Arduino A0.
- Connect flame sensor D0 digital out) pin to Arduino pin 2.
- Connect flame sensor VCC to 5V on Arduino and GND to GND.
- Connect buzzer positive to pin 13 and buzzer to GND.
Conclusion:
This Simple Flame Sensor Circuit using Arduino is simple but works well.
Using just Arduino, sensor and buzzer we can build a flame detection system.
It shows how small sensors can solve real problems with microcontrollers.
Leave a Reply