
Every circuit needs stable DC voltage, because power supply plays a very important role in electronics; however, AC voltage comes from main supply, so we need to convert AC to DC.
Therefore, this circuit uses LM317 to make adjustable DC power supply and output voltage can change from 1.2V to 30V, with maximum output current is about 1A.
LM317 IC is easy to use and it needs few external components, because of this it is very popular voltage regulator IC.
In this article for 1.2V to 30V 1A LM317 Adjustable Power Supply Circuit, we will explain about circuit working, formula calculation and construction step by step in simple way.
Circuit Working:
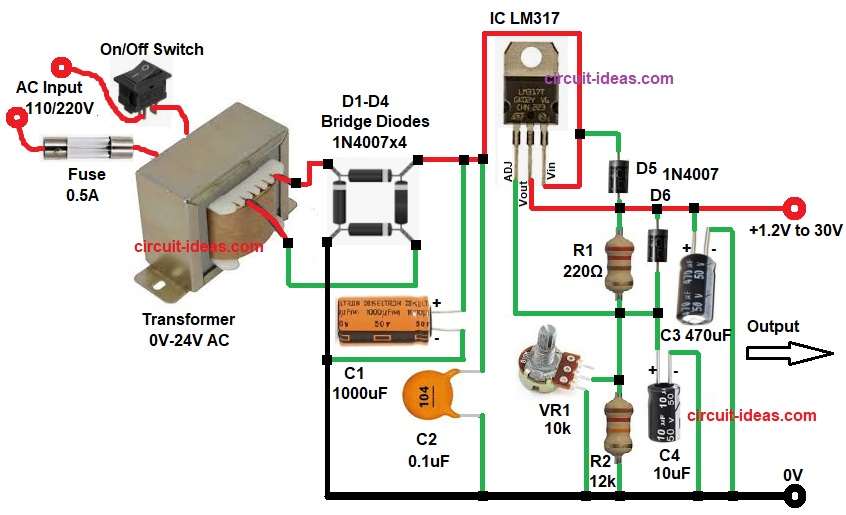
Parts List:
| Components | Values | Quantity |
|---|---|---|
| Resistors | 220Ω, 12k 1/4 watts | 1 each |
| Potentiometer 10k | 1 | |
| Capacitors | Electrolytic 1000uF 50V, 470uF 50V, 10uF 50V | 1 each |
| Ceramic 0.1uF | 1 | |
| Voltage Regulator IC LM317 | 1 | |
| Diode 1N4007 | 2 | |
| Bridge Rectifier Diodes 1N4007 | 4 | |
| Step-down Transformer Secondary 0-24V AC, Primary 110V/220V AC | 1 | |
| Fuse 0.5A | 1 | |
| On/Off Switch SPST | 1 |
First, AC mains supply 110V or 220V given to transformer and this transformer reduces high AC voltage to low AC voltage.
Then fuse placed before transformer primary for safety device and switch connected in series with AC live line before transformer so we can safely turn power supply ON or OFF.
After that, low AC voltage goes to bridge rectifier made with four 1N4007 diodes, and this bridge rectifier converts AC into pulsating DC.
Now capacitor C1 1000uF filters ripple, so output becomes smoother DC; next, this filtered DC goes to LM317 input pin and now LM317 regulates voltage according to resistor network.
R1 220Ω, VR1 10k variable resistor and R2 12k to limit resistor, also because of internal 1.25V reference the output voltage controlled by R1 and VR1.
Diode D5 connected between output and input and it protects LM317 when input suddenly shorted.
Diode D6 protects adjust pin from capacitor discharge.
Furthermore, capacitor C2 0.1uF reduces high frequency noise, capacitor C3 470uF improves output stability and capacitor C4 10uF improves ripple rejection.
Therefore, finally we get smooth adjustable DC output from 1.2V to 30V.
How to Build:
To build a 1.2V to 30V 1A LM317 Adjustable Power Supply Circuit follow the below connection steps:
- First, start the circuit by assembling all the circuit parts.
- Then start to connect filtered DC positive to Input pin of IC LM317.
- Connect output pin to output terminal of 1.2V to 30V
- Connect adj pin the junction of resistor network R1, R2 and VR1.
- Now connect 220 ohm resistor R1 from output pin to adj pin of IC and then connect resistor R2 in series with resistor R1.
- Also, connect one side of 10k potentiometer VR1 center pin between resistor R1 and R2 and second pin to GND.
- Further, connect diode D6 and capacitor C4 in series from output pin of IC1 and GND
- Connect C3 470uF capacitor between output and ground.
- Next, connect protection diode D5 from output to Input (cathode to Input) and connect capacitor C1 positive from bridge diode input and negative to GND and also connect capacitor C2 from input pin of IC1 to GND.
- Then transformer secondary one side goes to bridge AC input and other secondary side goes to second AC terminal of bridge and bridge positive goes to filter capacitor positive C1 and bridge negative to ground.
- Lastly, connect on of switch and fuse in parallel to transformer primary.
Important note:
Transformer current rating must be minimum 1.5A for full 1A output and heat sink is necessary because power dissipation = (Vin – Vout) x Iout.
Example:
- Vin is 30V
- Vout is 5V
- Current is 1A
Power dissipation = (30 – 5) x 1
Power = 25W
So large heat sink required.
Conclusion:
To conclude, 1.2V to 30V 1A LM317 Adjustable Power Supply Circuit is a simple and reliable project which gives clean and stable DC output, because of adjustable feature, it is useful for lab testing and DIY projects.
However, proper transformer selection and heat sink are very important otherwise regulator may overheat.
Therefore, with correct components and careful wiring, this circuit works very well from 1.2V to 30V at 1A; also it is good beginner and professional power supply solution.