
This project is about controlling DC motor with Arduino and MOSFET, as MOSFET is small electronic part but very strong which can handle big current.
Arduino cannot drive big motor directly, so MOSFET help Arduino to run motor safely; therefore, this Arduino DC Motor Controller Circuit using MOSFET is simple, safe and cheap.
Arduino Code:
int motorPin = 9;

void setup() { pinMode(motorPin, OUTPUT); }

void loop() { analogWrite(motorPin, 0); delay(2000);

analogWrite(motorPin, 128); delay(2000);

analogWrite(motorPin, 255); delay(2000); }
Circuit Working:
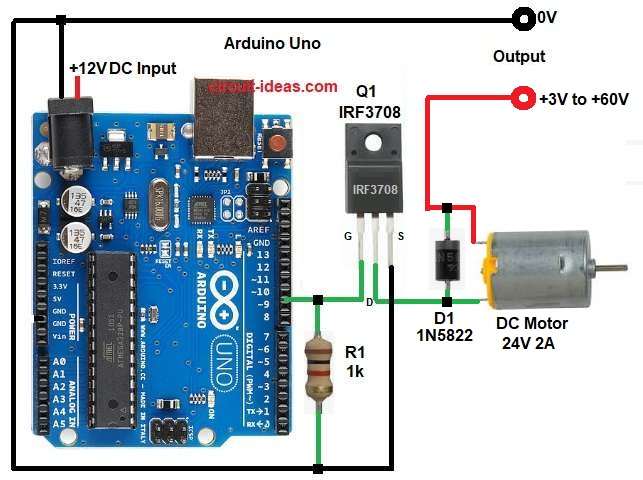
Parts List:
| Components | Values | Quantity |
|---|---|---|
| Resistor | 1k 1/4 watt | 1 |
| Arduino Board | Arduino Uno | 1 |
| MOSFET | IRF3708 | 1 |
| DC Motor | 24V 2A | 1 |
| Power Supply | +3V to +60V | 1 |
| Schottky diode | 1N5822 | 1 |
| Heatsink | Optional | 1 |
The circuit work with DC supply from about +3V to +60V and then Arduino sends PWM signal to MOSFET gate.
After that, MOSFET turns ON and OFF fast and PWM controls average motor voltage; then motor speed changes with PWM value and external supply gives motor power.
Also, pull-down resistor R1 ensures MOSFET stays OFF when Arduino pin is floating during boot and then Arduino only controls the gate and D1 diode protects MOSFET from back EMF.
How to Build:
To build a Arduino DC Motor Controller Circuit using MOSFET follow the below steps:
- First, take all parts like in circuit diagram.
- Next, MOSFET source pin connect to common GND.
- Then Arduino PWM pin 9 connect to MOSFET gate pin through R1 resistor.
- Now MOSFET drain pin connect to one end of DC motor terminal and DC Motor other terminal connect to +3V to +60V power supply.
- After that, power supply negative connect to external GND and finally, diode connect across motor terminals.
Conclusion:
To conclude, this Arduino DC Motor Controller Circuit using MOSFET is easy and with low cost, as it controls high power DC motors safely.
Also, the circuit protects the Arduino from high current, and the MOSFET provides efficient switching; hence, this circuit works well for robotics and automation projects.