Feeding pets can be easy and on time using automatic system.
This project for Building a Smart Pet Feeder Circuit using Arduino and other parts like IC 7809, SG90 servo motor and HC-SR04 sensor to make simple pet feeder.
Feeder work with distance sensor to give food so pet can eat on time without people help.
This system help pet owners save time and feed pets regularly.
Code:
#include <Servo.h>

Servo myservo;  // create a servo object to control the servo

const int trigPin = 9;    // Trigger pin of the ultrasonic sensor
const int echoPin = 10;   // Echo pin of the ultrasonic sensor

const int
 servoPin = 2;   // Servo motor pin

int duration, distance;

void setup() {
  myservo.attach(servoPin);  // attach the servo to pin 2
  pinMode(trigPin, OUTPUT); // sets the trigPin as an output
  pinMode(echoPin, INPUT);  // sets the echoPin as an input
}

void loop() {
  // Generate a pulse of 10us on the TRIGGER pin
  digitalWrite(trigPin, HIGH);
  delayMicroseconds(10);
  digitalWrite(trigPin, LOW);

  // Read the duration of the pulse on the ECHO pin
  duration = pulseIn(echoPin, HIGH);

  // Calculate the distance in centimeters
  distance = duration * 0.0343 / 2;


  // Check if a pet is within the desired range
  if (distance >= 10 && distance <= 20) {
    // Dispense food by rotating the servo
    myservo.write(90); // Adjust the angle as needed
    delay(1000); // Delay for dispensing
    myservo.write(0); // Return to initial position
  }

  // Add code for timer-based feeding if desired
}
Code Explanation:
- This line include Servo library and it helps control servo motor.
- This line make servo object name myservo.
- myservo will control servo motor.
- Next lines set pins for trigger (trigPin), echo (echoPin) and servo (servoPin) as constant numbers.
- duration and distance are integer variables and they save pulse time and measured distance.
- This function run one time when program start.
- myservo attaches to servoPin.
- echoPin set as input and trigPin set as output.
- This function run again and again in loop.
- trigPin send small pulse to make ultrasonic sound.
- echoPin measure how long sound come back and it uses this to find distance.
- If distance is between 10 and 20 cm then servo motor turn to 90° to drop food.
- We can also add timer code to feed by time.
Circuit Working:
Parts List:
| Component | Quantity |
|---|---|
| Arduino Uno | 1 |
| IC 7809 (Voltage Regulator) | 1 |
| Servo Motor SG90 | 1 |
| Ultrasonic Distance Sensor HC-SR04 | 1 |
In this circuit diagram choose container big enough to hold pet food.
Add open-close lid on container and servo motor will control this lid.
Fix servo motor in box so it can open and close food container properly.
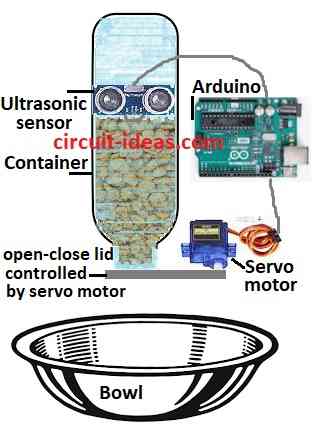
Fix ultrasonic sensor so it can see pet in set distance.
Ensure pet can come in front of sensor clearly.
Put all parts inside box to protect from weather.
Make small hole so pet can reach food.
Use IC 7809 to change 12V to 5V which is needed for Arduino, servo and sensor.
Give 5V power to sensor and servo using breadboard.
HC-SR04 sensor check how far pet is by sending sound waves and measuring return time.
Servo motor control food lid.
Arduino tell servo to turn and open or close feeder.
How to Build:
For Building a Smart Pet Feeder Circuit using Arduino following steps need to be followed for assembling:
- First collect all parts shown in circuit diagram.
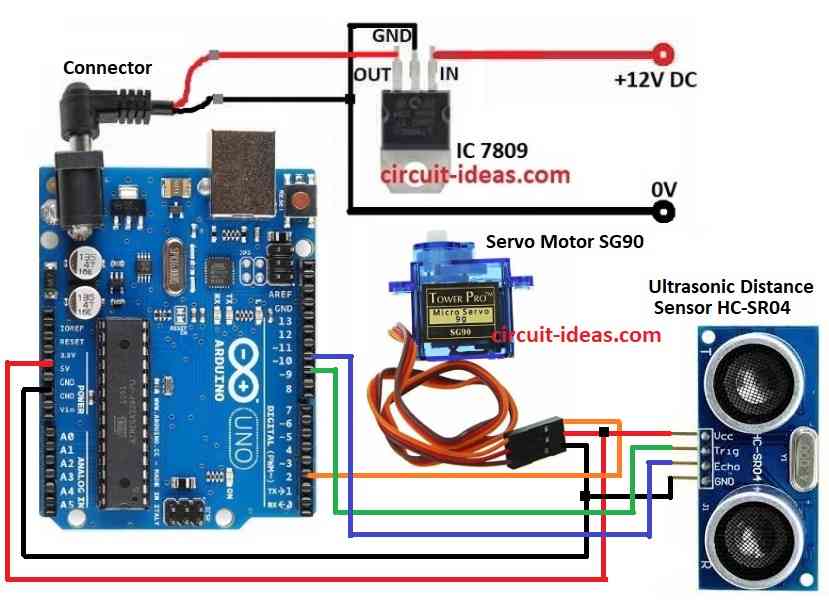
- Connect IC 7809 to give steady 9V DC to Arduino as shown in circuit diagram.
- Connect Servo Motor SG90 with black wire to GND on Arduino, red wire to 5V on Arduino and orange wire to pin 2 on Arduino
- Connect Ultrasonic Sensor HC-SR04 with VCC to 5V on Arduino, TRIG to pin 9 on Arduino, ECHO to pin 10 on Arduino and GND to GND on Arduino
Conclusion:
This Building a Smart Pet Feeder Circuit using Arduino shows how to make automatic pet feeder using servo motor and ultrasonic sensor.
It helps feed pet without human help by making pet care easier.
References:
Reliable Smart Pet Feeding Machine Using Arduino Uno Starter Kit