This project for DC Motor Speed Controller Circuit shows how to control DC motor speed using Arduino, MOSFET and potentiometer.
Arduino make PWM signal to control MOSFET gate.
MOSFET work like switch and control voltage to motor and changes speed.
Arduino speed controller is simple and with low cost.
It can control motor, light and heater.
Speed and power are easy to change in this circuit.
Programming Code:
const int motorPin = 9; // PWM pin for motor control
const int potPin = A0;

void setup() {
  pinMode(motorPin, OUTPUT);
}

void loop() {
  int potValue = analogRead(potPin);
  int motorSpeed = map(potValue, 0, 1023, 0, 255);
  analogWrite(motorPin, motorSpeed);
}
Code Explanation:
- Motor pin is Arduino pin connected to MOSFET gate.
- Potentiometer pin is Arduino analog pin connected to potentiometer.
- setup() make motor pin as output.
- loop() keep reading potentiometer and changes value to speed from 0 to 255 and sets motor PWM.
Circuit Working:
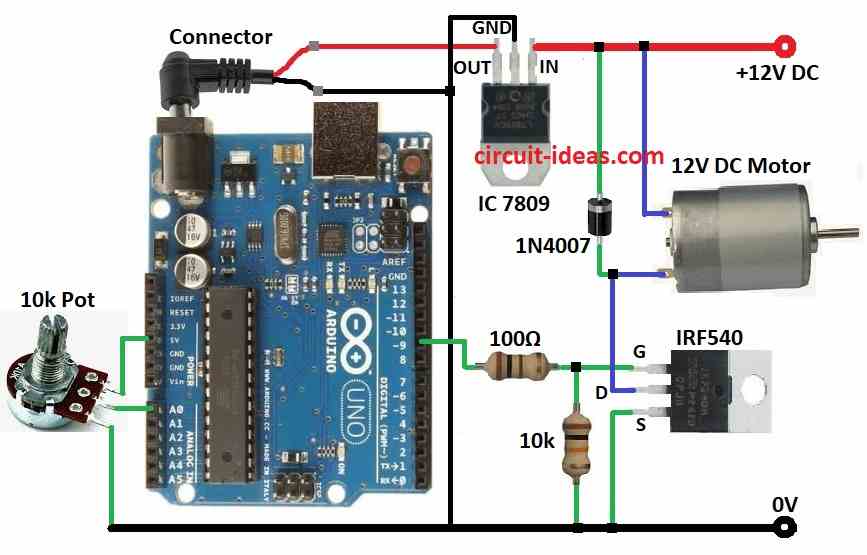
Parts List:
| Component | Quantity |
|---|---|
| Resistors (All resistors are 1/4 watt) | |
| 100Ω | 1 |
| 10k | 1 |
| Potentiometer 10k | 1 |
| Semiconductors | |
| Arduino UNO | 1 |
| IC 7809 | 1 |
| MOSFET IRF540 | 1 |
| Diode 1N4007 | 1 |
| DC Motor 12V 1Amp | 1 |
In this article the 12V power give power to circuit.
Arduino make PWM signal to control MOSFET.
10k potentiometer set PWM duty cycle and controls motor speed.
MOSFET work like switch and is controlled by PWM.
It changes voltage to motor.
One diode connect with motor to stop reverse EMF from motor coil.
Motor uses own 12V power.
MOSFET controls voltage and so it controls motor speed.
How to Build:
To build a DC Motor Speed Controller Circuit using Arduino following are the connections steps to follow:
- Collect all parts shown in circuit diagram.
- Connect Arduino 5V and GND to PCB.
Potentiometer Connection:
- One outer pin connects to 5V
- Middle pin connects to A0
- Other outer pin connects to GND
MOSFET Connections:
- Connect 100 ohm resistor between Arduino pin 9 and MOSFET gate.
- Connect 10k resistor between MOSFET gate and GND.
- Connect MOSFET source to GND.
- Connect MOSFET drain to one motor wire.
- Connect other motor wire to 12V positive.
Diode and IC Connections:
Conclusion:
This project for DC Motor Speed Controller Circuit using Arduino controls DC motor speed using Arduino, MOSFET and potentiometer.
Arduino make PWM signal and MOSFET change motor voltage and potentiometer sets the speed.
Simple way to learn motor control with electronics.