Power cut can come anytime, so our room becomes dark and feels very scary and bad.
So, this small circuit gives light instantly, also there is no switch needed and no tension.
Then light turns ON automatically and this happens because of simple and Easy Emergency Light Circuit using Transistors.
Now, the circuit works like this, when AC mains is ON, it charges the battery and when power goes OFF, the LED light turns ON automatically.
Finally, this circuit is with low cost and is easy to build at home and also, it is very good for beginners.
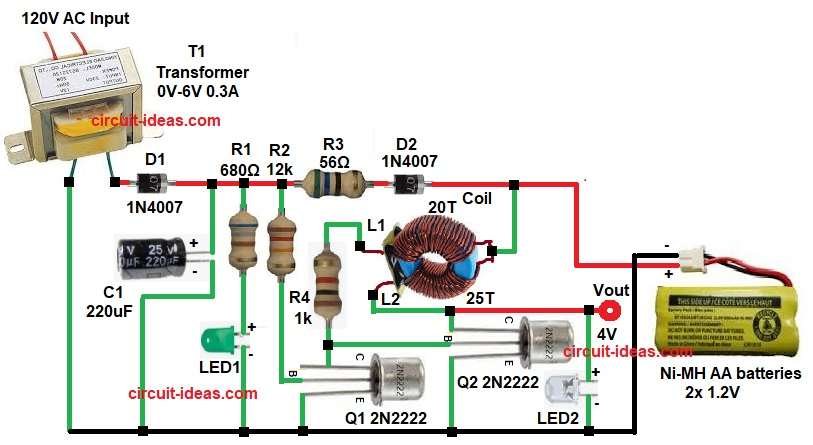
Circuit Working:
Parts List:
| Components | Values | Quantity |
|---|---|---|
| Resistors (All resistors are 1/4 watt) | 680Ω, 12k , 56Ω, 1k | 1 each |
| Capacitor | Electrolytic 220uF 25V | 1 |
| Semiconductors | Transistors 2N2222 | 2 |
| Any standard LED 5mm one for indicator and one emergency output light | 2 | |
| Diodes 1N4007 | 2 | |
| Transformer step-down transformer primary 120V AC, Secondary: 0V-6V 0.3A | 1 | |
| Coil L1 with 20 turns, L2 with 25 turns and use 30AWG solid wire on ferrite core | 1 | |
| 2x 1.2V 2100mAh Ni-MH AA batteries | 1 |
AC mains of 120V goes to transformer, and then transformer gives low voltage of 6V AC.
Next, diode D1 converts this AC to DC and capacitor filters the voltage, so output becomes smooth DC.
After that, this DC charges battery and resistor R3 controls the charging current.
Also, in this circuit LED1 shows power status and LED2 gives emergency light status.
Moreover, diode D2 controls direction of current and allows current to go to battery and capacitor C1 smooths the DC voltage.
In the circuit 4V Vout is for charging and for controlling the circuit operation.
Now, when AC supply is present then Q1 stays OFF, Q2 stays OFF and LED also stays OFF.
But when power failure happens then battery gives supply to circuit, then Q1 turns ON, Q2 turns ON and LED glows.
Finally, coil acts like booster, so it increases voltage for LED2 and then LED2 gives proper brightness.
And battery in the circuit stores power during normal time, then it gives power during power failure and this makes circuit work as emergency light.
How to Build:
To build a Easy Emergency Light Circuit using Transistors follow the below connection steps:
- First, start by gathering all the circuit components as in diagram above.
- Then start with transformer T1 primary side connect to AC mains.
- Secondary one side connect to 6V output to diode D1 and other side connect to gnd.
- Diode D1 anode connect to transformer output and cathode connect to capacitor C1 and resistor R1 network.
- Capacitor C1 positive end connect between diode D1 and resistor R1 and negative goes to ground.
- Resistor R1 one side connect to DC line and other side connect to LED indicator.
- LED Indicator anode end connect to resistor R1 and cathode end goes to gnd.
- Transistor Q1 base pin goes to R2 resistor one end and control line.
- Collector pin goes to coil L1 one end through resistor R4 and emitter pin goes to ground.
- Transistor Q2 base pin goes to one end of resistor R4 and other end of R4 goes to coil L1.
- Collector pin goes to coil L2 one end and Vout ouput of 4V.
- Emitter pin goes to ground.
- Coil L1 with 20 turns is connected to transistor Q1 collector and base of Q2.
- Coil L2 with 25 turns is connected collector of Q2 transistor and Vout of 4V.
- Battery 2.4V positive goes to circuit supply line and negative goes to ground.
- Finally, output emergency LED2 anode goes to Vout 4V is boosted voltage and cathode to Gnd.
Conclusion:
This is simple and Easy Emergency Light Circuit using Transistors, which is easy to understand and build.
This circuit provides instant backup light, as it charges battery during normal time and gives light during power failure.
The circuit uses few components and is with low cost and is useful for home during emergency, and is good project for students and beginners.