
This project show how to use sound sensor with Arduino; as sound sensor detect clap or loud voice.
When sound come, Arduino turn ON LED and buzzer and also this project for Simple Sound Sensor Circuit with Arduino help beginner understand sensor working.
Arduino Code:
int sound = 7;
int led = 13;
int buzzer = 8;
int value = 0;

void setup() {
pinMode(sound, INPUT);
pinMode(led, OUTPUT);
pinMode(buzzer, OUTPUT);
}

void loop() {
value = digitalRead(sound);
if(value == HIGH){
digitalWrite(led, HIGH);
digitalWrite(buzzer, HIGH);
delay(300);
} else {
digitalWrite(led, LOW);
digitalWrite(buzzer, LOW);
}
}
Code Explanation:
- We create variable sound for sound sensor pin.
- LED ON pin 13.
- Buzzer ON pin 8.
- In setup we set pins input and output.
- In loop we read sensor value.
- If sound detected value become HIGH.
- Then LED is ON and buzzer is also ON.
- If no sound then both are OFF.
Circuit Working:
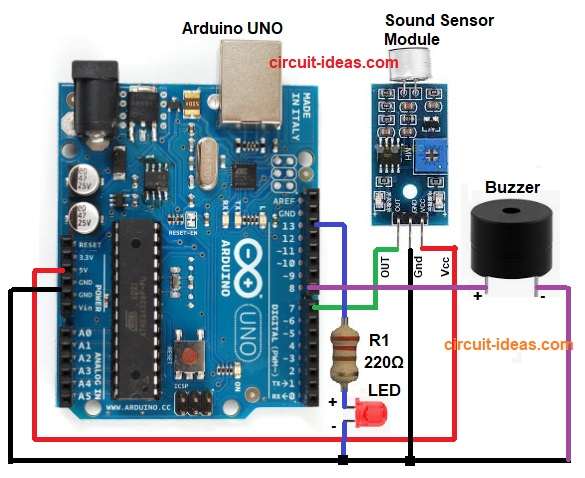
Parts List:
| Components | Quantity |
|---|---|
| Resistors 220Ω 1/4 watt | 1 |
| Arduino UNO | 1 |
| Sound Sensor Module | 1 |
| LEDs 5mm any | 1 |
| Buzzer | 1 |
Sound sensor gives digital output and when loud sound hit microphone module then output pin become HIGH.
Arduino read HIGH signal and then send voltage to LED and buzzer; after that LED glow and buzzer makes sound.
Finally, when sound stop sensor output is LOW and Arduino turn OFF LED and buzzer.
Formula with Calculation:
Below is the formula for LED current, LED current is approx 15 to 20 mA; so we used 220 ohm resistor:
Current = Voltage / Resistance
Voltage around 5V minus LED drop 2V = 3V
Current = 3 / 220 = 0.013A
Hence, this is safe for our LED.
How to Build:
To build a Simple Sound Sensor Circuit with Arduino we need to follow the below steps:
- First, assemble all the parts as shown in circuit diagram.
- Next, sound sensor VCC pin connect to Arduino 5V, sound sensor GND pin connect to Arduino GND and sound sensor OUT pin connect to Arduino pin 7.
- Then LED positive leg connect to one side of 220 ohm resistor and other side of resistor connect to Arduino pin 13 and also LED negative leg connect to GND.
- Now buzzer positive wire connect to Arduino pin 8 and also buzzer negative wire connect to GND.
- Lastly, all grounds must join together.
Conclusion:
To conclude, this Simple Sound Sensor Circuit with Arduino is very easy and best for beginners; also we can learn how sound sensor work with Arduino.
Additionally, it show how sensor signal control LED and buzzer and also we can improve project by adding relay, motor or other automation.