Simple Temperature Meter Circuit is like small detective for heat.
It use special sensor like thermocouple or thermistor to feel heat near it.
Sensor can be small part or smart chip like LM35 or LM34 which change heat into electric signal.
Then circuit take this signal and confirms how much hot or cold it is.
At end it shows temperature on small light or digital number screen.
So if we want to know temperature then can make ones own tiny weather station.
Circuit Working:
Parts List:
| Category | Component | Quantity |
|---|---|---|
| Resistors | 100Ω 1/4 watt | 1 |
| Preset 100k | 1 | |
| Preset 10k | 1 | |
| Capacitors | Electrolytic 1µF 25V | 1 |
| Semiconductors | IC LM35 | 1 |
| IC LM3915 | 1 | |
| LEDs 5mm 20mA | 6 |
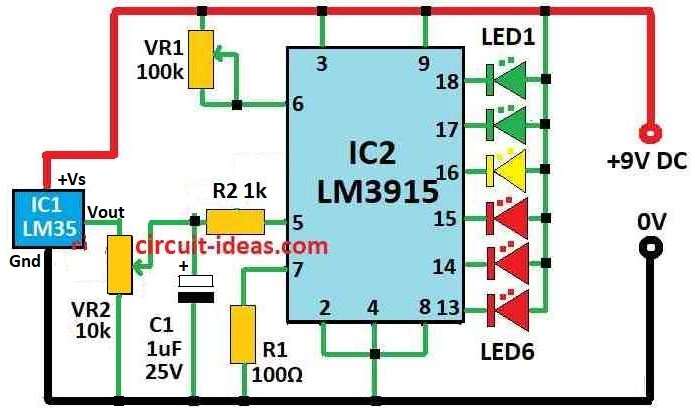
This temperature meter uses LM35 sensor chip which give straight output from 10mV for every 1°C heat.
The Temperature show on LED lights.
IC LM35 have three pins look like small transistor.
When heat goes up it give more voltage from 10mV per degree Celsius.
It can measure from -4°C to 110°C.
There is also LM34 IC same like LM35 but it show in Fahrenheit which gives -10mV for every 1°F.
Output from LM35 IC1 go to LM3915 chip IC2.
LM3915 is special chip it can control 10 LED lights.
It do not need extra resistor LM35 chip already control current to LED.
LM3915 input is very sensitive.
As voltage go higher to 125mV steps then one more LED turn ON
In this project we have only used 6 LEDs and if want more can use other outputs from chip.
When LM35 sees more heat, more LEDs turn ON from LED1 to LED6.
If there is no need of sensitivity change then remove VR2.
Just connect IC1 output straight to IC2 input.
When power turns ON some LEDs will light up.
To set correct reading check with thermometer and hot water.
Put cotton with 37°C water on LM35 chip slowly which is the room temperature.
Now adjust VR1 and VR2 until LED1 glows.
Formulas:
Here is formula for LM35 sensor output voltage:
This formula provides how much heat (in °C) gives how much voltage.
When temperature goes up by 1°C then voltage goes up by 10 millivolt.
Formula:
Vout = 10mV/°C × Temperature (°C)
where,
- C is for Celsius unit for temperature.
- Vout is voltage coming out from LM35 sensor.
LED Resistor Calculation:
To find value of resistor for LED use ohms law:
RLED = (VCC − VLED) / ILED
where:
- VCC is power supply for 9V
- VLED is how much voltage LED needs to light up
- ILED is how much current LED uses i.e for 5mm LED it uses 20mA.
Note:
We can make simple temperature meter circuit using LM35 sensor and LM3915 chip.
Use above formula and tips for making LEDs light up correctly.
This will help show temperature in easy way with lights.
How to Build:
To build a Simple Temperature Meter Circuit follow the below mentioned steps:
- Connect LM35 output pin to LM3915 input pin.
- Give power to Vcc and ground to both LM35 and LM3915 from power supply.
- Connect LEDs to output pins of LM3915 with resistor for each LED.
- Connect VR1 and VR2 to adjust sensitivity like shown in circuit diagram.
- Put both ICs(LM35 and LM3915 on breadboard or PCB.
- Give power to both ICs and connect Vcc and ground.
- Again connect LM35 output to LM3915 input.
- Connect LEDs with resistors to LM3915 output pins.
- Use VR1 and VR2 as per circuit diagram.
- Check all wires and pins should must be correct and tight.
Testing the Circuit:
- Turn ON the power.
- Use thermometer and warm water with different heat levels.
- Use cotton with warm water and touch LM35 sensor slowly.
- Now adjust VR1 and VR2.
- We will see LEDs light one by one when temperature goes up.
Note:
- Handle all parts carefully.
- Check wires and connections again and follow the circuit diagram.
Conclusion:
Simple Temperature Meter Circuit is useful circuit for checking and showing temperature.
It have parts like temperature sensor, signal circuit and display to show result.
These circuits are important in many places where watching temperature is needed for safety and good working.