LM350 is adjustable voltage regulator IC, which gives output from 1.25V to 25V and it can supply current up to 3A.
Because it can deliver more than 3A current, we must fix the LM350 on a big heat sink to remove heat properly.
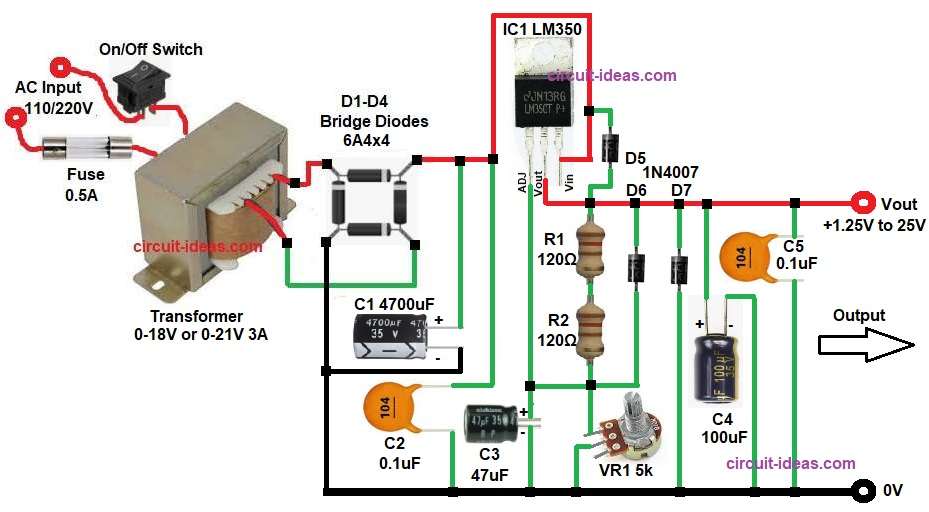
This 1.25V to 25V Adjustable Power Supply Circuit with IC LM350 converts AC to DC first and then it regulates DC voltage.
The regulated output voltage can be adjusted from 1.2V to 22V by turning the potentiometer knob.
Therefore, the circuit useful for lab power supply and also, it has overload and thermal protection inside.
Circuit Working:
Parts List:
| Components | Specification | Quantity |
|---|---|---|
| Resistors | 120Ω 1/4 watt | 2 |
| Potentiometer 5k | 1 | |
| Capacitors | Electrolytic 4700uF 35V, 47uF 35V, 100uF 35V | 1 each |
| Ceramic 0.1uF | 2 | |
| Semiconductors | Voltage Regulator IC LM350 | 1 |
| Bridge Rectifier 6A4 | 4 | |
| Diodes 1N4007 1000V 1A | 3 | |
| On-Off Switch or SPST | 1 | |
| Fuse 0.5A to 1A | 1 | |
| Transformer Primary 110V / 220V AC Input, Secondary 0-18V or 0-21V 3A | 1 |
First, AC mains supply goes to the transformer and this transformer reduces 230V AC to 18V AC.
Then bridge rectifier converts AC to DC and this DC has ripple where capacitor C1 filters this ripple.
Also C2 capacitor removes high frequency noise.
Now DC goes to LM350 IC input pin and then this LM350 regulates voltage at output.
Resistors R1 and R2 set output voltage and when preset changes this output voltage changes.
Diode D1 protects regulator from reverse current and diodes D6 and D7 protect from capacitor discharge and short circuit.
Capacitor C3 improves ripple rejection, C4 and C5 improve stability and finally regulated DC comes at Vout.
How to Build:
To build a 1.25V to 25V Adjustable Power Supply Circuit with IC LM350 follow the below connection steps:
- Start the circuit first by collecting all the circuit parts
- Connect input pin of IC1 to unregulated DC input of bridge diodes
- Connect adj pin of IC to the output pin of IC
- Connect the output pin of IC to Vout of 1.25V to 25V.
- Connect capacitors C1 and C2 in parallel between positive of bridge rectifier and input pin of IC.
- Connect bridge rectifier two pin at secondary pin of transformer and negative pin of bridge goes to GND.
- Connect both the primary pin of of transformer 110/220V AC input through on-off switch and fuse in parallel.
- Connect a protection diode D5 cathode from input pin and anode to output pin of IC.
- Connect resistor R1, R2 and VR1 in series from output pin of IC and GND.
- Connect capacitor C3 positive from adj pin and GND.
- Connect diode D6 cathode from output pin of IC and anode pin goes between resistor R2 and VR1 and adj pin of IC.
- Connect diode D7 cathode from output pin of IC and anode goes to GND.
- And finally, connect capacitor C4 and capacitor C5 in parallel from output pin of IC and GND.
Conclusion:
To conclude, this 1.25V to 25V Adjustable Power Supply Circuit with IC LM350 is simple and powerful.
The circuit gives stable DC output, its voltage can adjust easily and also it supports high current up to 3A.
With proper heat sink the performance of the IC is reliable.
Therefore, it is best choice for variable power supply project, as it is useful for lab use, battery charging and DIY electronics work.