Interfacing a 7-Segment Display Circuit with Arduino UNO is small electric part which shows numbers, also it have 7 LEDs inside and makes shapes for numbers and some letters.
We can also connect it to Arduino and then it tells what number to show, as this article teaches how to connect 7-segment to Arduino UNO and show numbers.
Furthermore, it is cheap way to show numbers where we can see it on counters or shop signs.
Hence, to show letters or symbols we need costly LCD screen, so people use 7-segment only for simple number display.
Arduino Code:
#define a 2
#define b 3
#define c 4
#define d 5
#define e 6
#define f 7
#define g 8

void setup() {
  pinMode(a, OUTPUT);
  pinMode(b, OUTPUT);
  pinMode(c, OUTPUT);
  pinMode(d, OUTPUT);
  pinMode(e, OUTPUT);
  pinMode(f, OUTPUT);

  pinMode(g, OUTPUT);
}

void loop() {
  displayNumber(0);
  delay(1000);
  displayNumber(1);
  delay(1000);
  // ... other numbers
}

void displayNumber(int num) {
  // Code to set pins based on the desired number
}
Code Explanation:
- Pin definitions say which pin goes to which part of display.
- Setup make those pins work as output.
- Loop keep running and show numbers again and again.
- Display number take number and turn ON right pins to show it on display.
Circuit Working:
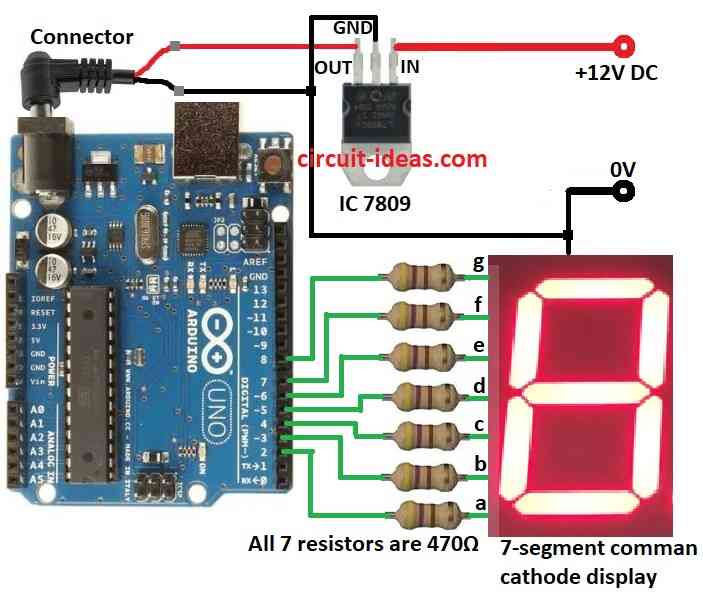
Parts List:
| Components | Quantity |
|---|---|
| Resistors | |
| 470Ω 1/4 watt | 7 |
| Semiconductors | |
| Arduino UNO | 1 |
| IC 7809 | 1 |
| 7-segment common cathode display | 1 |
In this article the code goes through many numbers and use display number for each, also inside display number it control which parts of display turns ON.
Different number need different part ON or OFF and if we want to show 0 to 9 on 7-segment display then:
Code tell Arduino to go from number 0 to 9 and for each number it uses display number function.
Inside that it decide which lights (segments) must be ON or OFF, then it turn ON the right lights to show that number.
How to Build:
To build a Interfacing a 7-Segment Display Circuit with Arduino UNO we need to follow the below mentioned steps for connections:
- First, connect common cathode of 7-segment display to ground.
- Then connect segments a, b, c, d, e, f, g to Arduino pins using 470 ohm resistors.
- Finally, use 7809 IC to give stable 9V DC power to Arduino.
Conclusion:
To conclude, this project for Interfacing a 7-Segment Display Circuit with Arduino UNO is good for beginners and it helps to learn how to use Arduino with 7-segment display.
Also, it give strong base to understand digital electronics and microcontroller coding and then later we can make things like counters, displays and digital clocks.
Leave a Reply