Anyone want to check speed of bike, car or any moving vehicle?
So with Arduino and GPS module we can make small but cheap DIY speedometer, as this project for Arduino GPS Based Speedometer Circuit is easy and fun; also it shows real-time speed on LCD using GPS satellite data.
This project requires only an Arduino, a GPS module and an LCD, not large or complex sensors.
The GPS module provides speed data and we can view the speed anytime and anywhere when it receives a clear signal from the sky.
Arduino Code:
#include <SoftwareSerial.h>
#include <TinyGPS++.h>
#include <Wire.h>
#include <LiquidCrystal_I2C.h>

TinyGPSPlus gps;
SoftwareSerial gpsSerial(4, 3); // RX, TX
LiquidCrystal_I2C lcd(0x27, 16, 2); // I2C address 0x27, 16x2 LCD

void setup() {
  Serial.begin(9600);
  gpsSerial.begin(9600);
  lcd.init();
  lcd.backlight();
  lcd.print("Speedometer");
}

void loop() {
  while (gpsSerial.available() > 0) {
    gps.encode(gpsSerial.read());
    if (gps.speed.isUpdated()) {
      float speed = gps.speed.kmph();
      lcd.setCursor(0,1);
      lcd.print("Speed: ");
      lcd.print(speed);
      lcd.print(" km/h ");
    }
  }
}
Code Explanation:
- The coding part is very simple.
- We uses TinyGPS++ library to read GPS data and get speed.
- SoftwareSerial helps Arduino talk to GPS on different pins.
- LiquidCrystal library shows speed on 16×2 LCD.
- Arduino first reads GPS data all the time.
- If GPS gives new speed then Arduino change it to km/h and print on LCD.
- Code runs in loop, so speed updates real-time.
Circuit Working:
Parts List:
| Components | Quantity |
|---|---|
| Arduino Nano | 1 |
| NEO6M GPS Module | 1 |
| 1.3 inch I2C OLED display | 1 |
| Adapter power supply | 1 |
The circuit is very simple and Arduino is the main brain in this circuit and GPS module gets satellite signals and sends location data to Arduino.
Then Arduino calculates speed from the change in GPS coordinates using TinyGPS++ library and the I2C LCD shows speed in km/h.
No extra sensors needed because GPS gives both location and speed and then Arduino reads GPS data and calculates speed and then sends speed to LCD to display.
GPS module receives latitude and longitude from satellites and Arduino reads this data continuously and also Arduino calculates speed in km/h using TinyGPS++.
Also, a I2C LCD shows real-time speed updating every second or faster depending on GPS signal.
This project works anywhere outside with clear sky, because GPS needs direct satellite signals and we can also add LED or buzzer to alert if speed is high.
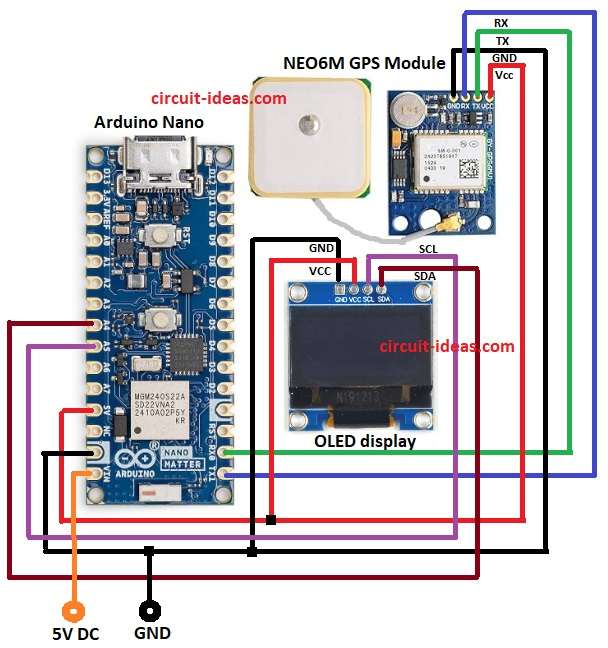
How to Build:
To build a Arduino GPS Based Speedometer Circuit follow the below steps for connections:
- First, take all parts as from circuit diagram.
- Connect GPS module pin VCC to Arduino 5V.
- Connect GPS module pin GND to Arduino GND.
- Connect GPS module pin TX to Arduino RX or RX0.
- Connect GPS module pin RX to Arduino TX or TX1.
- Connect OLED display pin VCC to Arduino 5V.
- Connect OLED display pin GND to Arduino GND.
- Connect OLED display pin SCL to Arduino A5.
- Connect OLED display pin SDA to Arduino A4.
- Connect power – to Arduino GND.
- Connect power + to Arduino VIN.
Conclusion:
To conclude, this is a simple Arduino GPS Based Speedometer Circuit, it shows real-time speed on LCD using GPS satellite data.
Moreover, the circuit is small, cheap and easy to build and is perfect project for learning electronics and Arduino.
Therefore, ride safe and check speed anytime!
Leave a Reply