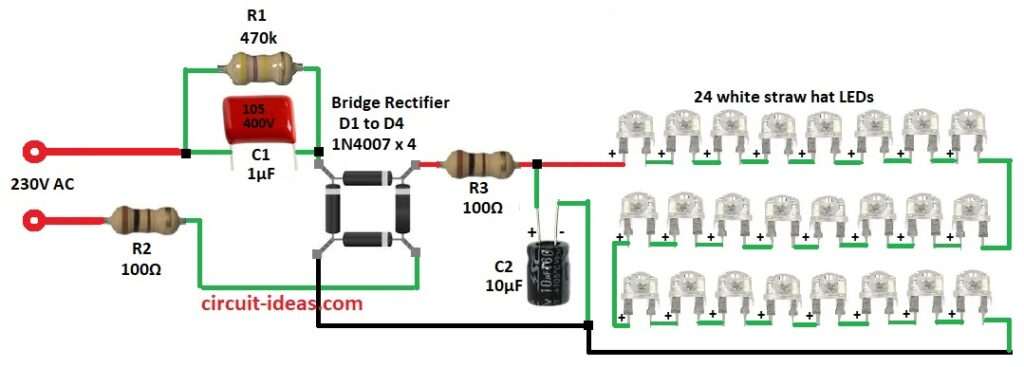
This is Simple AC Mains Powered LED Night Light Circuit which runs on AC mains power 230V.
With no big transformer needed.
It can light 24 bright white LEDs with each takes 50mA current.
It is small, cheap and good for night room light.
Circuit uses capacitor power supply, bridge rectifier and filter capacitor to power LEDs well.
Circuit Working:

Parts List:
| Component Type | Value / Specification | Quantity |
|---|---|---|
| Resistors | 470k 0.25W | 1 |
| 100Ω 0.5W | 2 | |
| Capacitors | PPC 1µF 400V | 1 |
| Electrolytic 10µF 160V | 1 | |
| Semiconductors | Bridge Rectifier 1N4007 400V 1A | 1 |
| White Straw Hat LEDs | 24 |
Circuit use capacitive power supply idea.
Capacitor C1 drop AC current with low power loss.
Bridge rectifier D1 to D4 with 400V 1A can change AC to DC.
Capacitor C2 smooth DC for stable power.
Resistors R1 and R2 limit big current when power is ON and protect parts.
24 bright white LEDs in series are parallel to get right voltage and current.
Formulas with Calculations:
Formulas and calculation for LED night light circuit:
Current limit by capacitor:
Capacitive reactance:
Xc = 1 / (2 × π × f × C1)
= 1 / (2 × 3.1416 × 50Hz × 1µF)
= 3180 ohms
Mains voltage = 230V AC
Current:
I = V / Xc = 230V / 3180Ω = 72mA
This current goes to whole circuit.
LED voltage drop:
Each white LED use 3.2V drop.
8 LEDs in series = 8 × 3.2V = 25.6V
There are 3 such branches in parallel sharing current.
How to Build:
To build a Simple AC Mains Powered LED Night Light Circuit following steps are required to be followed:
- Gather all the parts as shown in circuit diagram
- Take bridge rectifier pins D1 to D4.
- Connect one pin of bridge rectifier to one end of resistor R1 and capacitor C1 both in parallel.
- Connect other ends of R1 and C1 to 230V AC.
- Connect second pin of bridge rectifier to resistor R3.
- Connect third pin of bridge rectifier to 230V AC through resistor R2.
- Connect fourth pin of bridge rectifier to negative of capacitor C2.
- Connect positive of C2 to one end of resistor R3.
- From positive of C2 connect 24 white LEDs.
- LED anode goes to positive and cathode to negative GND.
Conclusion:
This Simple AC Mains Powered LED Night Light Circuit requires no transformer, so it saves energy and makes a smart design.
Circuit is good for night light and decoration.
With no heavy transformer the circuit is light and cheap.
References:
How does this circuit, from an LED night light, work? [duplicate]
Leave a Reply