• Skip to primary navigation
  • Skip to main content
  • Skip to primary sidebar

Circuit Ideas for You

Get free circuit ideas online.

  • Home
  • Privacy Policy
  • About
Home » Cricket Stumps and Bails LED Indicator Circuit

Cricket Stumps and Bails LED Indicator Circuit

Last updated on 26 August 2025 by Admin-Lavi Leave a Comment

In cricket stumps with flashing LED are used.

They glow when ball hits the stumps.

This project is for Cricket Stumps and Bails LED Indicator Circuit

It uses light sensor and LM3909 IC.

Power comes from small 3V coin cell.

It is low cost and is easy to build.

Circuit Working:

Working of Bails LED Flasher Circuit:
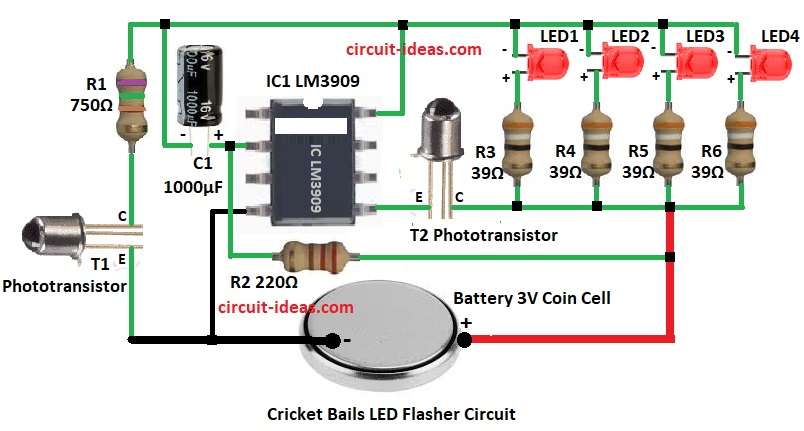
Cricket Bails LED Flasher Circuit Diagram

Parts List:

Component TypeValueQuantity
Resistors750Ω 1/4 watt1
220Ω 1/4 watt1
39Ω 1/4 watt4
Capacitor Electrolytic 1000µF 16V1
SemiconductorsIC LM39091
Phototransistor2
LED Red 5mm 20mA4
Battery 3V Coin Cell1

This circuit also uses IC1 LM3909 but has two Phototransistor sensors T1 and T2.

Both sensors work together for better detection.

When bail moves or light changes then sensors conduct.

Conduction signal goes to IC1 input.

IC1 makes four LEDs blink alternately.

LEDs connected with resistors for current limit.

Red LEDs flash bright to show bail is disturbed.

Battery 3V gives supply with small size fits inside bail.

Working of Stumps LED Flasher Circuit:
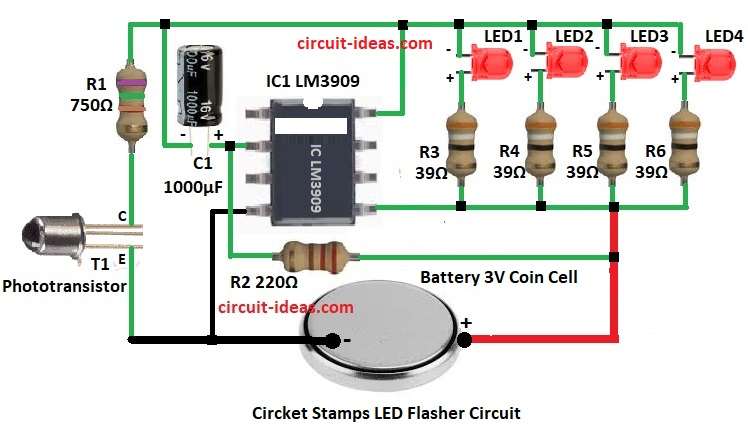
Cricket Stumps LED Flasher Circuit Diagram

This circuit uses IC1 LM3909 and one Phototransistor sensor.

When ball hits the stump the sensor detects change in light.

Sensor transistor conducts and gives input to IC1.

IC1 is LED flasher IC and it makes LEDs blink.

Four red LEDs glow through resistors.

Flash effect happens quickly so stump looks bright.

Power comes from 3V battery.

Circuit is very small and can fit inside the stump.

How to Build:

To build a Cricket Stumps and Bails LED Indicator Circuit follow the below mentioned steps for connection:

  • Collect all parts shown in circuit diagram.
  • Pin 2 of IC1 connect to positive of capacitor C1.
  • Negative of C1 connect to IC1, LED cathode and resistor R1.
  • Pin 4 of IC1 connect to negative of 3V battery.
  • Pin 5 of IC1 connect to one side of sensor T2.
  • Other side of T2 connect to LED anode.
  • Pin 8 of IC1 connect to LED cathode.
  • Sensor T1 one side connect to resistor R1.
  • Other side of T1 connect to negative of 3V battery.

References:

What’s the circuitry work behind the glowing LED stumps used in cricket?

Filed Under: LED and Lamps

About Admin-Lavi

Lavi is a B.Tech electronics engineer with a passion for designing new electronic circuits. Do you have questions regarding the circuit diagrams presented on this blog? Feel free to comment and solve your queries with quick replies

Previous Post: « Simple LED Heart Blinker Circuit with IC 555 Timer

Reader Interactions

Leave a Reply Cancel reply

Your email address will not be published. Required fields are marked *

Primary Sidebar


Categories

  • Alarm Circuits (32)
  • Amplifier Circuits (67)
  • Arduino Projects (30)
  • Audio Circuits (93)
  • Automobile Circuits (19)
  • Battery Charger Circuits (48)
  • Free Energy (13)
  • Heater and Temperature Controllers (9)
  • High Voltage (1)
  • Indicator Circuits (38)
  • Inverter Circuits (13)
  • LDR Circuits (15)
  • LED and Lamps (116)
  • Meters and Testers (28)
  • Motor Controllers (18)
  • Oscillator Circuits (33)
  • Power Supply Circuits (92)
  • Remote Control Circuits (6)
  • Security and Protection (24)
  • Sensors and Detectors (75)
  • Solar Circuits (16)
  • Timer Circuits (30)
  • Transistor Circuits (56)
  • Transmitter Circuit (12)
  • Tutorials (4)
  • Water Level Controller (4)

Recent Posts

  • Cricket Stumps and Bails LED Indicator Circuit
  • Simple LED Heart Blinker Circuit with IC 555 Timer
  • Digital Display AC Line Tester Circuit
  • 555 IC Based Schmitt Trigger Circuit
  • Simple Wire Loop Security Alarm Circuit

Recent Comments

  1. Admin-Lavi on Constant Voltage, Constant Current Battery Charger Circuit
  2. Bill on Constant Voltage, Constant Current Battery Charger Circuit
  3. Admin-Lavi on Long Range FM Transmitter Circuit (2km)
  4. Sina on Long Range FM Transmitter Circuit (2km)
  5. Admin-Lavi on Long Range FM Transmitter Circuit (2km)

Copyright © 2025 | New Circuit Ideas