In many homes and industries sometimes a fan does not turn ON immediately, here, a fan start delay timer is a circuit that delays the fan start.
When we apply power, the fan remains OFF for approximately 10 seconds and then turns ON automatically.
Also, we can easily adjust the delay time if required. This feature helps protect devices and supports automation systems.
The circuit does not use any ICs; instead, it uses transistors and other basic components; it operates from a 12 V DC input supply, and its simple design makes this 10-Second Fan Start Delay Timer Circuit inexpensive and easy to build.
Circuit Working:
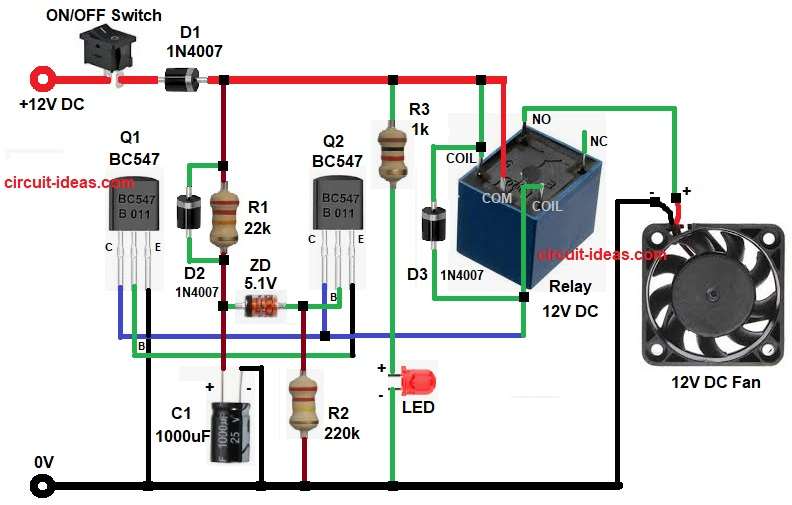
Parts List:
| Components | Values | Quantity |
|---|---|---|
| Resistors | 22k, 220k, 1k | 1 each |
| Capacitor | Electrolytic 1000uF 25V | 1 |
| Semiconductors | Transistors BC547 | 2 |
| 5mm Red LED | 1 | |
| Diodes 1N4007 | 3 | |
| Zener Diode 5.1V 1N751 | 1 | |
| Relay 12V DC | 1 | |
| ON/OFF Switch | 1 | |
| Power Supply 12V DC | 1 | |
| 12V DC Fan | 1 |
First, turn ON switch S1 to apply 12 V DC to the circuit, then initially, capacitor C1 holds no charge , causing transistor Q2 to remain OFF .
Because of this the transistor Q1 also remains OFF and therefore, the relay stays OFF and hence the fan connected to the relay remains OFF.
Now slowly capacitor C1 starts charging and it charges through resistor R2 and this charging takes time and this time decides the delay period.
After some seconds the voltage across C1 increases and when it reaches about 5.1V Zener diode conducts and then the base current flows into transistor Q2 and as a result, Q2 turns ON.
After that the transistor Q1 also turns ON and then the relay energizes; so the relay contacts switch and finally the fan turns ON after 10 seconds delay.
Meanwhile, the diode D3 protects the transistor from relay back EMF and LED1 shows power or working status.
How to Build:
To build a Fan Start 10 Second Delay Timer Circuit follow below steps for connection:
- First, assemble all the parts as shown in circuit diagram.
- Next, transistor Q1 BC547 emitter pin connected to ground, base pin connected to emitter of Q2 and collector pin connected to collector of Q2.
- Then transistor Q2 BC547 emitter pin connect to base of Q1, base pin connected to Zener diode and resistor R2 and collector pin connected to collector of Q1.
- Also, 12V relay one coil pin connected to 12V supply and other coil pin connect to collector of Q1 and Q2.
- After that, capacitor C1 positive end connect to R2 and ZD1 junction and negative connect to Ground.
- Now LED1 and R3 connected as power indicator.
- Finally, diode D1 and switch connected from 12V power supply and diode D2 and R1 connected in parallel.
Conclusion:
Overall, this Fan Start 10 Second Delay Timer Circuit is very useful, it is simple and effective and uses only transistors and basic components.
In addition, beginners and students can easily adjust the delay time and build this circuit; furthermore, they can also use it for both learning and practical applications.

Leave a Reply