This is a small DIY Solar Battery Charger Circuit project.
It charges one 3.7V lithium battery using sunlight.
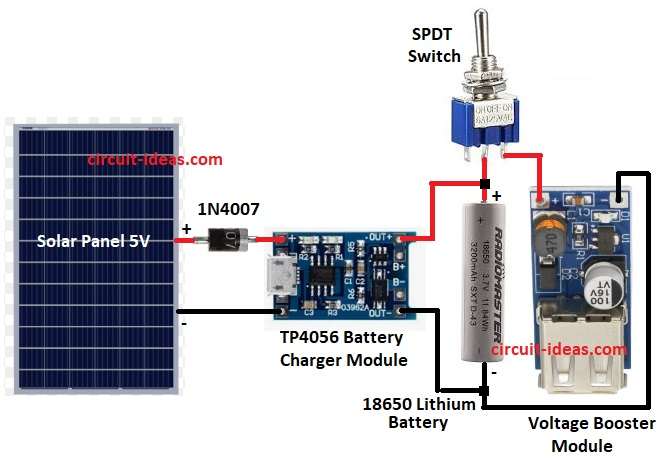
We can use solar cell, TP4056 charger board, one diode, one switch and one boost converter module..
This circuit make 5V power for battery and mobile charging.
Graph for lithium battery charge over time:
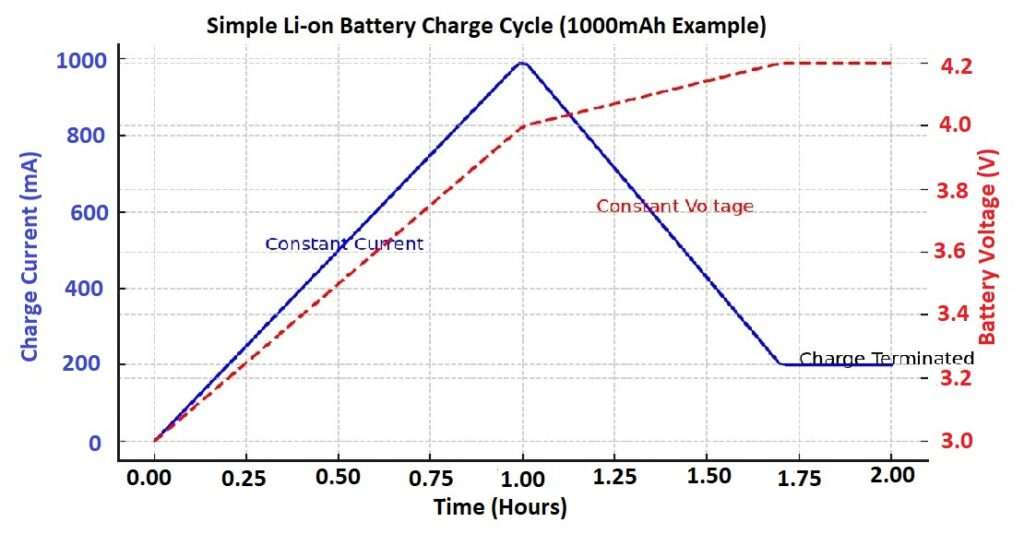
This graph show how lithium battery charge over time.
At start the battery take high current and voltage go up slowly, this is constant current stage.
When voltage reach around 4.2V, charger hold voltage steady and current start to go down and this is constant voltage stage.
When current drop very low then charging stops and charge gets terminated.
This is how TP4056 or other Li-ion charger work safely to charge 3.7V battery.
Circuit Working:
Parts List:
| Component Name | Quantity |
|---|---|
| TP4056 Battery Charger Module | 1 |
| 18650 Lithium Battery | 1 |
| SPDT Switch | 1 |
| 1N4007 Diode | 1 |
| Solar Panel 5V | 1 |
| Voltage Booster Module | 1 |
Solar panel make electricity from sunlight.
Diode stop battery power go back to panel at night.
TP4056 board charge the 18650 battery safe.
SPDT switch control charge or use mode.
Voltage booster take 3.7V from battery and make 5V for mobile or USB device.
How to Build:
To build a DIY Solar Battery Charger Circuit follow the below steps for connections:
- Assemble all the parts as shown in circuit diagram
- Solar cell positive connect to diode anode.
- Diode cathode connect to TP4056 IN+.
- Solar cell negative connect to TP4056 IN-.
- TP4056 OUT+ connect to battery positive.
- TP4056 OUT- connect to battery negative.
- Switch middle pin connect to battery positive.
- Other side of switch go to boost converter input +.
- Boost converter input – connect to battery negative.
Conclusion:
This DIY Solar Battery Charger Circuit is simple and cheap.
It is good to learn small solar project.
We can use it to charge phone, light or small gadget from sun.
It is safe to use and nice for beginner people.
Leave a Reply