Amplifiers are super important in audio systems because they provide the power needed to make speakers work well while keeping the sound quality high.
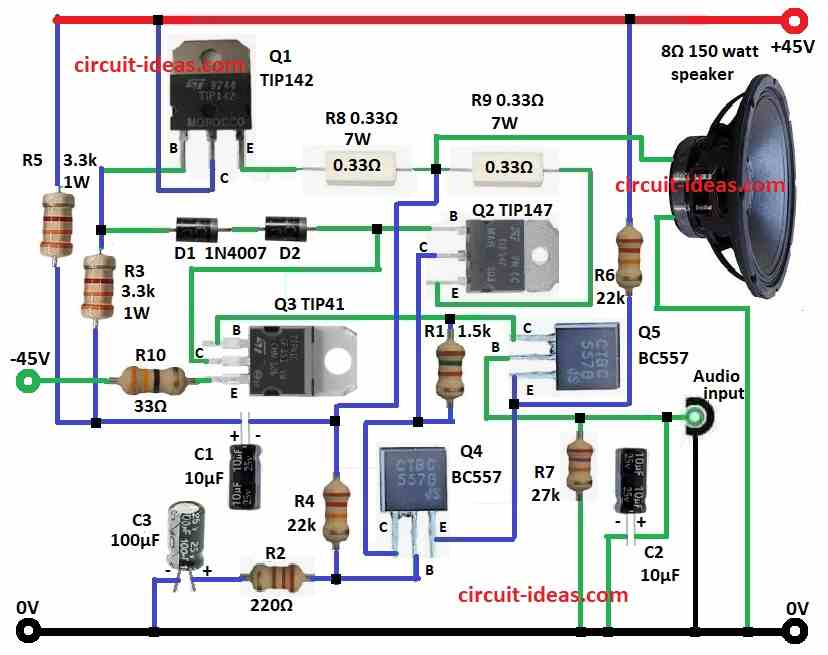
This specific audio amplifier circuit can output 150 Watts and is cleverly built using two Darlington power transistors the TIP142 and TIP147.
It is a great choice because it is efficient and affordable especially for an 8 ohm speaker.
The simple design and use of easy to find parts make it a fantastic option for DIY fans and electronics lovers.
Circuit Working:

Parts List:
| Component Type | Specification | Quantity |
|---|---|---|
| Resistors | 1.5k | 1 |
| 27k | 1 | |
| 220Ω | 1 | |
| 33Ω | 1 | |
| 22k 1/4 Watt | 2 | |
| 3.3k 1 Watt | 2 | |
| 0.33Ω 7 Watt | 2 | |
| Capacitors | Electrolytic 10μF, 25V | 2 |
| Electrolytic 100μF, 25V | 1 | |
| Semiconductors | Transistor TIP142 | 1 |
| Transistor TIP147 | 1 | |
| Transistor TIP41 | 1 | |
| Transistor BC557 | 2 | |
| Diode 1N4007 | 2 | |
| Speaker | 8Ω 15 Watt | 1 |
The circuit diagram includes several important parts like transistors TIP142, TIP147, TIP41, and BC557 as well as resistors, capacitors, diodes and a speaker.
This design uses a complementary Darlington pair setup which helps to boost the current significantly and create a clear audio output.
The audio signal enters the circuit through the Audio IN input.
Capacitor C2 plays a key role by blocking any direct current DC so that only the alternating current AC signal can pass through.
Next the audio signal goes to transistor Q5 that acts as a preamplifier.
Its job is to increase the weak audio signal to a stronger level for the next stages.
The boosted output from Q5 is sent to Q4, which powers the base of the Darlington pair made up of Q1 TIP142 and Q2 TIP147.
These transistors are crucial for amplifying the audio signal at a high power level.
In this setup TIP142 handles the positive part of the audio wave, while TIP147 manages the negative part.
To keep the current flowing steadily and prevent overheating resistors R8 and R9 are included in the design.
The arrangement of resistors and capacitors is vital for ensuring proper biasing and stability.
Resistors R1 and R2 help set the biasing conditions for transistors Q4 and Q5.
Additionally, feedback is provided by resistor R7 improving the amplifiers linearity and reducing distortion.
The circuit is powered by a dual power supply that provides +45V and -45V.
Formulas with Calculations:
Below mentioned working can be used to design a Simple 150 Watt Audio Amplifier Circuit using Transistors
Output Power:
The RMS power delivered to the load is calculated using:
P = Vpeak2 / 2R
where,
- Vpeak is the peak voltage swing
- R is the load resistance for 8Ω speaker
Power Dissipation in Resistors:
The power dissipated in R8 and R9 is given by:
PR = I2R
where,
- I is the current through the resistors.
Frequency Response:
The cutoff frequency of the coupling capacitors is:
fc = 1 / 2πRC
For C2 10µF and R7 27k :
fc = 2π × 27,000 × 10 × 10 − 61 = 0.59Hz
This ensures good low frequency response.
How to Build:
To build a Simple 150 Watt Audio Amplifier Circuit using Transistors follow the below mentioned steps for connections:
- Gather all the components as mentioned in the above mentioned circuit diagram.
- Connect base of transistor Q1 to diode D1 and D2 through the base of transistor Q2, connect the collector of transistor Q1 to positive supply of +45V, connect the emitter of transistor Q1 to Q2 emitter through resistors R8 and R9.
- Connect the base of transistor Q2 to base of transistor Q1, connect the collector of transistor Q2 to collector of transistor Q4 and connect the emitter of transistor Q2 to emitter of transistor Q1.
- Connect the base of transistor Q3 to the collector of transistor Q5, connect the collector of transistor Q3 to base of transistor Q2 and connect the emitter of transistor Q3 to -45V through resistor R10.
- Connect the base of transistor Q4 between resistors R4 and R2 and capacitor C3 in series to GND, connect the collector of transistor Q4 to collector of transistor Q5 through resistor R1, connect the emitter of Q4 transistor to emitter of Q5.
- Connect the base of transistor Q5 to audio input through capacitor C2, connect a resistor R7 between base of transistor Q5 and capacitor C2 to GND.
- Connect a resistor R6 from emitter of Q5 to positive supply of +45V.
- Connect a 8Ω speaker positive end between resistor R8 and R9 and GND.
- Connect capacitor C1 between the junctions of resistors R5, R3 and junction of R8, R9, R4.
- Connect the other end of R5 resistor to positive supply.
Conclusion:
This Simple 150 Watt Audio Amplifier Circuit using Transistors delivers great sound quality for medium power audio uses.
It has a simple design and strong parts which help it work efficiently with very little distortion.
Good heat management and testing make sure it runs well for a long time.
This amplifier is ideal for home audio setups, DIY projects and educational activities.
You can try out various input sources and speakers to get the best performance.
Leave a Reply