Imagine we have a phone battery but how long does it really last?
This Simple Li-ion Battery Capacity Tester Circuit is like a battery health checker.
It shows how much power our Li-ion battery like in phones or laptops can still hold.
It helps us know if the battery is getting weak and needs change.
This circuit is very useful because old batteries lose power and make our device die faster.
Circuit Working:
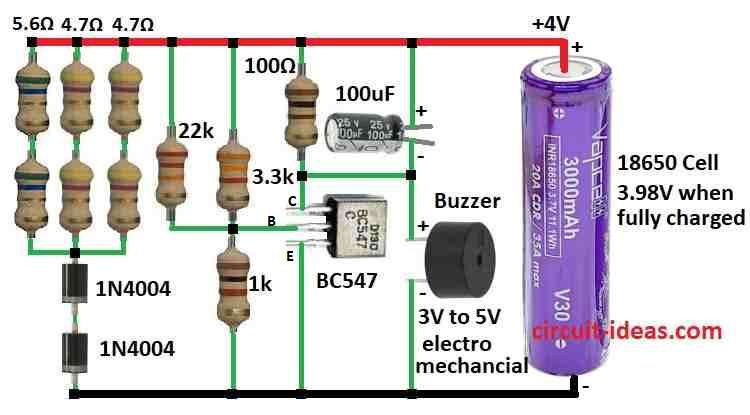
Parts List:
| Component | Description | Quantity |
|---|---|---|
| Resistors | All resistors are 1/4 watt unless specified | |
| 1k | 1 | |
| 100Ω | 1 | |
| 3.3k | 1 | |
| 22k | 1 | |
| 4.7Ω | 4 | |
| 5.6Ω | 2 | |
| Capacitors | ||
| Electrolytic 100µF 25V | 1 | |
| Semiconductors | ||
| Transistor BC547 | 1 | |
| Diodes 1N4004 | 2 | |
| Buzzer 3V to 5V | 1 | |
| Cell 18650 | 1 |
This circuit checks how much power a rechargeable battery really has, which is very important because many fake batteries like Ultrafire exist.
Ultrafire cells weigh only 30g which is too light for a real 6Ah battery.
Our test showed the cell had less than 0.5Ah which is clearly fake.
To use this tester we need a simple parts like resistors and diodes.
These act as a load for draining the battery at about 600mA or 2.4W.
Together resistors and diodes can handle up to 2.5W.
As the battery drops from 4V to 2V the current and voltage also drop.
We can check current by measuring voltage across resistors but do not use an ammeter it lowers the current too much.
Also avoid jumper wires as they drop about 350mV.
We can change the load by just ensuring that parts do not get too hot.
A buzzer beeps when battery voltage hits 2V.
If using another transistor then adjust the resistors so it still detects 2V correctly.
Some BC547 transistors differ by up to 200mV.
Our fake test battery lasted less than 2 hours.
Some fakes weigh just 28g they have a tiny cell inside.
When charging Li-ion batteries always use a charger that stops at 4.2V.
Never charge with a variable power supply without watching the voltage which can overcharge and damage the battery.
Formulas:
In this circuit we CAN check a lithium-ion batteries capacity using this formula:
Capacity (mAh) = Discharge Current (mA) × Discharge Time (Hours)
What it means:
Capacity is how much charge the battery can store.
Discharge current is how much current the circuit pulls from the battery.
Discharge time is how long the battery takes to fully drain at that current.
Important circuit parts:
Resistor 3.3kΩ Controls the discharge current.
We can find the current using ohms law to measure the voltage across the resistor.
Circuit does not measure time by itself.
We have to watch the battery voltage and check how long it takes to drop to about 3V.
Keep in mind:
This simple tester is not very accurate.
For better results use a more advanced tester.
Always be safe with lithium-ion batteries.
Discharge in a fireproof box and at a safe current based on batteries details.
How to Build:
To build a Simple Li-ion Battery Capacity Tester Circuit follow the below mentioned steps:
Load Circuit:
- Use resistors to make a load to drain the Li-ion battery.
- Make the load adjustable for different test speeds.
- Use transistors to control the load.
- Transistors must handle the current safely.
Voltage Measurement:
- Use resistor voltage divider to reduce battery voltage.
- Send this lower voltage to op-amp set as voltage follower.
- This gives a stable reading for the comparator.
- Use LCD or LED to show battery voltage and said capacity.
- Use buttons to start/stop test and choose different loads.
Assembly:
- Build the circuit on a breadboard or PCB as per diagram.
- Check all connections and stay safe with Li-ion batteries.
- Connect a 18650 battery to the circuit.
- Adjust load and reference voltage as needed.
- Start test and watch display for battery details.
Adjustment:
- Fine-tune load and voltage reference to get better accuracy.
After Testing:
- When test is done disconnect the battery.
- Turn OFF all parts of the circuit.
Note:
- This project needs basic electronics skill.
- Ask someone with experience if anyone is not sure.
Conclusion:
A Simple Li-ion Battery Capacity Tester Circuit helps check battery health and capacity.
It discharges battery at set speed and shows voltage.
If built well it can help us to use our batteries better and longer.
Leave a Reply