Make our Lights Dance with Sound!
This Sound Activated LED Circuit with Arduino turns every clap, snap or beat into a colorful light show.
It is a fun and easy project that brings sound and LEDs to life.
Perfect for beginners who want to see their music or sounds in action!
Circuit Coding:
int soundSensor = A0;
int ledPins[] = {2,3,4,5,6};
int sensorValue = 0;

void setup() {
for(int i=0; i<5; i++) {
pinMode(ledPins[i], OUTPUT);
}
pinMode(soundSensor, INPUT);
Serial.begin(9600);
}

void loop() {
sensorValue = analogRead(soundSensor);
Serial.println(sensorValue);
if(sensorValue > 400) {
for(int i=0; i<5; i++) {
digitalWrite(ledPins[i], HIGH);
}
} else {
for(int i=0; i<5; i++) {
digitalWrite(ledPins[i], LOW);
}
}
}
Coding Explanation:
- Variable soundSensor store A0 pin.
- Array ledPins store LED pins.
- Setup function set LED pins output, sensor pin input.
- Loop read analog value from sensor.
- If value is more than 400 then all LEDs ON.
- Else all LEDs are OFF.
- Serial print show sensor values for testing.
Circuit Working:
Parts List:
| Component | Quantity |
|---|---|
| Resistors | |
| 220Ω 1/4 watt | 5 |
| Semiconductors | |
| Arduino UNO | 1 |
| Sound Sensor Module | 1 |
| LEDs any 5mm 20mA | 5 |
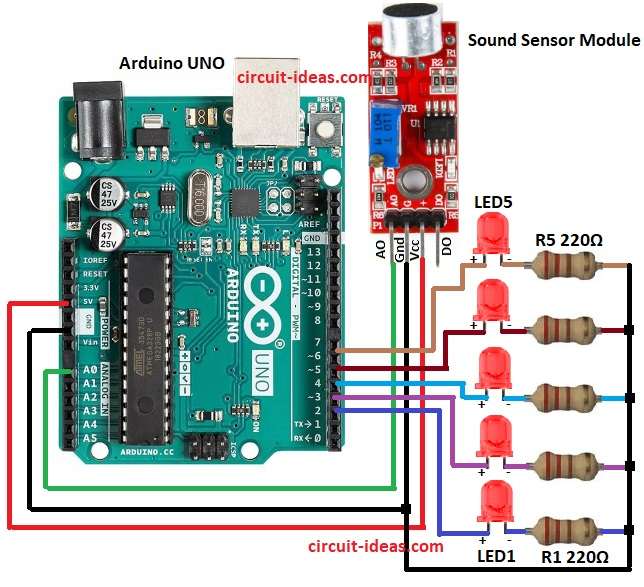
Sound sensor get power from Arduino 5V and GND.
Sensor detect sound and send signal to Arduino A0.
Arduino read signal and turn ON/OFF LEDs on pins D2 to D6.
Each LED need resistor from R1 To R5 to protect from too much current.
When sound is loud then more LEDs light up.
Circuit is simple with no button and no switch.
How to Build:
To build a Sound Activated LED Circuit with Arduino follow the below mentioned steps for connections:
- Take all parts same as circuit diagram.
- Sound sensor VCC go to Arduino 5V.
- Sound sensor GND go to Arduino GND.
- Sound sensor OUT go to Arduino A0.
- LEDs connect to Arduino pins D2, D3, D4, D5, D6 with resistors R1 to R5.
- Each LED anode go to Arduino pin.
- Each LED cathode go to GND through resistor.
Conclusion:
Sound Activated LED Circuit with Arduino is simple project.
It shows sound control LEDs.
Same idea can be used for fan, light, motors.
Circuit is easy to make and is good for beginners.
References:
How to connect an ultrasonic sensor and a sound sensor on one breadboard