Think like music have one volume knob, range that is dynamic? it is how far volume go from very soft to very loud.
Here, Audio Compressor Circuit does this job it move knob by itself and when sound is too loud it make little lower and when it is too quiet it push it little louder.
So all sound come more same level which is not too loud not too soft, it is also good for music or sound where volume go up-down too much.
Circuit Working:
Parts list:
| Components | Quantity |
|---|---|
| Resistors (All resistors are 1/4 watt unless specified) | |
| 10k | 1 |
| 100k | 1 |
| 5.6k | 1 |
| 12k | 1 |
| 220k | 1 |
| 1k | 1 |
| Capacitors | |
| Ceramic 47nF | 2 |
| Ceramic 470nF | 1 |
| Electrolytic 1µF 25V | 1 |
| Semiconductors | |
| Transistor BC547 | 2 |
| Diodes 1N4148 | 4 |
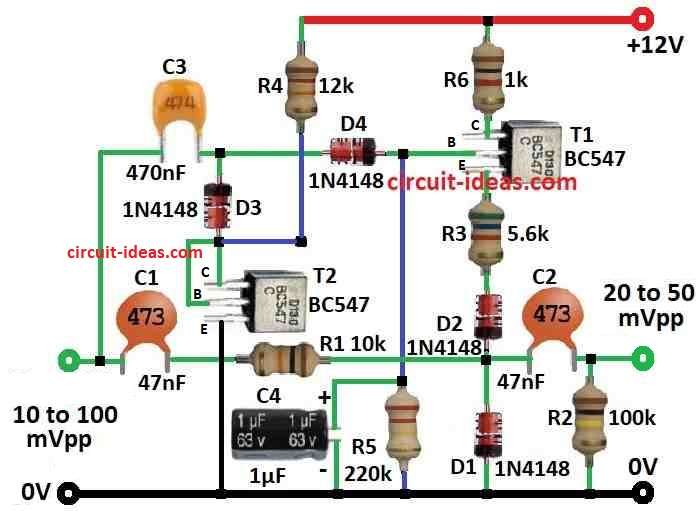
To begin with, this audio compressor circuit uses only one main part and that is T1 transistor; audio connects through C1, R1, D1 and then C2 and R3.
Also, same times small part of audio connects to D3 and D4 and these make control voltage for T1 and how fast volume fade or change? that depends on C4 and R5.
Even if audio input change a lot like 50dB the output will stay around plus minus 3dB and hence, this circuit works good in transmitter use.
Formula:
This design controls the audio signal gain based on how loud it is and this way we can make a Audio Compressor Circuit.
Also, it reduces the dynamic range and loud sound become less loud and quiet sound become little louder.
How to find Compression Ratio:
Compression ratio (R) tell us how much signal strength go down after some loud limit.
Formula is:
R = Vout / Vin
where:
- Vout is output audio level (after compression)
- Vin input audio level (before compression)
To control this ratio we can change transistor bias and feedback parts, as this circuit uses BC547 transistors and give base idea how to make audio compressor.
Furthermore, we can adjust it more for better sound or for special audio need.
How to Build:
To build a Audio Compressor Circuit follow the below steps for connections:
- First, connect audio input to capacitor C1.
- Then connect resistor R1 with C1 and C2 in line.
- After that, put diode D1 next to R1 in parallel
- Next, connect capacitor C2 with resistor R3 side by side in parallel.
- Now connect emitter of T1 to ground.
- Put resistors R3 and R5 in line in series from T1s collector to positive power.
- Also, add diodes D3 and D4 next to R5 in parallel
- Put capacitor C4 also with D3 and D4.
- Now take output from both ends of resistor R5.
- Turn ON power but check voltage and polarity first and be sure all is safe and right.
Note:
- Use correct values for components based on ones audio need and also grounding and insulation must be good to avoid noise or shock.
Conclusion:
To conclude, people often use an Audio Compressor Circuit in audio recording, mixing and broadcasting because it helps improve sound, control loud and soft parts and protect audio equipment from too much signal.
Also, people use it in musical instruments, sound systems and telecom equipment, but they must check that the sound stays clear, balanced and easy to hear.

Leave a Reply