This post shows how to make High Voltage Fence Charger Circuit, which does not cost much and is safe to stop wild animals and keep our pets inside fence.
Also, the circuit is cheap and easy to fix and is better than normal fence.
WARNING: Electric fence can kill if wrongly made, only do with adult help.
Circuit Working:
Parts List:
| Components | Values | Quantity |
|---|---|---|
| Resistors | All resistors are 1/4 watt unless specified | |
| 18k | 1 | |
| 1M | 1 | |
| 15Ω | 1 | |
| Capacitors | PPC 330nF 250V | 1 |
| Electrolytic 4700µF 16V, 1µF | 1 each | |
| Semiconductors | Diode 1N4148 | 1 |
| MOSFET IRF830 | 1 | |
| IC 555 | 1 | |
| Automobile ignition coil | 1 |
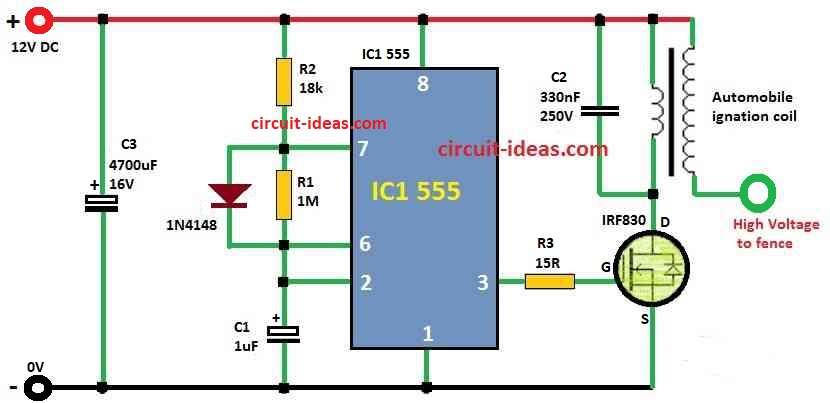
Car ignition coil connect to power and through this circuit make high voltage pulse and also 555 timer IC work in astable mode and make square wave many times.
Resistor R1 and capacitor C1 show the pulse rate; a higher R1 value slows the pulse, while C1 recite the pulses speed and power
555 timer send signal to MOSFET transistor gate, transistor like switch when is ON the high voltage pulse go from coil to fence wire.
R1, R2 and C1 help change pulse speed and power and user can change parts to fit their fence, if want stronger pulse? then use bigger transistor with more power.
Note: C2 is optional in this circuit, if circuit not work with C2, then please remove it, as circuit can work good without C2 capacitor.
How to Build:
To build a High Voltage Fence Charger Circuit follow these steps for connections:
- First, connect wires a little bit high from ground before we use wire.
- Next, take wire off ground so no we do not touch by mistake.
- Then use normal car ignition coil to make high voltage pulse.
- Also, use MOSFET transistor with 555 timer to control pulse well.
- After that, put resistor R1 to make pulse come about 1.3 times per second (1.3 Hz).
- Use resistor R2 to change how long transistor stays ON and make duty cycle near 2%.
- Also, capacitor C1 help control speed and power of pulse.
- If need more power or speed then use stronger transistor.
- If we make right this simple high voltage fence charger can give small shock with low current.
- It is not very dangerous for people or animals, but animals stay away after one painful shock.
- Finally, this circuit is good to add or replace normal fence and give more choice.
Conclusion:
At last, for High Voltage Fence Charger Circuit always remember size and what we need from electric fence change and how we should build the charger circuit.
Also, user must always stay safe when working with this kind of electric device.

where can the ground rod be connected in this circuit?
Hi etere,
Ground rod connect to the circuit GND (negative 12V) point. Drive one ground rod deep into earth and connect it to the “-” terminal of this circuit. The fence wire connect to the high voltage output from ignition coil. Animal touches fence and earth, then pulse complete through ground rod. Good earth connection is very important for proper working.
regards,
Lavi
lp.shema za elektr.pastir sa dodatnim popravcima radi savršeno stime da C2.blokira bez njega radi dobro
Zdravo,
Egidio Grzinić.
Hvala na povratnoj informaciji. Da, neki korisnici su prijavili da C2 može blokirati rad. Bez C2 sklop može raditi dobro. Hvala što ste podijelili svoj rezultat.
Srdačan pozdrav,
Lavi