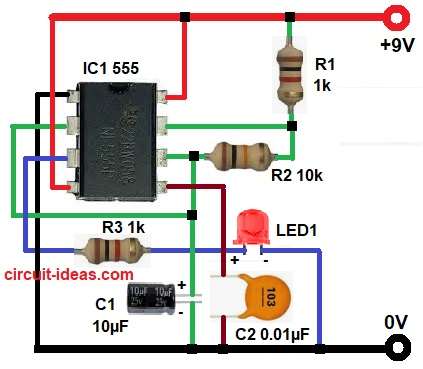
This is simple LED Blinking Circuit using 555 Timer, make LED ON and OFF again and again; its good for beginner to learn 555 timer working.
Also, it needs few parts and run from 9V battery and is easy to make and is a small fun project.
Circuit Working:
Parts List:
| Components | Values | Quantity |
|---|---|---|
| Resistors | 1k 1/4 watt | 2 |
| 10k 1/4 watt | 1 | |
| Capacitors | Electrolytic 10µF 25V | 1 |
| Ceramic 0.01µF | 1 | |
| Semiconductors | IC 555 timer | 1 |
| LED any color | 1 | |
| Power supply 9V | 1 |
To begin with, 555 timer work in astable mode in this circuit and output goes high and low again and again.
When output is high the LED is ON and when output is low then LED is OFF, furthermore, blink speed depend on resistor R1, R2 and capacitor C1.
Hence, C1 charges and discharges and make led blink fast or slow.
Formulas with Calculations:
Formula for astable mode:
Ton = 0.693 × (R1 + R2) × C1
Toff = 0.693 × R2 × C1
Total time t = Ton + Toff
Frequency f = 1 / t
Example:
R1 = 1k, R2 = 10k, C1 = 10µf
Ton = 0.076s, Toff = 0.069s
t = 0.145s, f = 6.9hz
LED blinks around 7 times per second.
How to Build:
To build a LED Blinking Circuit using 555 Timer follow the steps below for connection:
- First, take all parts same like is circuit diagram.
- Next, pin 1 goes to ground.
- After that, pin 2 trigger connect to capacitor C1.
- Then pin 3 output connect to LED by resistor R3.
- Now pin 4 reset connect to +9V and pin 5 control pin connect to capacitor C2.
- Further, pin 6 threshold join with pin 2.
- Finally, pin 7 discharge connect between resistor R1 and R2 and pin 8 Vcc connect to +9v battery.
Conclusion:
Overall, this is an easy and low cost LED Blinking Circuit using 555 Timer and by changing R2 or C1, we can change blinking speed.
Also, it is a good experiment to learn 555 timer working.

Leave a Reply