This is simple and useful mini project for Touchless Dustbin Circuit using Arduino Uno and Ultrasonic Sensor.
It is called smart dustbin or automatic dustbin.
In normal dustbin we have to touch lid by hand which is not hygienic.
In smart dustbin the lid opens automatically when person comes near.
It uses Arduino, ultrasonic sensor and servo motor.
It can be used in home, office, hospital and public places.
Code:
#include <Servo.h>

Servo servoMotor;
int trigPin = 9;
int echoPin = 10;
long duration;
int distance;

void setup() {
  servoMotor.attach(6);       // Servo signal pin connected to D6
  pinMode(trigPin, OUTPUT);   // Trig pin of ultrasonic sensor
  pinMode(echoPin, INPUT);    // Echo pin of ultrasonic sensor
  servoMotor.write(0);        // Initial position, lid closed
  delay(1000);
  Serial.begin(9600);         // For debugging
}

void loop() {
  // Send ultrasonic trigger pulse
  digitalWrite(trigPin, LOW);
  delayMicroseconds(2);
  digitalWrite(trigPin, HIGH);
  delayMicroseconds(10);
  digitalWrite(trigPin, LOW);

  // Read echo time
  duration = pulseIn(echoPin, HIGH);

  // Convert time into distance (cm)
  distance = duration * 0.034 / 2;

  Serial.print("Distance: ");
  Serial.print(distance);
  Serial.println(" cm");

  // Check if object is near (less than 10 cm)
  if (distance < 10) {
    servoMotor.write(90);   // Open lid
    delay(3000);            // Wait for 3 seconds
    servoMotor.write(0);    // Close lid
  }
}
Code Explanation:
- Ultrasonic sensor formula used as distance = (Time x Speed of Sound)/2.
- Speed of sound is approx 343 meter per second or 0.034 cm per microsecond.
- Division by 2 is because wave travel forward and backward.
- This distance value is compare with set threshold.
- Servo motor is controlled by Servo library in Arduino.
- Command servo.write(angle) move motor to set position.
Circuit Working:
Parts List:
| Component | Quantity |
|---|---|
| Arduino UNO | 1 |
| Servo Motor | 1 |
| Ultrasonic Sensor | 1 |
| 9V Battery | 1 |
Arduino UNO is the main controller.
This power supply also run servo and sensor.
The ultrasonic sensor sense distance of object.
When hand or any object comes in front of dustbin within set range then Arduino receive signal.
Arduino send command to servo motor.
Servo motor rotates and open the dustbin lid.
After some seconds servo again rotate back and closes the lid.
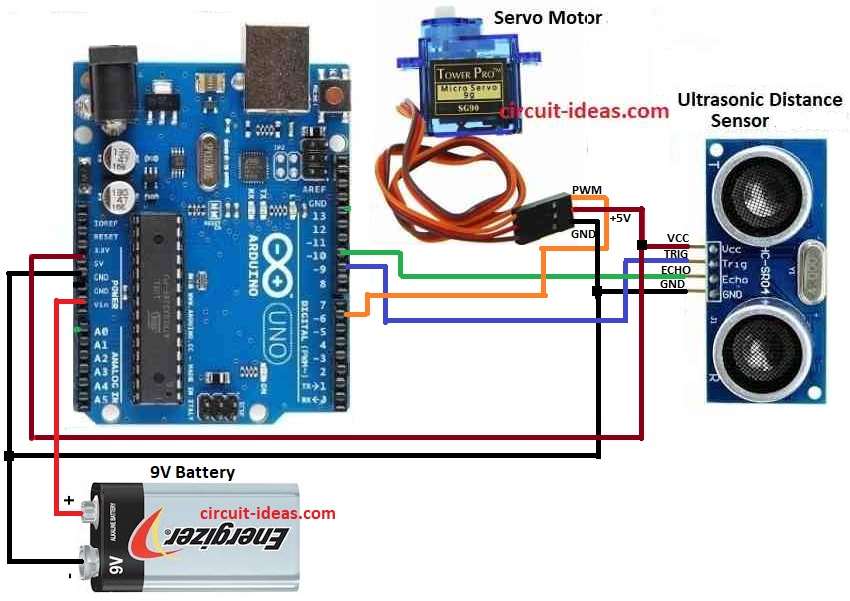
Pin connections of Ultrasonic sensor, Servo motor and 9V battery:
Ultrasonic sensor has 4 pins.
- VCC pin connect to Arduino 5V.
- GND pin connect to Arduino GND.
- Trig pin connect to Arduino digital pin 9.
- Echo pin connect to Arduino digital pin 10.
Servo motor has 3 wires.
- Red wire connect to 5V.
- Brown or black wire connect to GND.
- Yellow or orange wire connect to Arduino digital pin 6.
9V battery connect to Arduino Vin and GND pin.
Formulas:
Formula for distance = (Echo Time in microsecond × 0.034) / 2
Example: If echo time is 600 microsecond then distance = (600 × 0.034) / 2 = 10.2 cm approx.
If distance < 10 cm then dustbin lid gets open.
Conclusion:
This Touchless Dustbin Circuit using Arduino Uno and Ultrasonic Sensor project is simple and useful.
It is with low cost and automatic and it makes dustbin hygienic.
There is no need to touch lid by hand.
Circuit is good for school, home, office and hospital.
With bigger servo or metal frame we can work for large dustbin also.
Leave a Reply