This project is for making a small robot car.
Robot can move and avoid obstacle on road.
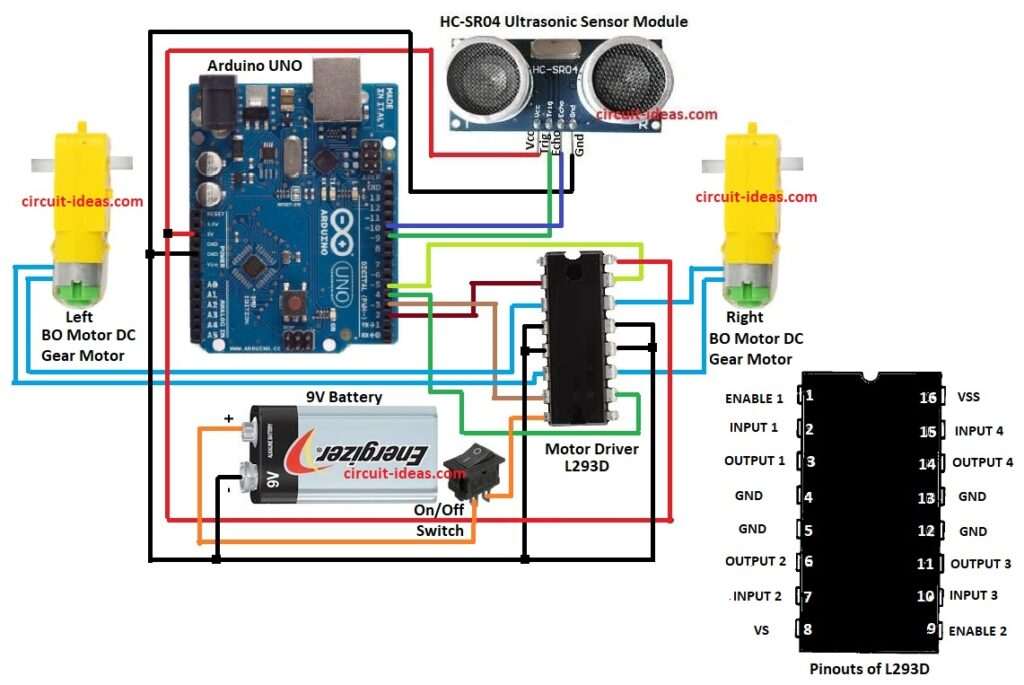
It uses Arduino Uno, ultrasonic sensor HC-SR04, motor driver L293D and two DC motors.
This Arduino Based Obstacle Avoidance Robot Circuit is simple and good for beginners.
Robot check distance with ultrasonic sensor.
If obstacle is near then robot stops and changes direction.
Circuit Coding:
int trigPin = 9;
int echoPin = 10;
int motor1pin1 = 2;
int motor1pin2 = 3;
int motor2pin1 = 4;
int motor2pin2 = 5;
long duration;
int distance;

void setup() {
pinMode(trigPin, OUTPUT);
pinMode(echoPin, INPUT);
pinMode(motor1pin1, OUTPUT);
pinMode(motor1pin2, OUTPUT);
pinMode(motor2pin1, OUTPUT);
pinMode(motor2pin2, OUTPUT);
Serial.begin(9600);
}

void loop() {
digitalWrite(trigPin, LOW);
delayMicroseconds(2);
digitalWrite(trigPin, HIGH);
delayMicroseconds(10);
digitalWrite(trigPin, LOW);
duration = pulseIn(echoPin, HIGH);
distance = duration * 0.034 / 2;
if (distance > 20) {
digitalWrite(motor1pin1, HIGH);
digitalWrite(motor1pin2, LOW);
digitalWrite(motor2pin1, HIGH);
digitalWrite(motor2pin2, LOW);
} else {
digitalWrite(motor1pin1, LOW);
digitalWrite(motor1pin2, HIGH);
digitalWrite(motor2pin1, HIGH);
digitalWrite(motor2pin2, LOW);
delay(500);
}
}
Code Explanation:
- Variables are made for sensor and motor pins.
- Setup function tell which pin is input or output.
- Trig pin send short pulse.
- Echo pin wait and read back pulse.
- pulseIn measure time of travel.
- Formula change time into distance.
- If distance is more than 20 cm then both motors go forward.
- If distance is less than 20 cm then robot stops and turn.
- Turn done by one motor forward and other motor backward.
- Delay is 500 ms so robot complete its turn.
- Loop repeat always.
Circuit Working:
Parts List:
| Component | Quantity |
|---|---|
| Arduino UNO | 1 |
| Ultrasonic Sensor HC-SR04 Module | 1 |
| Motor Driver L293D | 1 |
| BO Motor DC Gear Motor with wheels | 2 |
| ON/OFF switch | 1 |
| 9V Battery | 1 |
Arduino Uno is main brain of this project.
Ultrasonic sensor HC-SR04 connect to Arduino pins.
Motor driver L293D run two DC motors.
Arduino alone cannot give enough current to motors.
9V battery gives power supply.
ON OFF switch connect in battery positive line for easy control.
When power is ON, ultrasonic sensor keep measure distance.
If distance more than 20 cm then robot goes forward.
If distance less than 20 cm then robot stops and turn.
After a turn the robot goes forward again.
This simple logic help robot avoid obstacles.
Formulas:
The below mentioned formula is for Arduino Based Obstacle Avoidance Robot Circuit:
Ultrasonic sensor formula:
Distance = (Time x Speed of Sound) / 2
where,
- Ultrasonic sensor is for sound wave.
- Sound here hit obstacle and come back.
- Time represents total travel time (go and return).
- Speed of sound is about 343 meter per second (0.034 cm per microsecond).
- Divide by 2 is because sound travel two way, go and back.
So this formula gives one-way distance from sensor to obstacle.
How to Build:
To build a Arduino Based Obstacle Avoidance Robot Circuit follow the below mentioned steps for connections:
- First gather all parts same as circuit diagram.
- HC-SR04 VCC connect to Arduino 5V.
- HC-SR04 GND connect to Arduino GND.
- HC-SR04 Trigger connect to Arduino pin 9.
- HC-SR04 Echo connect to Arduino pin 10.
- Put motor driver L293D on breadboard.
- Input1 and Input2 connect to Arduino pins 2 and 3.
- Input3 and Input4 connect to Arduino pins 4 and 5.
- Output1 and Output2 connect to left motor wires.
- Output3 and Output4 connect to right motor wires.
- L293D VSS pin 16 connect to Arduino 5V.
- L293D VS pin 8 connect to 9V battery positive.
- L293D GND pins 4,5,12 and 13 connect to Arduino GND and battery negative.
- Battery positive wire go to VS pin 8 of L293D.
- Battery negative wire go to GND pins 4,5,12 and 13 of L293D.
- On/Off switch one end connect in battery positive line.
- Other side of switch connect to VS pin 8 of L293D.
Conclusion:
This Arduino Based Obstacle Avoidance Robot Circuit make small robot car with Arduino.
Robot use ultrasonic sensor to see obstacle.
When obstacle come near the robot stops and turn.
When road is clear then robot go forward.
It is easy project for beginner to learn sensor, motor driver and coding.
More sensor or better code can make robot smarter.
References:
Obstacle Avoiding Robot using Arduino UNO and HC-SR04 Ultrasonic Sensor
Leave a Reply