This DIY LED Lamp Circuit using Salvaged Parts from Blown LED Bulb is cheap and easy project.
It uses stuff people throw away.
Here we will learn how to change broken CFL light to energy saving LED light.
This circuit work direct with 230V AC power with no need of transformer to save energy.
It uses capacitive power supply to control current.
Five bright LEDs light well.
Circuit Working:
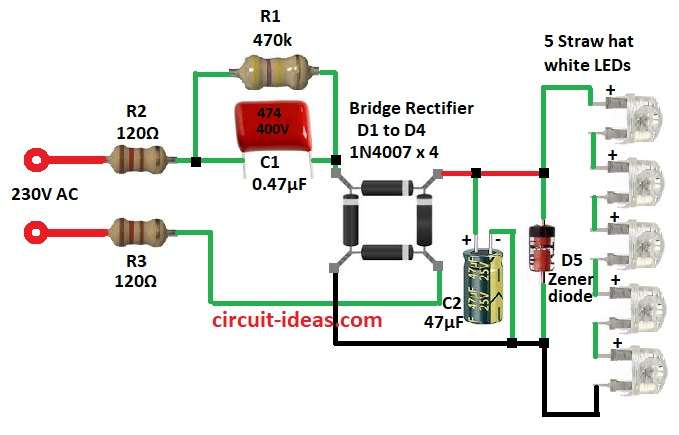
Parts List:
| Component Type | Value/Specification | Quantity |
|---|---|---|
| Resistors | 470k 1/4 watt | 1 |
| 120Ω 1/2 watt | 2 | |
| Capacitors | PPC 0.47µF 400V | 1 |
| Electrolytic 47µF 25V | 1 | |
| Semiconductors | 1N4007 Bridge Rectifier | 4 |
| Zener Diode 16V 1W | 1 | |
| LEDs White Straw Hat 5mm 30mA | 5 |
This circuit uses capacitor power supply.
Then bridge rectifier, smoothing capacitor, Zener diode keep voltage steady and some LEDs for output.
Capacitor C1 400V control current main.
Resistors R2 and R3 protect from sudden current and voltage spikes.
Resistor R1 discharge capacitor C1 when power is OFF.
Diodes D1 to D4 in bridge rectifier change AC to pulsating DC.
Capacitor C2 smooth DC voltage for steady output.
Zener diode D5 keep voltage safe which is not too high.
Five bright LEDs need 3V 30mA each in series with 16V output.
Each LED drop 3V total of 15V for five LEDs.
Voltage is safe by Zener diode and circuit work good.
Formulas with Calculations:
Current limit by capacitor C1:
Formula:
Xc = 1 / (2πfC)
C1 = 0.47µF and f = 50Hz and Xc = 6770 ohms
Current I = V / Xc
I = 230V / 6770 = 34mA
LED need 30mA so 34mA is good.
Power in resistors R2 and R3 (120 ohm each):
Power = I² × R
P = (0.034)² × 120 = 0.14W
Use 0.5W resistor to be safe.
How to Build:
To build a DIY LED Lamp Circuit using Salvaged Parts from Blown LED Bulb following steps need to be followed while assembling and connections:
- Carefully take out broken glass from frame, it will take time but see no one hurt from sharp parts.
- After glass is out open assembly slowly to see inside parts, be careful do not break more.
- Take out electronic parts gently an unscrew or unclip to be soft with no damage.
- Throw old parts proper way and follow rules for hazardous waste.
- Build circuit on dot matrix PCB or 1mm thick laminate sheet.
- If laminate cut round piece big enough for circuit.
- Plan circuit and mark six holes for LEDs evenly.
- Drill holes with right size for LEDs and clean rough edges.
- Put little glue on LED bases and put LED in hole.
- Wait for glue to dry strong.
- Close assembly carefully with no wires touch each other.
- Use cable ties or clips to keep wires neat.
- Connect to 230V AC power carefully and follow safety rules and watch circuit work.
- Gather parts from circuit diagram and make our own bright lamp.
Conclusion:
This DIY LED Lamp Circuit using Salvaged Parts from Blown LED Bulb is simple and smart project to make.
With no big transformer needed, so its small and cheap.
It is used in recycled parts save money and help environment.
Circuit is good to learn AC to DC, LED driv, and capacitor power supply basics.
Leave a Reply