• Skip to primary navigation
  • Skip to main content
  • Skip to primary sidebar

Circuit Ideas for You

Get free circuit ideas online.

  • Home
  • Privacy Policy
  • About
Home » Solar Powered Animal Scarer Circuit

Solar Powered Animal Scarer Circuit

Last updated on 13 August 2025 by Admin-Lavi Leave a Comment

This Solar Powered Animal Scarer uses sun power to keep animals away.

It makes noise, flashes light or do other things to scare birds, rats, big animals.

People with garden, farm or open place use it to protect plants and people.

Circuit has three main parts:

  • Solar panel charges battery in daytime.
  • Sensor detects or hears animals.
  • Tool sends sounds only animals hear with flashing lights or scary noise.

When sensor finds animal circuit turns ON scary tool and animal runs away.

Circuit Working of Animal Repellent :
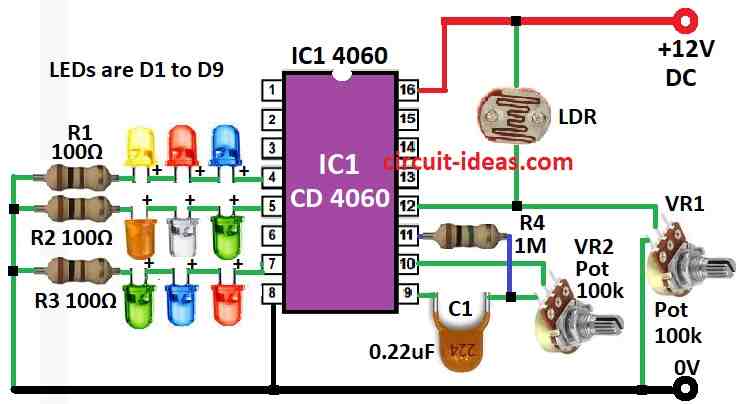
Circuit Diagram Working of Animal Repellent

Parts List:

CategoryPart DescriptionQuantity
Resistors100Ω 1/4 watt3
1M 1/4 watt1
Potentiometer 100k2
CapacitorsCeramic 0.22µF1
SemiconductorsIC 40601
LDR1
LEDs 5mm 20mA9

This solar device scares night animals like bats and cats to keep them from farm or garden.

It uses bright, colorful flashing lights.

Animals get confused and run away.

It works by itself and turns ON at night and OFF in morning.

Inside is oscillator with LDR and IC CD 4060 a binary counter.

IC uses pin 12 reset.

In daytime LDR gives power and keeps pin 12 high and IC stops.

At night the LDR stops power and pin 12 goes low by VR1.

Now IC starts and makes flashing lights with C1 and VR2.

LEDs connect to pins 7, 5 and 4.

VR1 sets LDR sensitivity.

VR2 changes flash speed.

Uses strong red, blue and white LEDs.

Red blinks fast first, then blue and then white.

White LED stays ON short time to light small area.

Can add more LEDs if want.

Circuit runs on 12V battery or power supply.

Formulas:

We can use IC 4060 to make animal repeller circuit.

IC 4060 is special chip that counts and makes signal many times (oscillator).

It has 14 steps and gives steady signal.

Oscillator frequency how fast signal goes depends on resistor R and capacitor C on pins 9 and 10.

Use this formula to find frequency (approx):

f = 1.44 / ((R + 2 × Rpot) × C)

where,

  • Rpot is variable resistor we can turn to change frequency.

Duty cycle how long LED stays ON can change with capacitor and potentiometer.

Duty cycle = T1 / T

where,

  • T1 is LED ON time
  • T is full ON + OFF time.

To stop LED burning use resistor:

RLED = (Vsupply – VLED) / ILED

where,

  • Vsupply is the battery power
  • VLED is LED voltage for 2V
  • ILED is LED current from 10 to 20 mA

Different animals need different settings.

Change R, C, VR to get best result.

How to Build:

To build a Solar Powered Animal Scarer Circuit one needs to follow the below mentioned steps:

  • Connect LDR to pin 12 on IC CD 4060.
  • Pin 12 resets IC when light changes and LDR controls this.
  • Join VR1 with LDR to set how sensitive LDR is.
  • Connect VR2 to IC to change how fast LEDs flash.
  • Add resistors R1 and R2 with VR2 to stop too much current to LEDs.
  • Put diode 1N4007 between solar panel and battery to stop power going back.
  • Put diode 1N4007 between battery and circuit to stop power going wrong way.

Connect LEDs like this:

  • Red to pin 7
  • Blue to pin 5
  • White to pin 4

Circuit Working of Animal Scarer Solar Power Supply:
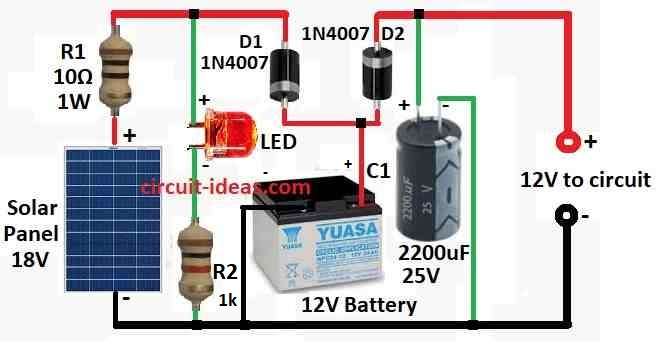
Circuit Diagram Working of Animal Scarer Solar Power Supply:

Parts List:

CategoryPart DescriptionQuantity
ResistorsR1 10Ω 1 watt1
R2 1k 1/4 watt1
CapacitorsElectrolytic 2200µF 12V1
SemiconductorsDiodes 1N40072
LED any 5mm 20mA1
Solar Panel 18V1
Battery 12V1

This circuit uses solar battery for power.

In daytime battery charges from sun through resistor R1 and diode D1.

Green LED turns ON to show charging.

At night sun goes down and solar power is low and D1 stops with reverse and D2 starts with forward.

Power comes from battery to circuit.

R1 stops too much current going to battery.

Big capacitor C1 stores small current and gives smooth power to circuit.

How to Build:

Below mentioned are the steps to build a Animal Scarer Solar Power Supply Circuit:

  • Connect solar panel positive to battery positive.
  • Connect solar panel negative to D1 anode positive side.
  • Connect D2 cathode negative side to battery negative.
  • Connect D1 cathode to battery positive.
  • Connect D2 anode to circuit positive where load is.
  • Connect D1 cathode to LED anode.
  • Connect LED cathode to battery negative.
  • Connect one side of resistor R1 to solar panel positive.
  • Connect other side of R1 to D1 anode.
  • Connect capacitor C1 positive to D1 anode.
  • Connect other side of C1 to battery negative.

Conclusion:

This Solar Powered Animal Scarer Circuit is good to stop animals.

It does not hurt animals but i uses light, sound, or special waves to scare them.

It gets power from sun with no need of electricity from wires.

It works by itself so it is safe and good for nature.

It helps protect farm, garden or house from animal damage in smart and clean way.

References:

Development of a solar powered bird repeller system with effective bird scarer sounds

Filed Under: Security and Protection, Solar Circuits

About Admin-Lavi

Lavi is a B.Tech electronics engineer with a passion for designing new electronic circuits. Do you have questions regarding the circuit diagrams presented on this blog? Feel free to comment and solve your queries with quick replies

Previous Post: « Full Duplex Audio Line Circuit
Next Post: Simple IC TDA2822 Stereo Audio Amplifier Circuit »

Reader Interactions

Leave a Reply Cancel reply

Your email address will not be published. Required fields are marked *

Primary Sidebar


Categories

  • Alarm Circuits (31)
  • Amplifier Circuits (67)
  • Arduino Projects (30)
  • Audio Circuits (93)
  • Automobile Circuits (19)
  • Battery Charger Circuits (48)
  • Free Energy (13)
  • Heater and Temperature Controllers (9)
  • High Voltage (1)
  • Indicator Circuits (38)
  • Inverter Circuits (13)
  • LDR Circuits (14)
  • LED and Lamps (114)
  • Meters and Testers (27)
  • Motor Controllers (18)
  • Oscillator Circuits (32)
  • Power Supply Circuits (91)
  • Remote Control Circuits (6)
  • Security and Protection (23)
  • Sensors and Detectors (74)
  • Solar Circuits (16)
  • Timer Circuits (28)
  • Transistor Circuits (56)
  • Transmitter Circuit (12)
  • Tutorials (4)
  • Water Level Controller (4)

Recent Posts

  • Low Power Led Flasher Circuit using Nand Gate IC
  • Two Star Flasher Circuit with 555 IC
  • Automatic Light Control Switch Circuit using IC 555
  • Ultrasonic Blind Stick Circuit using Arduino
  • Simple Humidity Level Detector Circuit

Recent Comments

  1. Admin-Lavi on Constant Voltage, Constant Current Battery Charger Circuit
  2. Bill on Constant Voltage, Constant Current Battery Charger Circuit
  3. Admin-Lavi on Long Range FM Transmitter Circuit (2km)
  4. Sina on Long Range FM Transmitter Circuit (2km)
  5. Admin-Lavi on Long Range FM Transmitter Circuit (2km)

Copyright © 2025 | New Circuit Ideas